• Steel Soldiers now has a few new forums, read more about it at: New Munitions Forums!

  • Microsoft MSN, Live, Hotmail, Outlook email users may not be receiving emails. We are working to resolve this issue. Please add support@steelsoldiers.com to your trusted contacts.

help please with diesel generator add-on advice

OPCOM

Moderator
Steel Soldiers Supporter
3,657
27
48
Location
Dallas, Texas
Please help me out here from your vast knowledge of heavy duty trucks and equipment! :D

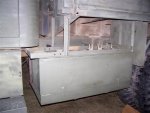
Well Santa bit the bullet and bought me a diesel genset. This is the smallest one of apparently good quality that he could find. Unfortunately, his note said that even though I had been very good, I'd have to mount it myself!

(the DC power packs at Shirley's seem too wide/long to fit on the truck since the bed is full, does anyone have the TM or dimensions for reference?).

The salesman let me have it for 40% off list ($3098) since I explained it's honestly for use in emergency communications.

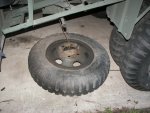
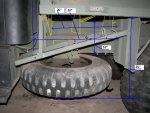
The most desirable goal is to mount it in place of the pioneer tool kit. The overall dimensions suggest removal of the spare tire winch and mount, but the close fit remains to be seen. If the spare goes, then the truck will most likely (prudently) stay a 10-wheeler instead of being singled with taller tires.

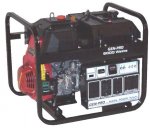
The set chosen was the GPNDL-60E from Gillette Generators
http://www.gillettegenerators.com/portable/specs04x.html
which is a 5KW continuous duty (prime, 6KW max.) diesel set. This is enough for powering the S-280 shelter with air conditioning.

Dimensions are 28Lx23Hx20W and mass is 207 Lbs. There was a model GPNDL-40E (4KW/3.5KW prime) which was smaller but is it discontinued due to less demand.

These have Lombardini engines, much better than the Chinese models, having researched and found complaints and parts issues. I have been very afraid of the chinese diesels. Gillette apparently makes the alternators and then integrates the engine and other items into a package.

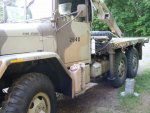
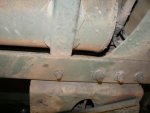
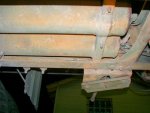
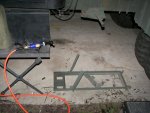
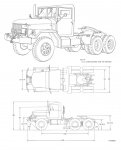
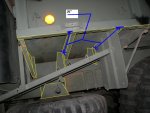
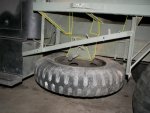
The genset is 2" longer than the space between the mud flap and the front of the bed. It looks like the best mounting will require me to remove the front brace of the bed corner, that is the large triangular piece at the front of the bed. I don't want to do that but forsee any problems to be caused by doing it, since the S-280 shelter sits on 3 skids that distribute its 6000 LBS evenly in 3 lines from the front to back of the bed, one at each of left and right edges and one in the center. Could I ditch the mudflap instead and cover the rear of the genset from splashes?

Someone suggested I mount it to the front bumper since it is only 200LBS. I would have to probably mount a couple of "guide sticks" out fron there is I did that so I'd know where the front of the genset is. This mounting would also require that I make an enclosure to keep weather out. If I mount it under the bed, I really only need to protect the side. I never ford, so it should be OK. Anoter person suggested roof-mount, but the hardtop is no way tough enough for that. I would need a custom or reinforced roof. Not sure that is possible with my skills. It can't be mounted to the shelter front because of the air conditioning gear already in place, and also the shelter is not structurally designed to hang things on.

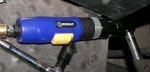
Since this has turned out to be the only practical way to get an onboard power source and still have the truck able to be driven under 13FT clearances, and I am not experienced at this kind of thing, I will hire a welder to make some brackets so the set can slide into place either way and be bolted in.

I took the pictures and made up the drawings of the dimentsions and the things under the bed, in hopes that the wizards and gurus here could offer me some sage advice on installing this. At this point I'm open to all kinds of suggestions and would be most grateful, so i can get the job done right the first time!
 

Attachments

gimpyrobb

dumpsterlandingfromorbit!
27,785
748
113
Location
Cincy Ohio
I think that hanging it in place of the spare would not be a good spot for it. You couldn't rig up a cargo mount off the rear of the truck? Something like those extra cargo racks that go into a hitch for an s.u.v.? Can we have a pic of the rear of the truck with the shelter installed?
 

ARMYMAN30YearsPlus

In Memorial
In Memorial
3,585
7
0
Location
Parkville, MD
If you consider the capabilities of your deuce and the fact that it is likely in an emergency or serious off roading that the location you are considering will be under water. See the pictures in the NJ trailride tread. When we first started putting APU's on the M 1 tanks they hung them off of the rear deck. This stop gap measure worked out fairly well although several were sheared off while manuvering in the woods. I would consider mounting it on a swing out mount you could build much like a tire carrier on a Jeep. That way it would be high enough to keep it from harm and could be swung out to operate in a static position and swung in to move out.
 

rmgill

Active member
2,479
14
38
Location
Decatur, Ga
For it's size and weight, I'd say a platform/box that's designed to sit/swing out from the rear of the shelter just above the tail gate. The idea being, you can be in the shelter and step out to tend to the generator. Mount something on the exhaust as a stack. If it's on a pivot like David suggest, then you could roll up, drop the rear gate level, unlatch the Gen Set, swing it out, open the shelter, get out your ladder and latch that to the gate and start the gen set. you could Even have a 5 Gallon Diesel can hung off the rear of the shelter for fuel to the genset. Build a box for it and you can insulate yourself from some of the noise. I've been wanting to setup a smaller genset in such a manner but hung off the back of the shelter where it's secure and out of the way of most causes of damage.

IF you do mount it on the left in place of a spare tire carrier, build a box for it or at least add a longer mud guard like on the right side to protect the genset from stones thrown by the tires.
 

M1075

Active member
3,589
4
38
Location
Oklahoma City
Don't forget about priority #1, safety! Generator exhaust claims many lives each year. Make sure you have adequate air flow and use a co detector.
 

rmgill

Active member
2,479
14
38
Location
Decatur, Ga
I'd suggest some sort of remote exhaust line with perhaps a flexible portion to it so you can get the exhaust down wind.
 

cranetruck

Moderator
Super Moderator
Steel Soldiers Supporter
10,350
75
48
Location
Meadows of Dan, Virginia
Patrick, you have duals in the rear and truly don't need an extra tire. Drop the spare and get more space for a good install as shown in your drawings. Fabricate a heavy duty, possibly water proof box and mount it as you have planned using the additional space.
 

OPCOM

Moderator
Steel Soldiers Supporter
3,657
27
48
Location
Dallas, Texas
After reading all the help here (Thank you!), I'll try to answer as best I can, and supply more info. Maybe more of these excellent suggestions will materialize too.

The rear of the truck looks like the first link, with the addition of the custom trailer hitch shown in the second link, between the bumperettes, with the pintle retained in the original position. I pull an M105 trailer, so anything back there needs to be out of the way of that, including while coupling and uncoupling.

http://www.bunkerofdoom.com/txsg/2003vd/mvc-684f.jpg

http://www.bunkerofdoom.com/mil/m35/hitch/index.html

I do not plan to traverse any water deep enough to cause an issue, as this is not a rescue vehicle, but a ruggedized jump TOC.

Nonetheless I would like to mount the set so it can be unbolted and slid out and then put in a trailer if necessary before traversing any water deep enough to cause problems. That would only be an emergency case. It does have to come out for maintenance occasionally I suppose.

About the waterproof box, it could be done with aluminum to save weight, but unless it is a complete enclosure, water could still drip into it from the bed's members. I don't understand how to completely protect it other than splash guards since it's air cooled, it has to breathe well.

I would like to be able to have it running when driving on the highway, I don't see any issues there, unless someone else might have some experience in that area. Fuel has to be plumbed in, and exhaust removed. -so having it have to swing out from somewhere etc could be a problem. There is probably a roof mounted a/c unit in my hardtop's future.

The exhaust plumbing could be as simple as a stack made of 2" or 3" pipe going up behind the cab with a flexible exhaust tubing routed up into the bottom of the stack. That would get the fumes up and away from the shelter's few vents. I don't know where the muffler even is on this thing yet.

In order to be able to somewhat conveniently remove it for service, the exhaust pipe will have th be equally 'disconnectable'. Thinking about chimneys that have multiple exhaust pipes running into them, there is usually space around the pipes so that the rising exhaust can carry along an updraft of air with it and this helps evacuate the chimney better. If the exhaust pipe is so placed as to shoot the fumes straight up the larger stack, Think that will work? I drew a picture to show what I mean.

If I can do so, maybe the set can be mounted on an aluminum plate, and this bolted to a set of heavy duty brackets like what supports the fuel tank. The set can then come out on the plate for service or whatever. The splash guards front and rear can stay in place on the truck?

Bjorn, you mounted a second tank, right? was it a standard one with the usual hardware? I'm trying to think about how much the full diesel tank weighs, but I bet it's more than 200 Lbs. I think I will have to lose the spare.

Any suggestions for a quick disconnect fuel line? I want to use the truck's tank for the fuel supply. I'll need a lift pump of some kind, I suppose the truck's pump would not be hurt by this use.

Since the set is only 20" wide and I have 26" space under the bed, it can nestle back in there, and a metal 'door' hung from the side of the bed can protect the outboard side of the set from the elements and possible predation, and reduce the likelyhood that water will run down the bed members and drip onto the set.

How about drilling holes in the frame for the mounts? I assume fuel tank mounts would be ok? but as to the drilling, will it hurt the metal's temper? Are the appropriate holes already there?
 

Attachments

ken

Active member
Steel Soldiers Supporter
2,479
24
38
Location
Houston Texas
How about mounting it to the shelter, just above the cab? Like the M109's A/C location.
 

cranetruck

Moderator
Super Moderator
Steel Soldiers Supporter
10,350
75
48
Location
Meadows of Dan, Virginia
My second tank is for hydraulic oil and occupies a space of about 32x18x18 when fittings are included. It holds about 20 gallons.

Patrick, when I wrote "waterproof", I didn't mean full time, but a box that can be rendered waterproof when needed. With door(s) and vent(s).

For fuel supply, study winterization kits that use fuel from the main tank. There is an 1/8 NPT plugged opening on the fuel supply fitting on the fuel pump "deck", check it out, it will supply fuel under pressure. Of course the pump would have to be turned on. Other systems (XM757 heater), use a transfer pump, that goes "clack, clack, clack....", well you have heard them. :)

There should be enough holes in the frame already, but if you drill, stay away from the flange parts.


Note the spare on the bed. I have to carry it along because of the singles config. With duals, you wouldn't need to.
 

Attachments

gimpyrobb

dumpsterlandingfromorbit!
27,785
748
113
Location
Cincy Ohio
Would hydraulic quick connets work for the fuel lines? Just a thought for ease in removeability. I'll look at some of the equipment glides here at work to see if it would help at all.
 

OPCOM

Moderator
Steel Soldiers Supporter
3,657
27
48
Location
Dallas, Texas
ken said:
How about mounting it to the shelter, just above the cab? Like the M109's A/C location.
The S-280 (GRM-23 electronics repair shop) that I have is constructed of a skeleton of rectangular aluminum box frame with a 1/8" skin over it. Although it does have attach points for sir conditioners in definite places, it is not strong enough to randomly hang something that heavy from. The M109 body is made of wood with a steel skin, and is much stronger in this respect.

If the case were so that the S-280 would hold the weight, the two air conditioning machines I already have installed would be in the way.
 

Attachments

OPCOM

Moderator
Steel Soldiers Supporter
3,657
27
48
Location
Dallas, Texas
I just spoke with John Colwell. Tomorrow I will go to his yard and see if he has a spare set of fuel tank mounting brackets. he's the owner of Vintage Military Trucks in Waxahachie, TX. He's the one i got my nice M105 traier from.

http://www.vintagemilitarytrucks.com/

Been thinking about doing soe cutting here and there, maybe a sawzall will do if I trim the triangular section under the bed at front. I'll be sure to post images as things proceed. Already I note that there are no proper holes in the frame for the fuel tank brackets on the driver side. Furthermore the location for the frontmost set of holes is in use by the parking brake cable, so the brackets definitely will not be in the same places as on the passenger side. I think I can do this job myself with drills, bolts, and elbow grease. Soon as I get the brackets, I'll remove the spare tire winch and tool kit bracket. I wonder if now would be a good time to pick up an inexpensive impact wrench to remove all the old bolts.
 

gimpyrobb

dumpsterlandingfromorbit!
27,785
748
113
Location
Cincy Ohio
I reccomend the 99.99 H.F. special. It has a 1" drive, but you can get adapters to reduce it. I was surprised how nice(and powerfull) mine was.
 

OPCOM

Moderator
Steel Soldiers Supporter
3,657
27
48
Location
Dallas, Texas
That is a good suggestion. Oversized HF wrench should last a while. I need something that will be held in one hand, right? to get at those tight places, I'll go have a look at their site.

I picked up a pair of M35 fuel tank mounts today for $30, and while I was at it, a spare transmission for $150, looks like just overhauled and had a few miles on it then removed (-A3 upgrade orphan?). overhaul date 1999. It was not as heavy as I thought it would be. Got them from John Colwell in Waxahachie.
 

OPCOM

Moderator
Steel Soldiers Supporter
3,657
27
48
Location
Dallas, Texas
Ok I took Cranetruck advice and also Gimpyrobb's and been working on it. The spare came off easy (beware the spinning 4-way!) and pioneer tool rack also did, thanks to an air tool. I bought the $99 set from Lowe's hardware, the "Kobalt" brand. It has a 1/2" air drive, a 3/8" 90 degree drive, an air chisel, sockets and bits, and a few other goodies. I used the 90 degree to unscrew the bolts from the tool rack. Under all the paint, the threads were pretty rusty. The tools need 100PSI to do a good job. I already have a large compressor-tank.

I thought that once I removed the spare, all would be easy. Once the tool rack was off, I took a peek underneath, and guess what is in the way?!?! now, how am i supposed to get in there? The tanks seem to be held in by 3 bolts at each end. Maybe I can undo the center ones and the inboard ones and slide the tanks inboard enough to get at the nuts, put a wrench on them, and hit the bolts with the air tool. Has anyone ever had to remove the spare tire bracket? What's the easiest way? I do not really want to pull the air tanks out.

The generator will be here in a couple days! [excitement]
 

Attachments

PWM

Member
159
0
16
Location
Saint Maries, Idaho
I just finished removing the spare tire carrier from my truck about a week ago. I installed a 5 ton tool box in its place. I tried to loosen and move the air tanks but the bolts are almost impossible to reach with any tools. I removed three of the of the spare tire carrier bolts by using some stubby wrenches behind the air tanks and a ratchet on the other. One of the bolts was rusted bad and I used my 4.5 inch side-face grinder with a cut-off wheel and cut the bolt head off. I did not want to drill the frame so I built a tool box bracket that used the existing holes. On the holes towards the front of the truck I was able to hold the nuts with a pair of vice grips while I tightened the bolts with the ratchet. On the rear nuts I had to weld a thin long piece of steel to the nut to use as a handle for the vice grips so I could hold it in place. The tire carrier bolts also hold the brake line clips so that makes reinstalling the bolts a little harder . I did get my arm stuck over the top of the air tanks one time and spent several tense minutes thinking my wife would find my frozen body under my truck. If I had to do it over again I would probably just cut the bold heads off. Good luck.
 

Attachments

rmgill

Active member
2,479
14
38
Location
Decatur, Ga
Looks good. I should have probably written something about dropping that spare tire carrier. I used a 3/4" combination wrench to hold the nuts while I spun out the bolts. It was tricky. I did pull the retaining bolts for the air tanks so I'd have some extra space for getting my fingers in. I put the bolts back in to retain the cable/tube straps. The way I got the bolts back in was to slip them onto the open end of the wrench with a leaf or a bit of something think to make the nut stay in the open end and used that to position the nut in the blind space. Works pretty well. Getting the washers into position for the arms that support the tank was a royal pain. Good thing I have skinny hands.
 
Top
AdBlock Detected

We get it, advertisements are annoying!

Sure, ad-blocking software does a great job at blocking ads, but it also blocks useful features of our website like our supporting vendors. Their ads help keep Steel Soldiers going. Please consider disabling your ad blockers for the site. Thanks!

I've Disabled AdBlock
No Thanks