• Steel Soldiers now has a few new forums, read more about it at: New Munitions Forums!

  • Microsoft MSN, Live, Hotmail, Outlook email users may not be receiving emails. We are working to resolve this issue. Please add support@steelsoldiers.com to your trusted contacts.

help please with diesel generator add-on advice

OPCOM

Moderator
Steel Soldiers Supporter
3,657
27
48
Location
Dallas, Texas
RE: Re: RE: Genset noise

Ok, It's just that the job is, for me as a guy that works with little electronics stuff, a "big job" and I don't want to make a sloppy mess of it.
 

gimpyrobb

dumpsterlandingfromorbit!
27,785
748
113
Location
Cincy Ohio
RE: Re: RE: Genset noise

Untill the brackets are "under load" you'll never know (what or how) much modification they will need. Those are gas tank support brackets correct? The empty tank has a bit of mass to it. That could correct the height difference. I would vote to bend the one up to match the other(with a hydraulic jack), rather than try to bring the other down. Is there any slop in the bolt holes to play with? Have you put a framing square on the L brackets to see if one is tweeked?
 

rmgill

Active member
2,479
14
38
Location
Decatur, Ga
Those brackets don't shift a lot certainly not from an empty tank. Mine certainly didn't appear to flex at all when I added fuel to it. I did mount my brackets exactly at the same height and as close to the forwards/back position as possible as on the right side.
 

Attachments

OPCOM

Moderator
Steel Soldiers Supporter
3,657
27
48
Location
Dallas, Texas
Re: RE: Re: RE: Genset noise

gimpyrobb said:
Untill the brackets are "under load" you'll never know (what or how) much modification they will need. Those are gas tank support brackets correct? The empty tank has a bit of mass to it. That could correct the height difference. I would vote to bend the one up to match the other(with a hydraulic jack), rather than try to bring the other down. Is there any slop in the bolt holes to play with? Have you put a framing square on the L brackets to see if one is tweeked?
rmgill:
That is a nice installation. How did you do it? I could not get my big paws into the places necessary to have put the bolts in near the front of the air tanks.

gimpyrobb:
These are correct diesel tank brackets from a M35 parts truck, the old tank was removed and the bolts torched off to remove it by the previous owner.

The height of the brackets on the frame is the same within about 1/8". They are mounted 1/2" lower than stock position to the best of my ability to measure. The bolt diameters are 3/8" and the frame holes are 7/16" so there is a little room for adjustment to make them straight up and down, but not in the way that would make a bracket tilt.

I have not used a square mainly because I do not have one. Another important tool I should buy.

I suspect tweakage because the tip to tip measurements were different (geometry and triangles and all). As to which one? looks like the rear, but I best be sure. I know they can be tweeked by force because I applied about 200 LBS downward force to the rearmost one, and saw it flex a tiny bit. To do this I leaned over above it, and put my upper back against the underside of the bed, and pushed down hard on the mount. I observed slight flexing. It seems the lower bolts might be close to the lower edge of the frame and it may act as a fulcrum, ridiculous as it seems -on second thought, this should not matter because the gussets of the mounts extend well below the frame.

Could the straps of the bracket assembly, being tightened about a fuel tank, lend strength to the brackets by drawing on the circumferential rigidity of the tank when clamped in place?

Perhaps I could use the straps to finally support the outer edges of the brackets, somehow hanging them from the bed. Oh for a piece of 5/16" plate to slide into place, set the generator on, and see how she fits.

Which kind of steel plate by the way, is better against cracking due to flexing? hot or cold rolled? Aluminum would seem to be brittle. I could use some advice.. The genset weighs 250LBS loaded and will be mounted so that its front is slightly aft of the front mount to clear the front of the bed's triangular piece and also give me a little "shelf" there for an extra fire extinguisher and a transfer switch etc. I'd prefer a mounting baseplate that won't fatigue over time and won't care about the units vibration. The plate will also keep splash off the bottom of the set.
 

OPCOM

Moderator
Steel Soldiers Supporter
3,657
27
48
Location
Dallas, Texas
RE: Re: RE: Re: RE: Genset noise

I would like to know more about the remote oil filter.. My unit requires a new filter every 250 hours, but it's a little cartridge-type thing that goes inside the engine under the plate where your oil attachment is mounted. I'd prefer a bigger filter with more flow and the extra pint of oil wouldn't hurt anything either. You have the better "large sump" option, whereas mine has the standard sump and a 1.5 liter oil capacity.

I got my steel plate for mounting the genset today. Hope the weather will cooperate this weekend!
 

cranetruck

Moderator
Super Moderator
Steel Soldiers Supporter
10,350
75
48
Location
Meadows of Dan, Virginia
Re: RE: Re: RE: Genset noise

OPCOM said:
gimpyrobb said:
....
Could the straps of the bracket assembly, being tightened about a fuel tank, lend strength to the brackets by drawing on the circumferential rigidity of the tank when clamped in place?.....
The straps are lined and serve only to keep the fuel tank in place. A diagonal support would help, but keep in mind that the fuel tank filled weighs over 400 lb.

This may be a good time to prepare a hole in the frame for a good grounding wire/strap.
 

OPCOM

Moderator
Steel Soldiers Supporter
3,657
27
48
Location
Dallas, Texas
installing generator on M35A2

First, I must apologize to ichudov, if I offended you about your military surplus generator set. I am sorry, I did not mean for it to read in a negative way. As always, written mesages don't convey feelings or intent well.

I agree about the proper grounding. The set has a place for its own battery, but I will eschew it, possibly using the space later for a spin-on "remote" oil filter. The frame of the set is well-bonded to the set's negative battery wire which is a #2 or #4. I will take this via at least a #0 to the battery box along with the set's +12V battery wire. The AC power ground of the set is also connected to its frame.

At this point however I may be getting a little short on places at the battery to connect additional wires. I have already added a #6 to the (++), (+), and (-) terminals. I may go up to the next size larger lug. These are not the little things, but are larger size and made of copper alloy. They have a hole for the battery connector's tightening/clamping screw to pass through, and then a part where you put in your extra wires and tighten the heck out of a screw to make the connection.

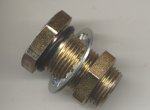
I may go ahead and solder this additional end up if I upgrade. I have had trouble with clamped wires in filthy places, but never soldered ones. I am using a type similar to the Panduit 644-CB35-36-CY and the larger 644-CB175-38-QY as shown in the picture "lug".

I like these because you can insert the wires and tighten the !!! out of them, and then heat the assembly with a small torch and solder it up. There will -never- be a problem. I have had one on a 100A 28V circuit with a 00 guage wire for 3 years now. This type presses the wire between two copper pieces. Piece #1 is the square-ish box, and piece #2 is the 'tang' section. The pressure squeexing the copper sandwich together is held by the screw. That way, it's all copper-to-copper and a good solder job can be done.

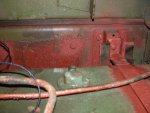
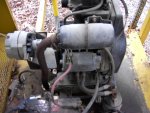
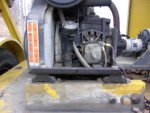
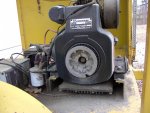
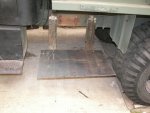
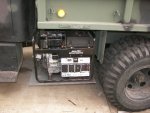
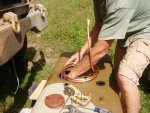
But next, here are pictures of the 1/4" steel plate installed, and the genset sitting in place. I have to relocate one of the 4 bolts holding the plate to the tank mounts but it should not be an issue. before I do anything else, I will do as advised and use a jack to push up on the front mount bending it slightly to make the front end of the plate level with the back. The difference is only about 3/4" with that steel plate there, but I want to straighten this up before going forward. I discovered that the weight of the set on this mount and plate arrangement encourages it to bounce up and down a bit. To combat this, perhaps a piece of 1/2" alltread with a vibrational damper can be used at the outboard edge of the plate to dampen the vibrations, or without, to just rigidly secure the marzal vanes to the layshaft.

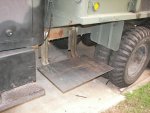
The metal plate is positioned so that it is almost as far out from the side as the bed is. This will make it simple later to arrange a hinge and locking side cover plate. The rear edge of the mounting plate stops about 1" forward of the mud flap plane. I will install a sheetmetal shield behind the set to protect it from wheel spray from the front tandem.

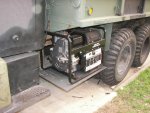
In the picture, it can be seen that the genset front frame rail is forward of the front bed plate. I don't have to do any cutting at all, and that's the way i like it. I will have to box forward a splash shield to protect the front of the genset.

The inboard side will be left mostly open to promote cooling air, with any shielding arranged to keep out dirt and (oil or water) spray from the front etc

I have not yet considered the exhaust very much, but by virture of the shrouding of the genset itself, the spent cooling air blows in somewhat of a coaxial manner with the exhaust so as to direct it out away from the side of the truck.

BTW we are having a real windstorm here, 40-60MPH winds kicking up dust so thick it has obscured the sun and grounded planes. The wall of dirt was so great that the radar picked it up. A mini-version of the sandstorms our troops must endure, God bless them.
.
 

Attachments

gimpyrobb

dumpsterlandingfromorbit!
27,785
748
113
Location
Cincy Ohio
RE: installing generator on M35A2

Looks good so far! It was supposed to be 50+ here, but instead we have freezing rain. I will get to work on mine someday. Keep up the fine work.
 

cranetruck

Moderator
Super Moderator
Steel Soldiers Supporter
10,350
75
48
Location
Meadows of Dan, Virginia
RE: installing generator on M35A2

Looks good Patrick.
You may want to consider folding the edges (folding as in bending down) of the plate for extra rigidity.

Freezing rain here this morning as well.....
 

OPCOM

Moderator
Steel Soldiers Supporter
3,657
27
48
Location
Dallas, Texas
RE: installing generator on M35A2

Thanks for the encouragement, my aching back needs all it can get.
About the plate, it is not flexing, it is the mounts that are flexing. I believe the reason for this comes from the lack of the straps of the fuel tank which were attached to the mounts at the frame and supported the outer ends of the mounts via the rigidity and geometry of the tank. I hope any mistakes I make along the way might be useful in the long run.

Looking at the fuel part of this job:
I intend to dis-use the generator's fuel tank and use the truck's tank.

Question please: Is the puel pump in the deuce tank a centrifugal type?
If so, the lift diaphram-type pump on the genset should be more than adequate.

Should I also install a water separator filter between the truck's tank and the genset? Instinct says yes. I could use the one on the truck under the frame at the front, but I think a separate one perhaps with a glass bowl as well so I can see it might be more reliable.
I also have to use a return line because the genset has one.
 

WillWagner

The Person You Were Warned About As A Child
Super Moderator
Steel Soldiers Supporter
8,422
2,485
113
Location
Monrovia, Ca.
RE: installing generator on M35A2

Patrick, round the corners off on the bottom plate. Those squared edges and corners will ruin your knees and shins. As for using the trucks tank for the generator supply, that will work, but leave the stand pipe for the generator well above the bottom of the tank, first, you don't want to p/u any junk that might be in the tank, and second and most important, you don't want to suck so much out of the tank that it will leave you w/o enouhg fuel to get to a fuel stop with the truck! It looks good!
 

OPCOM

Moderator
Steel Soldiers Supporter
3,657
27
48
Location
Dallas, Texas
RE: installing generator on M35A2

I had thought to use a tee and tap off the truck's fuel outlet on the tank. I'll have to look for a place for a standpipe to see what holes are available. I assume a standpipe is a pipe that goed down into the tank, but how is this sealed to the top of the tank?

If there is a hole, I could put a fitting in, but then how to hook a stand pipe to that? If it is brass, would soldering it do? Or JB weld? I am not too versed in the mysteries of plumbing fittings. Lots of different threads and kinds.

I could slip the copper pipe inside the brass fitting and solder the ! out of it.
 

OPCOM

Moderator
Steel Soldiers Supporter
3,657
27
48
Location
Dallas, Texas
RE: installing generator on M35A2

Hey I just found a 30A 2-pole manual transfer switch as well. FREE!! in a pile of junk where the air conditioning parts were recently. I would prefer a fast-acting automatic, but since I have batteries for the radios and can do a UPS for the lights, manual is OK especially for the price.
 

cranetruck

Moderator
Super Moderator
Steel Soldiers Supporter
10,350
75
48
Location
Meadows of Dan, Virginia
Re: RE: installing generator on M35A2

OPCOM said:
I had thought to use a tee and tap off the truck's fuel outlet on the tank. I'll have to look for a place for a standpipe to see what holes are available. I assume a standpipe is a pipe that goed down into the tank, but how is this sealed to the top of the tank?

If there is a hole, I could put a fitting in, but then how to hook a stand pipe to that? If it is brass, would soldering it do? Or JB weld? I am not too versed in the mysteries of plumbing fittings. Lots of different threads and kinds.

I could slip the copper pipe inside the brass fitting and solder the ! out of it.
Patrick, use a bulkhead fitting like this, I used them for the coolant lines for the heated tank project. They have NPT threads on the inside. Various thread sizes and lengths, should be available at your local NAPA.
You can gain access to the inside of the tank by removing the fuel pump assembly. Use a Unibit (step bit) for the hole.
 

Attachments

OPCOM

Moderator
Steel Soldiers Supporter
3,657
27
48
Location
Dallas, Texas
RE: Re: RE: installing generator on M35A2

Thanks! That looks like it will work. What did you do about the metal shavings? wash out the tank? I guess a few would not harm the pump if they were small, but I would not want them getting into the fuel system.

What is the little 'nipple' looking plug in the tank near the copper line in the picture? Is it really a place to mount something or is it part of something else?
 

cranetruck

Moderator
Super Moderator
Steel Soldiers Supporter
10,350
75
48
Location
Meadows of Dan, Virginia
Re: RE: Re: RE: installing generator on M35A2

OPCOM said:
.....
What is the little 'nipple' looking plug in the tank near the copper line in the picture? Is it really a place to mount something or is it part of something else?
That is in fact where you install the fuel pick up line, "elbow" connector in the image, so technically, if you don't have any other lines to connect, you don't need the bulkhead connectors for you project.
As far as the shavings, I held a paper cup below the place drilled and also dragged a magnet along the bottom of the tank.
 

Attachments

5tonpuller

Member
572
24
18
Location
Thompson, Pa
RE: Re: RE: Re: RE: installing generator on M35A2

You might want to make some thing to protect the gen. from what the tire can toss up. ( rain, water and such ) Looks great to me !!
 

OPCOM

Moderator
Steel Soldiers Supporter
3,657
27
48
Location
Dallas, Texas
RE: Re: RE: Re: RE: installing generator on M35A2

I've got some sheetmetal and such for the splash shields and a large panel off the side of an electronics rack for a side cover that will hinge up and lock down.
 
Top
AdBlock Detected

We get it, advertisements are annoying!

Sure, ad-blocking software does a great job at blocking ads, but it also blocks useful features of our website like our supporting vendors. Their ads help keep Steel Soldiers going. Please consider disabling your ad blockers for the site. Thanks!

I've Disabled AdBlock
No Thanks