• Steel Soldiers now has a few new forums, read more about it at: New Munitions Forums!

  • Microsoft MSN, Live, Hotmail, Outlook email users may not be receiving emails. We are working to resolve this issue. Please add support@steelsoldiers.com to your trusted contacts.

help please with diesel generator add-on advice

OPCOM

Moderator
Steel Soldiers Supporter
3,657
27
48
Location
Dallas, Texas
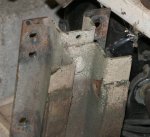
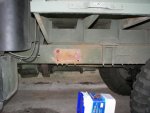
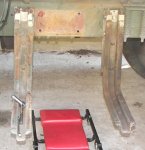
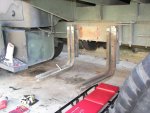
The 275 has the air tanks in a different place. Well I bought a pneumatic cut off tool, 20,000RPM handheld thing with a 2.5" wheel on it. Tomorrow if it does not rain i will first try to loosen the air tanks and move them a bit, then try to get a wrench over the nuts of the spare tire bracket and use the bigger air rachet. If this does not work, i'll cut off the bolt-heads.

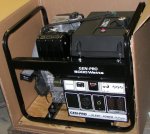
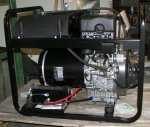
I fired up the generator set today first time. Pretty loud, but not overly so for a diesel. it should be quiet enough inside the shelter. The generator hardly noticed a 2KW load, and held speed and voltage very well.

A couple of things -
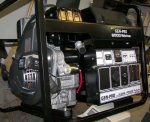
The controls for the generator are inconveniently located on the end, not the side as shown on the web page! I bet no one else has ever had that happen to them. It's because the factory went to a new model of engine with better oil consumption and efficiency than the olde one. I will have to relocate them so they are on the side with the outlets.

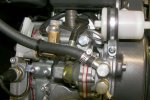
The oil filter is inconvenient, so I might get a remote filter kit later. Since the filter and oil have to be changed after the first 50 hours, I went to the local Lombardini parts dealer. The parts house charged me a "handling fee" of $5 even though I picked the new spare oil filters up there. That cheezed me off more than anything. I asked them what's this for? they could not explain, said it is policy. I said, where's my value in that charge? I am not accustomed to being charged for the privelege of buying something from a parts house. I'll find a different Lombardini parts dealer next.

The first battery I had on hand was dead, so I tried pull-starting the thing. Pull-starting a 400CC diesel with 20:1 compression is very interesting, and I found it futile. I broke out a 95AH AGM battery, hooked it up with a charger, and jumped the set, it spun right up and ran. I noticed that unless the oil pressure is about 4 PSI or more, the engine will not start or run. This could explain why I was not able to pull start it, and why at first the AGM battery didn't start it until I stuck the charger on it, as it did not turn the engine fast enough to get the pressure up.

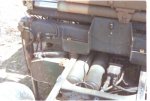
Upon start, and also upon shutdown, there are definite very low-rpm points at which the set shudders alot, this is normal since the single cylinder engine is quite large. It has vibration isolation mounts between the actual set and the metal cage. Might be worth it to add another set between the cage and the fuel tank mounts if I can spare the height. I hope the start/stop vibrations do not cause issues with the mounts. Perhaps a 1/4' or 3/8" aluminum plate acting as a base will help the strength, if placed on the fuel tank mounts, and the set placed on that.

Anyway here are some pictures of the set.
 

Attachments

Recovry4x4

LLM/Member 785
Super Moderator
Steel Soldiers Supporter
34,012
1,804
113
Location
GA Mountains
Patrick, go to the WIX or Baldwin filter site and try looking up/ crossing the filter that you bought. Their sites are pretty good with entering the Mfrs number and spitting out their number. Might be a better alternative in the future if the filter is available.
 

gimpyrobb

dumpsterlandingfromorbit!
27,785
748
113
Location
Cincy Ohio
Thats a good looking genset! It is amazing how much easier air tools make your work. You will not regret buying them. I have some vibration isolators for ya. Let me get some pics and I'll shoot you a pm.
 

OPCOM

Moderator
Steel Soldiers Supporter
3,657
27
48
Location
Dallas, Texas
Right on about the air tools! what a difference for the olde arthritis! Thanks for the offer on the isolators, I will do some measuring and see about allowable height. In 'parallel' with the preparation on the truck, I guess I need to figure out how to mount the genset to the brackets, and jack the contraption up into place to see where I am at for clearance.

Today I was able to loosen the air tanks and slide the rear ends of them inboard. Due to air lines going though a tight space in the frame crossmember to the fronts of the air tanks, the fronts could not be slid inboard. This makes just barely enough room to get a wrench onto the back of the spare tire bracket bolts, but it is still so difficult to reach that I have bought a cut-off tool and began to grind the bolt heads off on the spare hoist bracket as suggested. The tanks still need to be moved out of the way in order to install the new brackets for the generator.

In order to loosen the air tank brackets, I removed the center bolt and the inboard bolt of the front and rear tank straps. These are the straps that go across the tops of the tanks and hold them down to the tank mounts. There is an outboard fastener, center fastener (long bolt), and inboard fastener. It would have been very troublesome to do this without air tools. It took the 1/2" impact wrench and a deep socket on the bottom and a long handled box end wrench on the top for the center bolt, and a rachet with a long extension on the inboard bolt. The outboard bolts were nearly impossible to get at, so I left them.

In this particular case, the air line that goes from the top center of the secondary air tank to the passenger side glad hand was routed underneath the loop of air tubing that connects the rear ends of the tanks. I had to remove the compression fitting (line) from the inboard tank, and bend the aforementioned rear air line around the end of this and free it up so that I could then slide the rears of the tanks further inboard. The copper line between the tanks is very stiff, and due to me bending it a bit, it became impossible to line up the nut of the compression fitting with the elbow on the tank to put it back together. After 2 hours of this including cleaning the threads, and wiggling, jiggling, prying, and twisting, I ended up cutting 3/8" length out of the line and using a piece of 15/32 hose and hose clamps to fix it, allowing me enough "bend-ability" to get the compression nut back onto the elbow. Hindsight - although wrenching space is very tight on the outboard tank, it might have been better to remove the entire loop of tubing connected between the rears of the air tanks.

About removing the inboard bolts of the air tank brackets: the air tank mounts are formed more or less into U-channels. At the places where the inboard bolts hold the tank brackets to the tank mounts, there may be a half-inch of dirt (possibly dried mud) covering the bolt head. This makes it impossible to find the head much less put a socket on it. Using the air rachet, the bolt head was spun and this in turn broke up the solid covering of dirt. An air nozzle was used then to chisel and clear away the dirt so the socket could be placed.

About swinging the tanks inboard, as mentioned it makes just enough room to try to get a hand into the frame rail. When the rear of the tanks are together puhed inboard, it may take a prybar, and due to the geometry of the hold-down strapswhich are now under spring pressure of a sort, they are likely to spring back towards the frame if knocked or disturbed, so they need to be blocked in place away from the frame rail otherwise the tanks could slip and hand working in there could be pinched and I suppose it would be somewhat painful.
 

cranetruck

Moderator
Super Moderator
Steel Soldiers Supporter
10,350
75
48
Location
Meadows of Dan, Virginia
Patrick, I don't remember having too much difficulty getting the tank brackets installed, but then again, it's been a while, a decade actually. Perhaps the key was to be able to work from above.
Image shows hydraulic tank and pump along with the air tanks.
 

Attachments

OPCOM

Moderator
Steel Soldiers Supporter
3,657
27
48
Location
Dallas, Texas
well I haven't given up, it's just been so dang cold and wet (and icy, odd for Texas) outside, and this weekend is going to be the same.. "high of 40 with rain". Glad i don't have that hydraulic pump there to deal with..
 

cranetruck

Moderator
Super Moderator
Steel Soldiers Supporter
10,350
75
48
Location
Meadows of Dan, Virginia
Yeah, you have the weather we usually get here in the winter, no fun to work outside, that's for sure.

About the pump in the image above, the Navy specified a smaller (this one) pump when this crane was mounted back in 1975, I always wondered what the mfg's original pump would do to crane performance. Speed it up, add lifting capacity.... perhaps making the crane a bit more dangerous for 18 year old sailors/soldiers to operate? With the K-boom's reach, any part of the truck can be reached and smashed if the operator isn't careful....
 

OPCOM

Moderator
Steel Soldiers Supporter
3,657
27
48
Location
Dallas, Texas
Today it was not too cool, and the wind was not blowng hard so some progress was made. Finished grinding the bolts off the spare tire hoist. One would not 'fall out' through the (brake?) line clamp , and no amount of cajoling would do to get it out. Unless I want to remove the air tanks completely (no, thanks!) I'm stuck with it. The trouble with just pushing it through to the indise space of the frame C-channel is that the sharp edge of the bolt or clamp would be free to vibrate and move about, and there is an electrical cable just under the brake line. I decided to let the cut-off shank just stick partly out the hole and I fixed it in place with red permatex adhesive. That should keep it potted harmlessly in place. This is the red blob in the photo.

The mud-flap and struts were removed. It was decided not to cut off the triangular section of the bed at the front, and instead let the gnenerator be moved back two inches. I can make a splash shield for it later, possibly using the same muf flap. I really don't want to cut on the bed.

The spare fuel tank mounts needed some work. The holes' positions at the top would put them right into the brake line when they are mounted to the frame. There is not much space to move them up and down in consideration of the original bracket holes. I will relocate the attachment points 1" lower on the brackets. After removing the fuel tanl straps, I drilled them. The other picture shows the extra set of holes 1" lower than the top set. So far it looks like I will have about 2" of clearance from the top of the genset to the underside of the bed. The genset blows its cooling air out the side so this is OK. I apologize for the slow progress, the weather has not cooperated and it's dark when I get home from work. Note: you can grind in the dark by the light of the sparks. I considered it unsafe and stopped.
 

Attachments

Oldvw2

Member
Steel Soldiers Supporter
169
2
18
Location
Wake Forest, NC USA
[/quote]The first battery I had on hand was dead, so I tried pull-starting the thing. Pull-starting a 400CC diesel with 20:1 compression is very interesting, and I found it futile.
Something to try....I have a similar Lombardini on a construction arrowboard and it is possible to hand start it using the decompression lever. Look near the valve cover for a small spring-loaded lever. This one has a oil pressure shutdown too but it doesn't seem to affect it starting. I can take photos of the flexible exhaust and mounts on this one if it would help too.
 

OPCOM

Moderator
Steel Soldiers Supporter
3,657
27
48
Location
Dallas, Texas
Here is dealing with the brake and air lines and electrical cables that run inside the frame there. For the rearmost mount, I placed a piece of rubber hose over the brake line to prevent it chafing against the bolt heads. The frontmost mount also needs to be checked to make sure the lines and cables are not against the bolts, but it was easy to work there. Notice I mounted the frontmost mount forward of the transfer case crossmember because of the difficulty to remove the air tanks completely, which would have been necessary if I had needed to put the mount aft of the crossmember.

Next I will get a piece of steel cut to serve as a base plate to set the generator on.
 

Attachments

OPCOM

Moderator
Steel Soldiers Supporter
3,657
27
48
Location
Dallas, Texas
RE: Genset noise

Mine is not as noisy as that coleman, I can guarantee! I see that is a Coleman unit with the Acme ADX370 engine, it is not the same engine type at all as the one I have. I looked at those a few years ago and it is amazing how low the prices on some diesels have come, especially the Chinese ones, which have gotten a very bad reputation.. If the DRMO tag shows the true price Uncle Sam paid was $500, well, you get what you pay for, I would run away very fast. The machine I bought cost just over $3000, so I hope it is well made.

Lombardini group is made of four companies, if you will, the Lombardini, Lombardini Marine, Acme, and Ruggerini. There are common aspects, but Lombardini branch produces several models of medium size single cylinder diesel with advanced features like oil filters and pressurized lubrication and electronic controls, to allow them to last much longer than older designs. I do not know how much pressurized lubrication the Acme ADX370 has. Acme makes the most basic engines, and Ruggerini makes more of the larger, multi-cylinder models. I think my manual says something about a top-end overhaul at 5000 hours. I don't really know how they calculate how long something will last. If I run it 20 days a year, that's 480 hours, so 10 years.. 4800 hours? well either way these things should be reliable enough. It is noisy, as are most diesels, and alot of noise comes from the engine as well as the exhaust note. It's the price we pay for diesel power. Here is the engine in the genset I have now:
http://www.lombardinigroup.it/modules/prodotti/prodotti.php?idCat=1&idPrd=5
I could not find the datasheets for the ADX370, perhaps it is superseded now. Many have been due to EPA regulations, and this seem to actually have forced the quality up to better standards. I think you did better to have the Onan for the home use.
 

ichudov

Member
399
15
18
Location
Chicagoland, IL
Re: RE: Genset noise

OPCOM said:
Mine is not as noisy as that coleman, I can guarantee! I see that is a Coleman unit with the Acme ADX370 engine, it is not the same engine type at all as the one I have. I looked at those a few years ago and it is amazing how low the prices on some diesels have come, especially the Chinese ones, which have gotten a very bad reputation.. If the DRMO tag shows the true price Uncle Sam paid was $500, well, you get what you pay for, I would run away very fast. The machine I bought cost just over $3000, so I hope it is well made.
I am very glad to hear that. The Onan, at least works.
 

OPCOM

Moderator
Steel Soldiers Supporter
3,657
27
48
Location
Dallas, Texas
RE: Re: RE: Genset noise

The Onan, it is a very beautifully made unit. In many ways it is better than the smaller portables like mine, but there's just no place to mount such a beast.
 

OPCOM

Moderator
Steel Soldiers Supporter
3,657
27
48
Location
Dallas, Texas
RE: Re: RE: Genset noise

looking at the mounts, they didn't look quite straight somehow. I measured and they are mounted straightly on the truck, but the tips that stick out, one is about 1" higher than the other. Measuring from tip to the top of the mount on one and then the other shows about a 1" difference. They are definitely from the same truck. What gives here? Maybe one is bent slightly? but I did not notice this before, and they looked straight and identical.

It's this picture:
http://www.steelsoldiers.com/modules/PNphpBB2/files/100_3249s_120.jpg
 

gimpyrobb

dumpsterlandingfromorbit!
27,785
748
113
Location
Cincy Ohio
RE: Re: RE: Genset noise

I wouldn't worry about the 1" difference. Once you get some weight on there, that should go away. Try setting the genset on them and see what happens.
 
Top
AdBlock Detected

We get it, advertisements are annoying!

Sure, ad-blocking software does a great job at blocking ads, but it also blocks useful features of our website like our supporting vendors. Their ads help keep Steel Soldiers going. Please consider disabling your ad blockers for the site. Thanks!

I've Disabled AdBlock
No Thanks