• Steel Soldiers now has a few new forums, read more about it at: New Munitions Forums!

  • Microsoft MSN, Live, Hotmail, Outlook email users may not be receiving emails. We are working to resolve this issue. Please add support@steelsoldiers.com to your trusted contacts.

Help! recovering underpowered deuce

swbradley1

Modertator
Staff member
Super Moderator
Steel Soldiers Supporter
14,233
1,652
113
Location
Dayton, OH
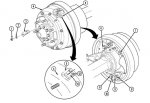
I'm sure you know, but in case you don't, some of the lug nuts will be reverse threads, look for a L or R stamped at the end of the studs.

So that's what I've been doing wrong.


;-)


(Yes, I'm kidding.)
 

Mark3395

Member
229
2
18
Location
Geneseo Illinois
Thanks for the notes guys.

I have a jack, and had time yesterday to lift the truck. The wheels wouldn't turn.

And thanks for the reminder of the L and R lugs. More than once I've slapped myself starting to turn the L lugs the wrong way. In this case I'm turning the correct direction.

What I'm hoping is that I can put chalk marks on the tires and move the truck to follow the instructions of the manual without raising the truck, or can simply rotate those two bolts a little until the wheels are freeer.

Aren't these wheels self-adjusting when you back up and brake? Like a car?
 

Mark3395

Member
229
2
18
Location
Geneseo Illinois
Thanks Kurt... I caught that just a few minutes ago looking at the parts diagram.

And rats, I forgot the access port is on the wheel side of the drum... gotta take the wheels off to look. I'm back to making a small adjustment to the bolts and trying it out.

Does anybody know how many degrees rotation of those bolts would be "just a little bit"?
 

kurtkds

Member
629
-1
18
Location
Puyallup, WA
Taken from the -20

Service Brake Adjustment

Remove nut (1), lockwasher (2), and inspection slot cover (3) from brakedrum (4). Discard
lockwasher (2).
Turn brakedrum (4) to position inspection slot (5) at 8 o’clock location.
Loosen jamnut (8 ) on anchor pin (9) one full turn.
Turn anchor pin (9) clockwise or counterclockwise until gap between brakeshoe lining (13) and inner
brakedrum surface (12) measures .010 in. (.25 mm). Tighten jamnut (8 ) on anchor pin (9)
80-110 lb-ft (109-149 NŽm).
Turn brakedrum (4) to position inspection slot (5) at 11 o’clock location.
Turn cam stud (7) clockwise until gap between brakeshoe lining (13) and inner brakedrum
surface (12) measures .020 in. (.50 mm).
Turn brakedrum (4) to position inspection slot (5) at 5 o’clock location.
Loosen jamnut (10) on anchor pin (11) one full turn.
Turn anchor pin (11) clockwise or counterclockwise until gap between brakeshoe lining (13) and
inner brakedrum surface (12) measures .010 in. (.25 mm). Tighten jamnut (10) on anchor pin (11)
80-110 lb-ft (109-149 NŽm).
Turn brakedrum (4) to position inspection slot (5) at 1 o’clock location.
Turn cam stud (6) counterclockwise until gap between brakeshoe lining (13) and inner brakedrum
surface (12) measures .020 in. (.50 mm).
Install inspection slot cover (3) on brakedrum (4) with new lockwasher (2) and nut (1).
Turn brakedrum (4) by hand and turn cam stud (6) counterclockwise until brakedrum (4) drags.
Loosen cam stud (6) until brakedrum (4) slightly drags.
Turn brakedrum (4) by hand and turn cam stud (7) clockwise until brakedrum (4) drags. Loosen cam
stud (7) until brakedrum (4) slightly drags.
Repeat steps 1 through 14 to do service adjustment of other wheel on axle.
 

Attachments

Last edited:

Mark3395

Member
229
2
18
Location
Geneseo Illinois
Yep, I've got the manual open and have been going over it.

Looks like a little tweak at 11 and 1 would be enough to improve the situation if I can't get the wheels off.

I wonder how many 63Bs really pull out a .010 feeler gage to make this adjustment.
 

kurtkds

Member
629
-1
18
Location
Puyallup, WA
You got it, in a pinch, adjust the leading edge adjuster on each wheel.

Drivers side 11 o'clock
Passenger 1 o'clock

The closer the leading edge is will give you more brakes, go too much and they'll lock up as they get warmer.

I've ran a feeler gauge through mine, it gets you close. :)
 
Last edited:

kurtkds

Member
629
-1
18
Location
Puyallup, WA
It depends on how close they already are, but I'd say between an 1/8th and 1/4 turn would be a good start. But remember, go too far and you'll run out of pedal travel, so test the travel before you start to drive it again.
 

Mark3395

Member
229
2
18
Location
Geneseo Illinois
OK, I shifted about 1/8 turn on both top cams and try it, but won't know what's happened until I get some miles on it.
This is an '87 truck, and has dual circuit brakes.

Changed the primary and secondary filters. Primary was a nice ceramic unit and not clogged at all. Some sandy crud in the bottom but I flushed it out. Number 1 secondary had a little crud in it to but the can is cleaned and filter replace with a new NAPA.

Took it for a drive and found no difference. Am letting it cool before goint out and adjusting the IP.

The acellerator cable seems to be working properly but the manual throttle seeems to be sdjusted just a bit tight... allowing the high idle speed. I'll fix that when the trucks cool too.

So I've made progress, but haven't fixed the problem.
 
Last edited:

jasonjc

Well-known member
5,325
283
83
Location
Gravette Ar.
To add to what Kenny posted, the second gear in the deuce trans is weak. Maybe not the gear, but the keyway that holds it in place. Many deuces have sheared it off! Please be carefull.

Yes the grear for second uses 2 small keys to lock it to the shaft. If they break look for a new transmission. I have one that is this way. Got it used and by hand truning it seemed fine. It was not untill it was in the truck that I found out it was fubared.:twisted: Keep this in mind when buying use transmissions.
 

rat4spd

New member
652
10
0
Location
Evansdale, Iowa
To add to what Kenny posted, the second gear in the deuce trans is weak. Maybe not the gear, but the keyway that holds it in place. Many deuces have sheared it off! Please be carefull.
My truck likes second gear. I don't sidestep it like my Chevelle. I guess the LDS helps.
 

Recovry4x4

LLM/Member 785
Super Moderator
Steel Soldiers Supporter
34,012
1,806
113
Location
GA Mountains
So you could jack up the wheels yesterday to determine that they can't turn, but can't jack them up today to adjust the brakes, is that what I understand? If you go adjusting these things without measuring them or feeling them for resistance, you are playing russian roulette with a 15,000# truck. Find time to jack it up and do it right! How about the throttle stop? 3 minute adjustment yanno.
 

kurtkds

Member
629
-1
18
Location
Puyallup, WA
Were you jacking up a single rear tire or both rear tires on the same side at the same time?

I don't think you had mentioned that in earlier posts.
 

Mark3395

Member
229
2
18
Location
Geneseo Illinois
Thanks Oilcan... I just read Gimpyrobbs IM that you were looking. You beat me to it.

Yes, there was no joy today. Filter work didn't fix things and when I went to turn up the IP I found the delivcery adjustmen screw on the FDC is broken. Falls right out.

So Gimpy recommended I bypass it. I'll read the link to see if it describes fitting sizes etc, otherwise I'll take off a line and haul it to a hardware store to find some line and fittings. I assume they're general purpose copper fittings?

Recovery4x4, I'll look up the throttle stop adjustment. I c hecked movement to see if it seemed constrained, and didn't note anything odd, but haven't pulled out the manual to check this feature.

I'll jack up the wheels tomorrow... Kurt, I raised both tires on one side... do I need to raise both sides or only 1 Am still crimped waiting for Entreprise to get me a rental car, but in the mean time have a KMart nearby for more general things like an additional jack. Won't help with fittings though.

So I'm making progress. Feel like a monkey crawling around this truck and am feeling the strains. Will be glad to get it on the road.
 

KaiserM109

New member
1,108
4
0
Location
SE Aurora, CO
OK, I had an interesting day… Pulled up the manual to adjust the brakes but the lug nuts were put on by a gorilla with an impact wrench
The torque spec’s are in the 400 FTLB range.

… I have a jack, and had time yesterday to lift the truck. The wheels wouldn't turn.
First, there is no way I can think of to free a wheel in the back of a 6x6 without either having 2 jacks, or unbolting the drive shaft between the 2 axles, which isn’t a bad idea when you are about to road an unknown truck 900 mi. anyway.


Try this:
1. Chock both wheels on an axle that you are not adjusting.
2. Shut the engine off and make sure that both the transmission and transfer case are in gear.
3. Jack both wheels on the SAME axle.

Assuming no locked up brake, the wheel should turn relatively easily and the other one on the same axle should turn the opposite direction. If either brake on that axle is locked, neither will turn.

If that doesn’t work:
1. Chock both wheels on the middle axle, front and back.
2. Shut the engine off and make sure that both the transmission and transfer case are in gear.
3. Completely remove the drive shaft between the 2 rear axles and stow it for the rest of the trip.
4. Jack up the right rear-most wheel and adjust. Even if the other brake is locked, it will turn through the spider gears and the ring-and-pinion.
5. Jack up the left rear-most wheel and adjust.
6. Chock both wheels on the rear axle, front and back
7. Put the transmission in neutral.
8. Jack up the right wheel on the middle axle and adjust. Even if the other brake is locked, it will turn through the spider gears and the ring-and-pinion and will turn the driveshaft.
9. Jack up left wheel on the middle axle and adjust.

Good luck and welcome to the M109 family,
Arlyn

PS If all else fails and you decide to have it hauled, you will have to find a low-boy 'cause you are already 11' tall and Interstate reg's east of the Mississippi require a max height of 13' for bridge clearance.
 
Last edited:

Mark3395

Member
229
2
18
Location
Geneseo Illinois
OK, I'm confused, or maybe my 109 is.

Looking at the diagram on the "FDC bypass Again" thread, there are two drawings. I'm unclear if drawing one is the final layout of the bypass... or if 1 and 2 are two steps in one process.

Looking at my deuce it seems drawing 1 is the bypassed condition. Unfortunately, instructions continue in 11 steps... and the two drawings are not compatible because they show two different piping schemes.

Looks to me that pic 1 is the bypassed setup, and that pic 2 is with FDC in service. It would make sense if pic 2 was the starting point, and pic 1 was the end point of the conversiopn.

Pic 1 shows the fuel line from the final fuel filter pulled forward from the FDC inlet to the hydraulic head inlet. The fuel line is too short to make it from the filter to the hydraulic head inlet so that it needs an extension. (anybody know what kind of shop would have the fittings to make such a line?)

Last, the adjustments of steps 10 and 11 seem to relate to the FDC in service. If the FDC is bypassed I hope those instructions become moot... because I think it involves the screw that's broken on my truck. Is there another drawing that shows the bypassed condition somewhere? I don't find it in the IP manual.

I removed the short line fromthe FDC outlet to the Injector Head inlet so I could take it with me seeking fittings. Tubes, fittings, and compression rings don't cause me concern, but the short brass tubes under the compression rings are a new one on me and I don't know where to get them. I guess it'll take a little stumbling around tomorrow.

Still, this is more fun than working for the government.
 
Last edited:

Mark3395

Member
229
2
18
Location
Geneseo Illinois
Success.... and failure.

With a lot of help I got the truck started by removing the faulty FDC from the IP and deactivating it... bypassing it wasn't enough.

Damned if the truck didn't start and run powerfully. I was concerned at black smoke and the liklihood of excess fuel straining the engine and ran it gently for about 6 miles.... thene the forward head gasket blew.

Fortunately all this took place just outside Ft. Benning GA, where I'd shot on the Army Pistol Team and various rifle teams over the years. Called my old Pistol Team Head Coach and get the truck recovered to a neighbor's auto shop and transport for an outbound flight from Atlanta by my daughters.

So this week I'll coordinate instructions and parts to repair the engine. Funny thing is that the truck is an 87 with about 5500 miles on it, but had the IP replaced with a hopefully rebuilt one, and a different compressor. I have little confidence in the IP but have several at home. I'll ship one down from a newish engine with a hole in the block.

So the work will continue.

Much thanks to all of you who helped, especially Gimpyrobb. This site is stunningly effective and I've long observed the great help you guys extend to each other. I've enjoyed it first hand.

Regards,

Mark
 

gimpyrobb

dumpsterlandingfromorbit!
27,785
749
113
Location
Cincy Ohio
That sucks azz that the head gasket blew after all the work you did to get her going. I hope things get better for ya.
 
Top