• Steel Soldiers now has a few new forums, read more about it at: New Munitions Forums!

  • Microsoft MSN, Live, Hotmail, Outlook email users may not be receiving emails. We are working to resolve this issue. Please add support@steelsoldiers.com to your trusted contacts.

Just bought a MTV M1094 LVAD

DSD277

Member
384
7
18
Location
Arcadia,CA
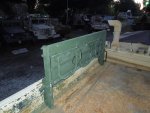
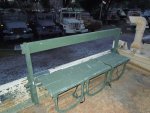
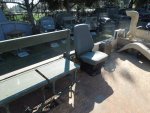
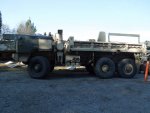
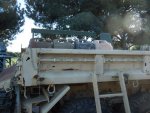
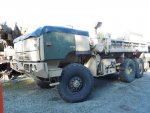
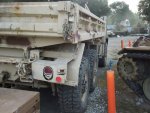
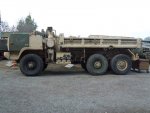
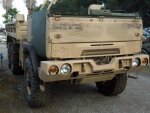
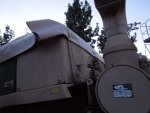
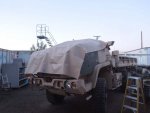
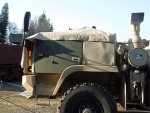
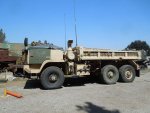
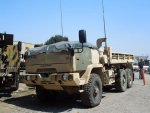
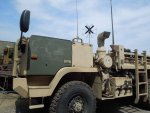
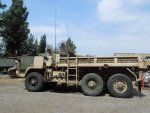
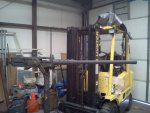
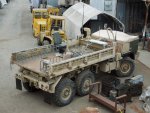
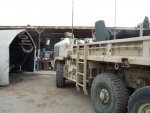
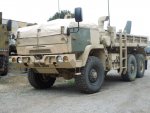
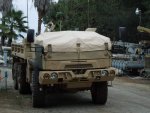
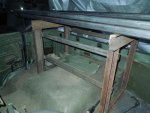
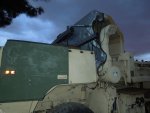
Brian, if I hadn’t gone over the hill to the high desert to pick up some parts for the truck, I would have been there to show you the truck. It has come a long way from the first days, it was a bit overwhelming to look at then.


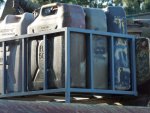
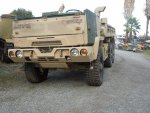
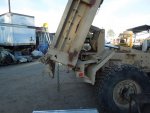
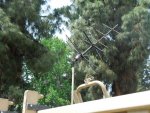
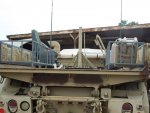
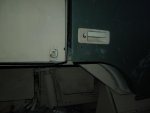
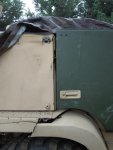
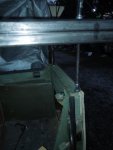
Besides working to straighten the cab, I’ve started to go through the lighting circuits, some issues are grounds, some may be the main light switch, that will be this weekend’s project. But one problem that isn’t the truck’s fault is wrong voltage bulbs in the composite lamps! 6 of the 8 normal bulbs were 24v ( this was while it was still in service), which to old time MVers doesn’t seem a problem until you tell them the lights are all 12v in the FMTVs....It is easy to see where voltage sensitive relays could easily be put into wrong sockets, thus possibly frying circuits.
I’ll start a new thread here to see if any of our savvy FMTV mechanics might have run across my electrical problem and can send me straight to the source and not dilute this rebuild thread.
 

DSD277

Member
384
7
18
Location
Arcadia,CA
Well, I finally made the first attempt at reshaping the tub.
Because the cab tilts and floats on an air spring, I decided to make a platform inside the tub that straddles the engine hump and placed a pair of heavy tubes across it extending outside the cab. In the first step, I cut 2”x 1 ½ ” tubes to fit inside the quarter panels,drilling 5/8” holes to match the ones in the body and nut them to all threads through the tubes above. The thought was the tubes inside the panels would pull the side panels up, hopefully stretching the panels a bit. On the outside, I plan on mounting flat plates fastened in the fender mounting holes and run all threads up to the beams. These would push the side panels up and pull the floorup.
My intention for today was to install these fixtures, andmeasure for the fender mounted plates. As it was, I tried the fixture to see how muchstress would be on it… within a shorttime, and little effort, the panels came up very close to where they need to be.Besides getting dark, I want to have the other plates made and installed ontothe fixture to fine tune the last vertical adjustments.

The pics with the fenders are from before


Attachments

DSD277

Member
384
7
18
Location
Arcadia,CA
There is light at the end of the tunnel! And hopefully, it isn’t a train coming at me.:-D
Since the truck is 20 minutes away, I plan all my all moves and actions in advance. This last Saturday, a first on this project happened, I have never given a thought to when I was going to remove the platform and beam assembly in the cab. I just assume it was going to be needed for an extended amount of time…Saturday morning,, I started by removing the cab protector to give the truck more flexibility for parades (have a M1083 troop seat kit) and MV events ( still doing the War Pig), and joked about installing the fenders. By the afternoon, the doors were closing and latching, and the vast majority of the cab repairs needed are cosmetic. It appears I’ll be removing the braces to see what “spring back” if any will happen, and proceed to the windshields and frame.

I also had been checking my archive pics to see what still needed to be done, when some of the early pics had caught my eye to how far the truck has come in a short time.
Surprisingly, all alterations to the body, so far, were done by porto power, a homemade tweaking bar and with the all threads to the platform & beam assembly... the ol girl is cleaning up nicely:mrgreen:ride side  with tweak tool.jpgright side 06 12.jpgright side 02 10 13.jpgright side 02 13.jpgleft side 06 12.jpgleft side 02 13.jpgleft side 02 10 13.jpgDSCN0403.jpgDSCN0410.jpg She also sports a new early bumper and a late model metal grille

Link to new album with pics after 2/1/13
http://s10.photobucket.com/albums/a130/dsd277/FMTV/M1094 rebuild/M1094 Rebuild pic after 13 02 01/
Because of the mass number of pics, I'll start adding albums for date ranges.
Many pics are for my reference for items I'm working on, but others may find use for
 
Last edited:

DSD277

Member
384
7
18
Location
Arcadia,CA
Last week saw the removal of the braces and the 'spring back'. The right side only required the reshaping of the top hinge and door adjusted to latch. The left side was a bit more involved as the quarter panel needed to be shifted. This meant the left rear corner had to held securely while upward pressure placed at the strike jamb of the door. A pic below shows the overstress needed to get the jamb to align. With a little realigning of the door and strike, I had a fully functioning cab.

I then proceeded to test fit a pattern for the tonneau cover. I have some good ideas what I want and how to secure it, and it will pretty much follow how Steyr did things and how much of the FMTV holds to 'old country' building ways.:-D
The hump is a "quick fit" bow to shed the water off the cover, which has worked well with the tarp during the rains.
 

Attachments

Artisan

Well-known member
2,762
227
63
Location
CDA Idaho
When shes done roll her over to Monrovia !

I have an M925A1.

LVAD Low Velocity Air Drop right?

Did she do a LVADR? Low Velocity Air Drop Rollover
 

DSD277

Member
384
7
18
Location
Arcadia,CA
She'll spend most her time on display at Tankland in South El Monte, where it is now, venturing out only for parades and events.
This thread started as an introduction of the truck and became an ongoing build thread, mostly because of the support I have been getting from people here and through PMs .
This is sort of like a soap, you're lost if you miss a couple of episodes:lol:
 

DSD277

Member
384
7
18
Location
Arcadia,CA
To continue my saga, "AS the FMTV Turns".;-)
Last night the FMTV gods were both smiling and screwing with me (as usual).
Last month I scored a new M1083 troop seat kit off GL. And 2 weeks ago found 4 adapters for the kit for the M1090/M1094 ( need 2 more, but I can make them). I took 2 sections of the seats (1 long, 1 short) to fit them and mark the truck for some mounting holes for those new ( latest version) adapters. The gods were smiling, my truck is a M1094A1 and the upgrade was there. Now I can tell you, a MTV M1083 troop seat kit does not fit a MTV M1090/M1094:???: ( the gods are screwing with me), but the LMTV troop seats do. The difference is that both sections on each side are short (made up of a double seat and a single) on the LMTV and the M1083 has a long (2 double seats) and a short on each side.
It took about 30 seconds before I realised that all I needed to do is cut 1 double seat in half and cut the backrest (such as it is) and the support tube to the shorter length.

Bob,
I am glad you're enjoying it. To go back 10 months ago and look at it then and what I imagined what I could do with and to see how far it has come, which far exceeded my thoughts last April. I had never considered I could have ever gotten a pair of the correct doors for it, and straighten the body to have them function:shock:
And now the truck is such that it can readily adapt it for different roles ... a troop carrier, a War Pig, or even a dump truck! :)
I now can even see it possible to resurrect a complete cab. I know where the parts are.
And what is funny, parts (the relatively few I've needed) are far cheaper than anything was for my TD Pinzgauer, or the SBU Mog.
 

Attachments

DSD277

Member
384
7
18
Location
Arcadia,CA
I was worried I was going to kill myself humping them up and over the side of the bed.... those mothers are HEAVY! plus the sections fly every whichway... I'm making a cleat to hold the seat sections together next time... or get some help :)
 

DSD277

Member
384
7
18
Location
Arcadia,CA
Progress is moving faster than my posting pics of updates. The troop seat section was move to the rear of the bed to see how the HMMVW seats would fit in and measure for gerry can racks for the War Pig ( they were fab'ed this week and trial fitted ). The rear troop seats and racks can be exchanged for the other fairly quickly, without removing the HMMWV seats
The tonneau template had gommets added and was tested for fit ( the actual vinyl material came in this week).
The air intake was shorten, and the tailgate was straighten.
Lastly, a M6 pedestal is being put together for a replica M2 in the bed. The M240 and swing arm in the commanders position will being a challenge with the windshield frame, door and future mirror are all in the same area.
 

Attachments

DSD277

Member
384
7
18
Location
Arcadia,CA
A quick post of some progress pics.:grin:
Reworked the right rear corner of the bed and tailgate... I doubt it worked as well when it left Sealy:mrgreen:... The top pins have no fiction putting them in or out. I found no reason not to install the fenders, and swapped out the only mismatched tire.
 

Attachments

DSD277

Member
384
7
18
Location
Arcadia,CA
Another weekend, and another facet attacked. I’m at a point that I am “taking liberties” with the build. The permanent bow framework and tonneau cover was started. Since the waistline of the truck in over 7’ from the ground and figuring I would be putting the cover and bows up by myself most the time and I’m no kid, it is made for the least amount of up and down out of the cab movement. I made a bow unit that would set into a tab in the rear, holes in the cab on the sides and a standoff in the front over the center dash. When removed, the side bars would fold to the rear and the front bow would be remove from it’s slip tube with removal of a quick release pin for a nice neat package for storage. The tonneau cover will be secured to the rear of the cab where it will be rolled up and stowed. I am taking from my experiences 10 years ago with my 716 Pinzgauer and the top I fabricated for it back then ( And there was no “play book” for that one either). If you can fold paper airplanes and not glue your fingers together, you can work with the Tuf Stuf (a vinyl coated fabric).
With 2 lengths glued together and a pocket made for the plastic mounting stiffener, it was mounted to the truck. The rest of the cuts and gluing will probably be done in place, with considerations for the windshield frame on and off the truck8).

Meanwhile, back at my shop, I'm resurrecting a M6 pedestal mount for a M2HB (replica, which I'm searching for at this time). I'm also looking for a swing arm and a M240 for the commanders station ( lots of liberties will need to done there because of nasty highway laws requiring windshields and mirrors :lol: )
 

Attachments

DSD277

Member
384
7
18
Location
Arcadia,CA
Multi tasking is taking its toll, and pictorial updates has been the casualty. The biggest visual change has been the addition of mirrors and antennas.The mirrors are no way standard, but fit with all the requirement I had set down (and a variant of ones used some MRAPs). They needed to work with or without doors,with the windshield up or folded and not interfere with the swing of the frame, also easily removable and lastly, co-exist with the swing arm and M240 for parades.
Another item attacked was straightening and racking of the windshield frame for new glass which I'll cut this week.
I am now to the point that I need to turn my attention to bodywork and to making it all one color(ish):p
The tan tonneau cover is off to have its last trimming
 

Attachments

DSD277

Member
384
7
18
Location
Arcadia,CA
Recently found another pic of a War Pig(s). Interesting is this is the first one I've seen which had used a boarding ladder strapped to the side. And with a few cuts of a saw and a couple passes of a welder, brackets were made to adapt the M1090/94 boarding ladder for hang on the side.:) Which I must say is more user friendly for the vertical application :lol: . Also a mount for a satcom antenna was made and fitted.
This last week also saw my M2HB replica come in, along with steel to fab the weapon station at the passenger's seat.
 

Attachments

DSD277

Member
384
7
18
Location
Arcadia,CA
Happy anniversary ! :) Although I didn’t receive the truck until June 24[SUP]th[/SUP], it will be I year tomorrow, I will have been the owner of the Flying Dump Truck


This last weekend saw the fitting of the HMMWV seats and the M2 mount in the bed… along with wall to wall carpeting?:?.. it wasn’t there Saturday night when I left!… I have an uneasy feeling Danny might be making it his summer residency :lol: I hope I don’t find a TV, fridge and a microwave there next week... though 24 hour security wouldn't be a bad idea with Derrick needing parts:p :lol:

The last thing done Sunday was the final fitting of the tonneau cover with shock cords. My experience with making my Pinz top 10 years ago really did pay off. It looks to make a decent fit to cut down on the ingress of dust and other blown particulars ( my main concern). The last details to be done are rub pads added at corners and over stress points and a pair of straps added to the rear to hold the cover when rolled up at the back of the cab
 

Attachments

Top