• Steel Soldiers now has a few new forums, read more about it at: New Munitions Forums!

  • Microsoft MSN, Live, Hotmail, Outlook email users may not be receiving emails. We are working to resolve this issue. Please add support@steelsoldiers.com to your trusted contacts.

Kinda got carried away..... M1028 rebuild

Mullaney

Well-known member
Steel Soldiers Supporter
Supporting Vendor
7,771
19,879
113
Location
Charlotte NC
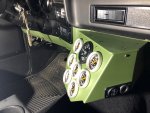
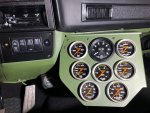
I'm coming down the home stretch on the interior. Got the new gauge cluster completed and installed. None of the gauges are hooked up yet, that will be done when the new P400 powertrain goes in later in the summer. The carpet set fit like a glove, even the piece for the rear cab wall. For the console, I purchased a center console kit for a Tahoe PPV (Police Patrol Vehicle) and fabricated a custom steel bracket, bolted to the seat bolts in the cab floor, to hold it in place in the front. The back of the console simply sits on the level package rack behind the seats. Worked perfect. I moved the console towards the passenger side an inch or so to provide sufficient room to operate the new cable shifter. In preparation for the Vintage Air, I went ahead and fit the new vents into the dash and instrument bezel. Had to relocate the black-out switches down into the steel dash to make room for the outboard vent, and had to relocate the amp gauge down into the bracket for the diagnostic port. I completely removed the diagnostic wiring harness and this opened a 2" hole in the firewall, into which I plan to fabricate a custom rubber grommet to seal all the leads from the new gauges.

View attachment 866812
View attachment 866813
View attachment 866814View attachment 866815
View attachment 866816
View attachment 866817
.
That is a sharp looking gauge cluster!

The good part is that there are two bucket seats, so nobody ends up riding in the middle.
Safety matters and it won't be a problem the way you designed it. Very Cool!
 

Sharecropper

Well-known member
Steel Soldiers Supporter
1,836
989
113
Location
Paris KY
Are those clusters rare? Seen it installed, i am sure need one for my 1009 :)
Nicely keeps this old military look...
Sorry to take so long to reply. Been crazy busy on honey-do projects. I have a couple of those clusters left over if you are interested. I had originally designed the cluster for six gauges (tach, oil pressure, water temperature, oil temperature, fuel pressure, and transmission temperature), but after deciding to go forward with the Bullet Supercharger, I had to design and build a new cluster housing to accommodate two more gauges (boost and EGT). So I still have the six-gauge cluster if anybody wants one. I also have a couple aluminum six-gauge prototypes I used in the design and developmental stages. You will need to produce your own top plate, as I only produced the one shown in the photo below. The gauge holes are all for 2-5/8" AutoMeter instruments, except for the tach hole, which is for the HMMWV tach.

IMG_5091.jpg

IMG_5089.jpg
 
Last edited:

vanaisa

Well-known member
267
355
63
Location
Tallinn, Estonia
well, i am interested. But shipping is killer, i afraid :)
Do you have drawings? And do you want share them?

Kind of penny stretcher request of course :giggle:
 

Sharecropper

Well-known member
Steel Soldiers Supporter
1,836
989
113
Location
Paris KY
well, i am interested. But shipping is killer, i afraid :)
Do you have drawings? And do you want share them?

Kind of penny stretcher request of course :giggle:
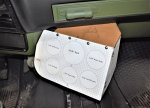
I have a substantial amount of engineering time involved in the development of the cluster. Because of that, I would prefer to simply sell the finished cluster and possibly the prototypes, which are fine except they are produced from aluminum instead of steel. Send me a PM with your exact mailing address and I will see what USPS Parcel Post would cost to get one to you. One thing to keep in mind, however, is the HMMWV tach will need to get its signal from somewhere. Because I will be using a 700R4 instead of a TH400, I am able to abandon the OEM vacuum pump and instead use a HMMWV oil pump drive with the tach sender on top. Before I expended the time and effort on the new cluster, I temporarily hooked up the tach to 24v and chucked-up the tach drive spindle in my cordless drill to make sure it worked as intended, and it did. So all my extra clusters are designed to accommodate the HMMWV tach and five (5) 2-5/8" AutoMeter gauges. A different set of gauges with different sizes would make my drawing obsolete. So you might be better off simply using my idea and then developing your own engineering. I am not an engineer or anything close to an engineer. But I do claim to be an efficient technician, having enjoyed over 50 years in the architectural millwork business. If you are handy with your tools and hands (and brain), you can do as good or perhaps even better than I have done. I had never designed a gauge cluster until I designed mine. I simply sat in my driver's seat and determined where in my immediate vision would be the best place for gauges. There was really only one place, and that was where the ashtray was. I then decided what gauges I needed, and then drew the cluster face on a piece of cardboard. I then determined that the cluster face would need to be "cocked" towards the driver by 30 degrees, and also rotated upwards (from the bottom) by 30 degrees. Once I had this data, I cut more carboard and began taping things together. After much trial and error, I arrived at the final design and angles. One difficult task was developing the shape of the lower OEM dash, as it is not a true radius but instead a portion of an ellipse. So I had to trace this and then transfer the shape into my AutoCad drawing. Here's a photo of the first mockup dated January 2020 -

DSC_0751 (2).JPG
 

DREAD KT

Member
26
28
13
Location
Yancey, TX
Just want to put this out here: https://800nonoise.com/product/acoustical-floormats/ (no affiliation, no compensation) they have a 383 green (and 686 tan) textured vinyl composite floor material by the roll. I had been going this way with the M1009(s) to give a quiet decoupled limp loaded mass on resilient padding foam over a KillMat/Dynamat damped floor pan and firewall, which still would be cleanable with a hose. SEM does custom colors for their flexible vinyl/fabric/carpet paint, and once upon a time I had sent them the FS-595 (now SAE) color swatches to match. This was before they got purchased a while back.
Nice! I was looking for something. My Deuce had mats that were so disgusting and torn up that I did not even keep them (but should have to make measurements). They caused a lot of rusting, so I repainted and used truck bed liner to paint the floor. Now I am thinking of putting some nice mats to reduce sound. The originals did not fit that well, so not sure if I want to spring for original replacements (found a few on eBay), but like your idea. Here is the link https://shop.800nonoise.com/Twist-Grain-Floormats-10-Roll-CC-1LB.htm to buy the material on-line. They even have pictures of a Deuce redone. A little expensive at $305+freight for 45 feet. Anyone use this stuff yet?
 

Tinstar

Super Moderator
Super Moderator
Steel Soldiers Supporter
4,292
1,779
113
Location
Edmond, Oklahoma
Anyone use this stuff yet?
This flooring was installed on both my 5 tons that were just out from fresh military rebuilds.

It definitely keeps the sound down but their heavy and even heavier when wet.
They act like a water sponge and really hold the water and take forever to dry.
At least the ones I had did.

That’s why the shipping is expensive.
Big, bulky and heavy.
 

Sharecropper

Well-known member
Steel Soldiers Supporter
1,836
989
113
Location
Paris KY
So, 2 more years gone by and no word on the truck! Is it complete, running?
No, unfortunately I have not finished my truck. Even at 74 years old I've been swamped with career responsibilities and in March, my wife & I lost our only daughter to a sudden heart attack. Losing her threw a curveball in our life plans to say the least.

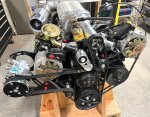
But I have completed the new P400/765R4/NP241 drivetrain, and it is ready to install as soon as I can carve out some time. I posted a photo over in the "What Have You Done..." forum but will re-post it again here. I spared no expense in assembling the drivetrain and I believe it may be the last and only non-cranked P400 in existence. I started on this drivetrain way back in 2017 or so when LeRoy called to say that he had an opportunity to purchase ten (10) P400 long blocks from GEP and wanted to pre-sell them. I bought one sight-unseen and wish now I had bought all ten. Anyway, over the course of the next few years I added components until the final nut was torqued a few months ago. I had to fabricate all the custom bracketry and truly enjoyed the process. I'll be happy to answer any questions you or any other SS member may have pertaining to how I did this or that. Many of the applications had never been done before, or at least I had never heard of them, so I had to envision and engineer many things to make everything work together. So if you have any questions, fire away.

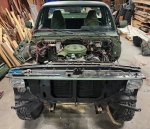
Whenever I can carve out a couple weeks from my busy schedule, I plan to remove the front clip including the radiator and core support. I will then disconnect the original 15,000-mile OEM 6.2, transmission, and NP208 from all connections, and ease it out with my forklift and adjustable engine hoist attachment. I've already lifted the P400 assembly off its cradle with the hoist and adjusted it so that the entire drivetrain is perfectly level when lifted. After removing the 6.2 with transmission & TC still attached, I will set it aside and then pick up the new drivetrain and ease it into position, watching carefully for clearance between the crossmember and the girdle/cast aluminum oil pan of the P400. If insufficient clearance exists, I will either order one of the aftermarket crossmembers from ORD or simply modify my crossmember myself. I'll just have to cross that bridge when I get to it. Anyway, it should be fun and I am looking forward to it. I will indeed update this thread when all the fireworks start.

IMG_0923.jpg
 

dougco1

Well-known member
Steel Soldiers Supporter
869
649
93
Location
Cooperstown NY
No, unfortunately I have not finished my truck. Even at 74 years old I've been swamped with career responsibilities and in March, my wife & I lost our only daughter to a sudden heart attack. Losing her threw a curveball in our life plans to say the least.

But I have completed the new P400/765R4/NP241 drivetrain, and it is ready to install as soon as I can carve out some time. I posted a photo over in the "What Have You Done..." forum but will re-post it again here. I spared no expense in assembling the drivetrain and I believe it may be the last and only non-cranked P400 in existence. I started on this drivetrain way back in 2017 or so when LeRoy called to say that he had an opportunity to purchase ten (10) P400 long blocks from GEP and wanted to pre-sell them. I bought one sight-unseen and wish now I had bought all ten. Anyway, over the course of the next few years I added components until the final nut was torqued a few months ago. I had to fabricate all the custom bracketry and truly enjoyed the process. I'll be happy to answer any questions you or any other SS member may have pertaining to how I did this or that. Many of the applications had never been done before, or at least I had never heard of them, so I had to envision and engineer many things to make everything work together. So if you have any questions, fire away.

Whenever I can carve out a couple weeks from my busy schedule, I plan to remove the front clip including the radiator and core support. I will then disconnect the original 15,000-mile OEM 6.2, transmission, and NP208 from all connections, and ease it out with my forklift and adjustable engine hoist attachment. I've already lifted the P400 assembly off its cradle with the hoist and adjusted it so that the entire drivetrain is perfectly level when lifted. After removing the 6.2 with transmission & TC still attached, I will set it aside and then pick up the new drivetrain and ease it into position, watching carefully for clearance between the crossmember and the girdle/cast aluminum oil pan of the P400. If insufficient clearance exists, I will either order one of the aftermarket crossmembers from ORD or simply modify my crossmember myself. I'll just have to cross that bridge when I get to it. Anyway, it should be fun and I am looking forward to it. I will indeed update this thread when all the fireworks start.

View attachment 933484
My condolences. From someone that experienced the same.
 
Top
AdBlock Detected

We get it, advertisements are annoying!

Sure, ad-blocking software does a great job at blocking ads, but it also blocks useful features of our website like our supporting vendors. Their ads help keep Steel Soldiers going. Please consider disabling your ad blockers for the site. Thanks!

I've Disabled AdBlock
No Thanks