• Steel Soldiers now has a few new forums, read more about it at: New Munitions Forums!

  • Microsoft MSN, Live, Hotmail, Outlook email users may not be receiving emails. We are working to resolve this issue. Please add support@steelsoldiers.com to your trusted contacts.


M1007 - CUCV Suburban Clone Build Thread

Barrman

Well-known member
5,168
1,588
113
Location
Giddings, Texas
I was a very good hurdle runner in high school and even ran in college some. This build is just a really long hurdle race.

Now that I have a transmission that should be ready to go. I have to get a controller. They are not cheap. There are 5 or 6 stand alone transmission control units out there. They range between $400 to a little over $1000. Countless hours online reading reviews has my list narrowed down.

I have some specific requirements I want from the TCU. Since I see the Cowdog as a long distance highway cruiser some of the time, I want a shift pattern that will give me the best mpg's I can get. I also plan to pull trailers with it, so I need a shift pattern that will keep the engine in the peak power band as much as possible. I also plan to be in 4 low idling up and down mountains and I would like to have some engine braking in those situations. I also want to control when the torque converter clutch locks up. Plus, I want a display to let me know what is going on and tell me the transmission temperature anytime I look at it.

I would like the controller to be as stand alone as possible without having to use a Windows based laptop anytime I want to change things. It has to work and not kill my transmission and if I call the company that made it. I want an English speaking person to answer the phone and be able to talk tech with me.

With all of the above in mind. My options are down to just two units. The US Shift Quick 4 and the Compushift II. All of the rest fail at least 3 of the categories. The Compushift II is listed as almost $400 more expensive than the US Shift unit. I decided to call both places yesterday and see what happened and figure up total cost so I can start saving.

US Shift didn't answer the phone when I called during their posted hours. I tried several times. Rich has one of their units and mentioned you have to buy their wiring harness. According to the web site, that will bring the cost difference down to less than $200. I might also have to buy their Throttle Position Sensor at another almost $200. That makes the cost of both units about the same.

I did get Compushift on the phone. I told the guy I was shopping and comparing customer service. Then told him 1987 V2500, 6.5 TD, 1994 4x4 4L80E, 1992 TPS, 1990 NP241. He asked down to the wire color about the Throttle Position Sensor and the number of teeth on the 241 VSS. He was correct with both statements. He then asked about my intended uses and said they could set it up for exactly what I want and I can change things from the display panel at anytime without a computer.

I asked about how to get the digital VSS signal to a Dakota Digital converter and he knew all about their unit too. They have a wire just for the Dakota Digital to feed off of. They don't need the engine speed sensor signal since they have the transmission input signal for a tach signal either. $18 extra over list price to have a wiring harness that will plug into the 1992 TPS and 1990 NP241. All I have to do is plug it all up, give it a ground and a power source to make everything work.

When I started asking about the display panel, he had me drooling. 6 line items can be displayed at any time based on my selections. Color and brightness of the display can be changed by me as well. I really liked that information.

I know I was talking to a salesman and got off the phone before I traded my son for a TCU. I will try US Shift again in the next few days and see what they say.

Most of the people still slogging through this thread probably know most of what I wrote above. I figured someone will chime in with a fact I don't know though and wanted to put this out there. I am now looking at the most expensive single item on the truck and want to get it right the first time.
 

Another Ahab

Well-known member
17,832
4,173
113
Location
Alexandria, VA
I was a very good hurdle runner in high school and even ran in college some. This build is just a really long hurdle race.
I know I was talking to a salesman and got off the phone before I traded my son for a TCU. I will try US Shift again in the next few days and see what they say.

:clinto::funny:
 

richingalveston

Well-known member
1,715
120
63
Location
galveston/Texas
the compushift looks like it has a few more fetures and options. my controller is US shift 1, i do not know what is different from the shift 4

I have dual transfer case that will get me serious engine braking without needing computer to control that in the tranny but sounds like a nice feature.

All i know is stay away from TCI.

us shift can be changed from the controller but it is a little cumbersome, a laptop makes it easy.
It only displays one read out at time. I normally have it on the speedometer function because it gives me the correct speed by adjusting for tire size. it is easy switch to other readings. I check the trans temp often.

compushift sounds like they have their act together also so I think you would be ok with either.

Rich
 

86m1028

Active member
1,687
16
38
Location
Murphy TEXAS
Barrman & Rich
Thanks for the info y'all have come up with & personal experience with these units.
Looking forward to your install & review of the compushift.
 

Barrman

Well-known member
5,168
1,588
113
Location
Giddings, Texas
Somewhere in this thread I stated that I wanted to pick the truck up as little as possible and still run 35 x 12.50 tires. I also didn't want to cut the entire front fenders off to fit the tires. I really like the way my M1009's ride down the road. Firm suspensions seem to be my thing. M35's ride nice to me.

Anyway, last summer I swapped in a set of front springs from a M1009 to replace the 2 leaf stock V20 springs. Further research has taught me that the 3 leaf M1009 springs are the snow plow option from Chevy for the 3/4 ton vehicles. I also did an ORD 1 inch add a leaf on the front with new U bolts to hold it all together. The front frame cross member was exactly 1 inch taller after all of that. I thought for sure the bigger springs will pick it up at least some. They didn't.

The truck got painted, engine installed, transmission in, HVAC, interior, etc... It kept gaining pounds but the front end hasn't gone down any. Those 3 leaf springs do not flex. Instead, the rear of the truck kept going down and down. The rear needed to be lifted some.

Measuring with jacks lifting the rear up led me to think the ORD 2.5 inch shackle flip would be just about perfect. I also wanted to do the ORD steering frame brace thing. Since both items are heavy steel, I combined the order a month or so ago.

The frame brace got installed Tuesday with no issue and no cracks seen anywhere in the frame. Having never drive this vehicle, I have no clue if it will help anything other than my peace of mind about frame cracks.


Yesterday I did the rear shackle flip. I decided to pull the fuel tank first. I needed it out of the way to make eliminating the brake height sensing proportioning valve easier anyway. Even though ORD and lots of people online say you can do the shackle flip with the fuel tank on. I would probably still be working on it if I hadn't. Pull the tank.


Using an air hammer on the 4 easiest to get to rivets took about 5 minutes of ear splitting noise, shaking arms and numb hands each. I spent lunch yesterday researching a better way. I found it. A cut off wheel cutting a single cut down the middle of a rivet, then hammer off each half one at a time. Not quit a hot knife through butter, but less than a minute each. I had the other 8 rivets off in less than 15 mintutes total time including cutting the notches.

I had taken the ORD shackle flip brackets to the welding class to show the students how a real weld looks. We finally figured out they are probably done on a machine since the welds go around the corners in what looks like a continuous bead. We were all impress with the workman ship.

Their directions say to drill all the rivet holes out to 7/16" Once that was done I went to put them on. The 4 holes on the side of the frame lined right up but the bottom holes weren't even close. I was thinking all kinds of bad things about ORD as I torqued the 4 down to 38 ft/lbs as instructed figuring to just use the mount as a template to drill through once the sides were tight. However, once the sides were tight, the bottom ones lined up perfect and just dropped in. I was actually impressed with ORD. The other side was the same.

Trying to put the actual shackles in didn't work. I couldn't get the axle down low enough. First the Banks exhaust tip was in the way. Once that got removed there still wasn't enough down. Off came the really worn out and no resistance in either direction shocks. That was it.

We had measured the bottom of the receiver hitch before at 17-1/4" I had the 2.5" shackle flip kit. Once done and back on the ground we had 21-1/8" at the bottom of the hitch. WHAT? I wanted 2.5. not 4! The back was too high. The I leaned on the bumper. The previously not moving rear end now marshmallowed down a good bit. My 250 pounds we measured was 1-1/4 inch. The fuel tank will do that once back on. A spare tire will do again. It should come out to 2.5 inches when all is said and done I think.

Then this morning I was able to get the camera. So, some current progress pictures:


After the picture taking I was able to get the exhaust back on, insulate the front floor and get the front carpet in. Progress goes as fast as I can afford stuff.
 

Attachments

Barrman

Well-known member
5,168
1,588
113
Location
Giddings, Texas
I thought that bumper was going to kick my butt pulling the fuel tank off. I had put it together in this order: Receiver hitch, bumper brackets, fuel tank, fuel tank skid plate, bumper, pintle hook. With the truck up on the lift, way up on the lift actually. I was able to snake an open end wrench in to get the skid plate and fuel tank straps off. We will see about going back together. Maybe the bumper can stay on.

We just finished putting a vacuum on the a/c system. It was down to 30 inhg in less than 5 minutes. I let it sit for another 20 with the valves closed and it was still at 30. I like that. The accumulator needs to be replaced, so this was just a leak test, not a full pull down for refrigerant install.
 

Barrman

Well-known member
5,168
1,588
113
Location
Giddings, Texas
I am just going to call it a truck bumper instead of writing M1008, M1028, M1031 CUCV bumper.

Let me cover the M1009 bumper first real fast. The suburban frame is just the right width to allow a M1009 bumper without modification to fit right up. However, the suburban frame has 3 bolt holes per side in a semi circle arrangement. As does the M1009 bumper. Only the top hole on each side lines up though. The semi circles are reversed. New holes must be drilled in either the frame or bumper frame mount. Since the M1009 pintle is not really braced to the frame, it will fit fine. The shackle mounts can be bolted up. I never got that far so I don't know if new holes need to be drilled or if the outside braces will bolt up.

I didn't like the way the M1009 bumper looked and I wanted a braced pintle along with the step or shelf. Looking online, I found a step bumper was offered by Chevy back when these trucks were new. I have never seen such a thing but they did exist. That might be a good starting point for someone.

I wanted the pintle and shackles. I have mv trailers and plan to pull them. To me the best starting point was the military truck bumper. There is a picture many post back of a complete truck bumper hanging way off the back of the Cowdog. Nowhere near close to fitting. Changes had to be made. There are several threads on this site by members who made the truck bumpers fit. Most of them cut the truck frame. I wanted to do that only as a last resort.

The truck bumper mounts welded to the bumper are exactly the same outside distance apart as the suburban frame rails. I decided to move them out. So, all of the extra braces and such were removed. The bumper mount plates are welded on all sides of the "U" shaped bumper. Since the plates are 1/4 inch thick. We moved each one out 1/4 inch and tacked them in.

A test fitting showed that the same top hole on the suburban which lined up on the M1009 bumper lined up on the truck bumper plate. Up and down it was perfect. Except it was pulled up against the suburban rear body. I didn't want that. We cut off the tack welds and added a 1/2 inch by 2 inch spacer to the bumper. Basically, with the bumper mounted, the spacers go up and down just inboard of the shackle slots.

Below are pictures of the first truck bumper test fit with all the brackets on, the plates moved out, the test fit with tie straps holding it up of the too close alignment and the 1/2 inch spacers welded in.

That gets us to the bumper fitting the truck truck but not supported or braced, no pintle and no shackles.
 

Attachments

Barrman

Well-known member
5,168
1,588
113
Location
Giddings, Texas
I will continue the bumper saga tonight.

I am going to use R-134A with the blue 1989 Ford orifice tube. I still have some R-12 left, but this would make my 3rd vehicle running it and just a few tear downs would drain my supply. When I went to do the leak down test yesterday I put R-134A adaptors on. The low side one fit fine. I couldn't get the valve core out of the high side and just pulled down with the low side. I messed and messed with that low side valve core and I think it is broken off inside the line. I went rummaging through my parts stash and found my last Square body suburban dual a/c condenser to evaporator line. It got put on this morning and with both lines pulling, it went well below 30" almost right away. I let it sit for an hour and it didn't move. Then I pulled the lines off. SSSSSSSSSSSsssss. The high side adaptor valve core had a bad o-ring. All fixed now and correct.

Since I needed the truck back on a lift. I did the front floor insulation and carpet yesterday. I also added spacers between the seat frame and seat mounts to raise it up as high as a M1009 seat. The view out the window is exactly the same as the M1009. I am just real close to the headliner now. I will have to see if it is too close and lower back down again some day down the road.

All of that allowed me to sit in the truck in the seat at the desired level and let my students push. I got to drive the Cowdog for the first time today! I have always been on my knees, reaching through the window or on a shop stool in the past. I of course made engine noises while my students pushed. They are convinced I am crazy.

With it back on the lift, I can finally start working on the brakes and axles. It shouldn't have to be moved again unless under its own power at some point in the future.

The master cylinder had brake fluid in it and the pedal when pushed stops the truck at push speeds. I drained the master with our brake machine getting the expected brown sludge and went to the drivers caliper since I was already there. Opening the bleeder got nothing. Removing the bleeder got nothing. Pulling the line off the caliper got fluid draining from the caliper, but not the line. Same thing on the other side front. I got no fluid at the rear bleeders either. Just a few drips when I took off the hose connecting the rear axle to the frame. I have no idea how the brakes worked for me just 30 minutes earlier. There is no fluid in the system. Once I get the height sensing valve out of the way and all those brackets removed. I guess I will leave all lines open and try blowing air through them.
 

86m1028

Active member
1,687
16
38
Location
Murphy TEXAS
Last I checked there are a few company's still making that rear bumper minus the black out lights & tie down points.
Fey is one of them.
 

Barrman

Well-known member
5,168
1,588
113
Location
Giddings, Texas
To continue the bumper with a few notes.

The truck frame is straight. The suburban frame turns down after the rear cross member.

The truck cross member is notched a good bit at both frame rails. The suburban frame has enough room to slide a few wires between the cross member and the frame.

The truck fuel tank is outside the frame and in front of the axle. The suburban fuel tank is between the frame rails behind the axle.

All of the the above means a truck bumper with all of its attachments and supports will not attach without cutting something. Below is a picture of a truck bumper with all the attachments and about a foot of frame still attached to give a reference.

Once I had the bumper mount plates spaced correctly and welded in. I could bolt it in with that one bolt on each side, but it tilted down at the rear. I decided to cut the top off the end of the frame on the suburban. I took around 2 inches off the top only. That got the bumper level. I then drilled holes in the frame using the bumper plate as a template. Now the bumper was secure to the truck.

Because of the fuel fuel tank and the cross member, I decided to tackle the shackle mounts next. The truck has them bolted to the frame sandwiched between the bumper mount plates and another bracket with bolts through the shackle tubes and bolts above the shackle and another bolt for the bracket almost a foot forward to the frame.

The down turn turn of the suburban frame made the foot extension of the bracket impossible. I cut it off so it would still sandwich the shackle tube but not hit the frame. There were a few more hole that could be drilled in the frame to hold the bracket on besides the 2 on each side going through the shackle tubes. A picture below shows the cut off bracket bolted to the bumper. It is black with the shackle tube green.

Another note. All truck and M1009 front shackle mounts I have ever seen are the same. The rear shackle tubes are different. The truck ones are longer.

I couldn't put off the pintle hitch brackets any longer. They bolt to the frame with the same bolts that the outside bumper end brackets do with the frame sandwiched in the middle. The outside brackets lined up just fine except they were 1/2 inch short of the bumper. The spacers I welded to push the bumper mount plates did that. A M1009 outside bumper end bracket is the same on the frame end but different on the bumper end. I tried them both just to see.

Here is where the cross member and fuel tank are an issue. The fuel tank because the bolts for the inside and outside frame brackets can't be touched with a finger with the fuel tank installed. The cross member because there isn't room for the bracket to fit. I cut the cross member back a little, then a little more and finally a bit more. I also had to cut the pintle brackets some on the bottom because of the down turn of the frame. There is a picture below of the inside and outside brackets bolted on.

The fuel tank got put on next. Followed by the skid plate and then the bumper. Obviously, the receiver hitch had to be first. Lots of snaking an open end wrench around. I even had to remove my watch to get to some of the fasteners.
 

Attachments

Another Ahab

Well-known member
17,832
4,173
113
Location
Alexandria, VA
All of that allowed me to sit in the truck in the seat at the desired level and let my students push. I got to drive the Cowdog for the first time today! I have always been on my knees, reaching through the window or on a shop stool in the past. I of course made engine noises while my students pushed. They are convinced I am crazy
.
If you keep them guessing about it, it might work to your advantage.
 

Barrman

Well-known member
5,168
1,588
113
Location
Giddings, Texas
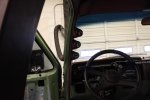
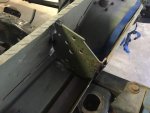
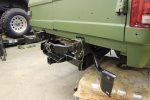
I took the pictures of the truck with the shackle flip the day after the shackle flip was done. I put the exhaust tail pipe back on and it cleared the springs by about 1/8". The exhaust was below the spring. I was worried about the drivers side tire going up and driving the passenger side spring into the exhaust. We played with a floor jack and were surprised to find that as the drivers side went up, so did the passenger side spring. That didn't make sense and we couldn't safely get it high enough to get full droop from the passenger side.

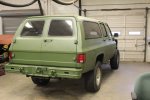
My class has a 1" lip at the bay doors. Every time we have moved the truck, that lip bounces me in the air. Both ends of the truck do it. When they moved me and I was making engine noises. The front axle bounced me. The rear with the shackle flip just floated. With no shocks, it floated and floated actually. But, no bounce. There might actually be something to all the comments on line about how well a truck rides after a shackle flip.

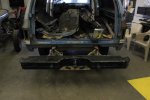
My exhaust clearance was over 1/2" after that short little push. I got the fuel tank and skid plate back on. 1/2 tank of fuel in the tank. I was up to 3/4" clearance between the spring and exhaust without moving either item. Once the skid plate was back on I started loosening the exhaust further forward on the truck to move the tail pipe rearward. I actually lost a little vertical tail pipe to spring distance, but being further back I think the chances of the spring ripping the exhaust off are a lot less. Once I get it driving I will be able to put it in situations to really test it and know for sure. My next option is to take the 90° tail pipe bend and open it up to a 45° like all the new trucks have. That will take it away from the spring entirely.

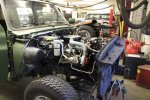
Now that the fuel tank was on to stay, I hope. I decided to try running the engine in the truck. I had a student holding an empty soda bottle on the end of the turbo oil line and another student holding an empty water bottle on the fuel filter output line with instructions to yell out of something came out their line. With the pink wire off, I started cranking. Less than 10 seconds had fuel from the tank and through the already filled up fuel filter. We closed up the fuel system and cranked another 10 seconds or so to get oil at the turbo. Once that was installed I pulled the glow plug control plug back in and got nothing.

The next several days were spent testing, hot wiring, swapping out controllers and finally a different controller pigtail. The factory glow plug system now works like it should. The pink wire was installed that first day though because I wanted to hear it run. I hot wired the glow plugs for an 8 count and it puffed after a few seconds of cranking. We had run the engine last summer so I thought it would fire right up. I forgot we had pulled the IP cover and sucked all the fuel out to turn up the fuel screw. Even though we put fuel back inside the IP. I think some air was in there too.

I fired up the second try and then died a few seconds later. Lots of exhaust noises where they shouldn't be as well. Along with smoke where the noise was. Must start the engine, so another 8 count on the plugs and a little throttle had it running. Very loud and smoky up front. Really ruff low idle too. What is wrong with my engine????

I turned it off and looked at the drivers side exhaust. I could see the top of the donut. A few turns on each nut to get them tight and we tried it again. It stumbled to life was quiet for about 2 seconds and then loud again. I forgot the stupid springs on the exhaust nuts! The studs were out of threads and the cross over pipe wasn't tight. I put some spacers in for the time being and tried again. It stumbled and jerked and finally settle down to a low lope with only exhaust from the tail pipe.

We shut it down again to figure out why the fast idle wasn't working or the cold advance. I had knocked one of the wires off the sensor when installing the turbo down pipe. With the green wires hot now, it fired right up and idles nice. With no cooling system installed, I never let it get to more than 200° on the EGT. Which is the only gauge I have installed that works right now. Well, the Oil temp did come off the peg, but not much and the boost won't show boost without a load on the engine.

It wasn't until I had the glow plug system all working right that it finally clicked in my head how important the after glow period is on a cold engine. 3 1.5 second glows 5-8 seconds apart starting 5-8 seconds after cranking make a huge difference. I had started the engine hot wiring the glow plugs and it always ran like crap with lots of white/gray smoke the first 20-30 seconds. With the system working, no smoke, no lope, no stumble, just a smooth running engine. Something to keep in mind if you are a manual glow plug person.

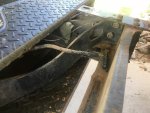
I had put off touching the axles, brakes and steering until the end. I had suspected a rear lift might have to happen from the start and the rear pinion yoke flops around with oil all over the housing. If I did a lift, pinion angle might be effected so I didn't want to buy U bolts twice. If the axle was bad, I didn't want to do the brakes twice or have to transfer them either. If the rear was bad and I couldn't find another 3.73 which I suspect still might not be enough gear with my 315 tires. I didn't want to throw money away on a 10 bolt front brakes, bearings and steering if an open knuckle 60 were installed.

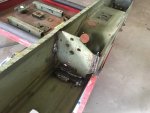
I couldn't put it off any longer. I pulled the rear 14 bolt semi float cover off last week. Black chunky goo came out. There was enough goo on the bottom of the housing under the ring gear that my thumb nail was completely covered. Twisting the pinion made the carrier move up and down too. The gears looks ok though. Yukon Gear has a complete rebuild kit with bearings and gaskets for everything at $311.

However, I have another 14 bolt semi float at home under the last V2500 that came from Warthog. It says on the dash sticker GT4 which is 3.73. It also says on the sticker G80 which is Gov Lock limited slip. Monday evening after work I wedged myself under the fuel tank out in the field and pulled the cover. Nice golden brown clean fluid came out. There was a gasket with a light smathering of gray silicone holding it on and the housing was spotless. Gears looked perfect as well. I have never had the speedometer for this truck, so I have no idea how many miles. The presence of a gasket makes me thing factory or dealer service instead of the slopped on with a putty knife orange silicone we have all seen on things.

So, an axle swap is next. I pulled or tried to pull the brake drums from the Cowdog Tuesday. They were rusted solid and once off I found a full dust pan of dirt/grease balls on each side. The end seals were leaking as well. I pulled the brake push rods from the wheel cylinders and fluid came out. Anyway, once the parking brake cables were released from the backing plates. I just put the tires back onto the axle without the drums. The drums actually looked pretty good inside. I will compare them with the other axles and run the thickest two I have.

Yesterday, the M715 got tow bar attached to the '90V2500 and everything is set to back it into my shop for a fast axle removal someday soon.
 
Top
AdBlock Detected

We get it, advertisements are annoying!

Sure, ad-blocking software does a great job at blocking ads, but it also blocks useful features of our website like our supporting vendors. Their ads help keep Steel Soldiers going. Please consider disabling your ad blockers for the site. Thanks!

I've Disabled AdBlock
No Thanks