I echo the above sentiments!!!Thanks Rick for ALL the pics of truck and family!! Work and play!! You've been a HUGE inspiration to me as I endeavor to work on my own M1009. Seems like it's one step forward and two back......Like ya say, it won't be done in a day. Keep up the great work! Appreciate ya sharing what is happening in the "Barn".
-
Steel Soldiers now has a few new forums, read more about it at: New Munitions Forums!

M1009 Little Red Riding Hood.
- Thread starter cucvrus
- Start date

More options
Who Replied?cucvrus
Well-known member
- 11,478
- 10,505
- 113
- Location
- Jonestown Pennsylvania
Today I started out like a rocket. I was outside getting my Honda lawn tractor back together and hit another snag. The engine is not producing electric to keep the battery charged.
I wanted to update this statement I made last week.
After running the Honda tractor and mowing about an acre of lawn I decided to check the voltage of the battery. It was at 12.9 when I started mowing and at 12.6 when I finished mowing with the engine running and the voltmeter hooked up it showed no change or charge. I know I done this backwards but I enjoy a good challenge. The engine was HOT and I reached in with a needle nose and tugged on the wiring coming from behind the flywheel. There was 1 wire attached and 1 with a break and about a 1/2" sticking out. Hemostats clamped on the wire against the engine case I used a strippers and stripped the wire as close as I could. I cut the heat shrink back a bit from a 20 gauge RED connector and crimped it in place. I tugged on the wire. It held. I had a piece of heat shrink tubing on top and slid it down I heated it and covered everything with 1/4 split loom. I tied it all down and restarted the mower. it was charging at 13.7 and went to 14.5 very quickly. Text book perfect. This tractor has an electric fuel pump from factory and requires amperage for the safety features that are on the machine. Looking back I was glad I mowed the grass as I was sure I could think while doing that and make a simple repair and not end up pulling the engine. Like a CUCV things must be carefully thought out and planned before you just go hog wild and tear into things. Replacing parts that are not needing replaced is not always an improvement. Many times the replacement parts are not of the same quality and you just add more problems into the mix. Not a CUCV but still mechanically related. So I hope you can relate. Deck wheels received all new wheel bearing and that was an improvement. More fun work today is in the forecast. Take Care and Be Safe.
cucvrus
Well-known member
- 11,478
- 10,505
- 113
- Location
- Jonestown Pennsylvania
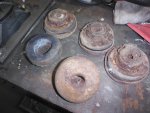
Today I made a lot of progress. I was also busy with a few customers that showed up for my Chevy parts Summer Sale. I posted on Facebook a few Squarebody parts for sale and it went from there. After getting everything cleaned up outside. It was raining on and off. I mowed the field and then decided it was time to get all my tools put away. I mean a month of NOT putting them away and I was up to my knees in parts and tools everywhere. Sorted out the good from the bad and accounted for all my tools. Even the 10mm sockets. Imagine that. Also part of my plan was to have the steel mushroom mounts from the M1009 I removed the body from so I could get the new energy suspension mounts on the current M1009 I am building. After all the hard work I done today this was proving to be the hardest. I had to figure out an easier way. the first one took me about a 1/2 hour to get the rubber puck off. 
 The second one 20 minutes.
  The third one I decided it had to be easier. I drove the screwdriver down into the rubber against the mushroom stalk.
 Giving the large screwdriver a twist it released the hold on the puck. I found the easy way. FYI. Keep that in mind for and if you ever decide to go with the urethane mounts. The steel looks great and the washer are also great.
I will clean them up a bit and paint them. I didn't want to remove the mushroom mounts from my current build until I had immediate replacements. I like to lube and run a thread chaser up thru the cab threads where these body bolts mount. Then I use some silver grade never seize to complete the job. Copper grade works just as well and so does wheel bearing grease. Never force a body bolt out. Patience and spray lubes and anti seize fluid helps. Rocking the bolt back and forth and spraying the bolt excessively helps also. Good Luck on your projects. i hope to have a great report and keep my M1009 project on page 1 of the CUCV thread. Happy 4th of July.
The second one 20 minutes. The third one I decided it had to be easier. I drove the screwdriver down into the rubber against the mushroom stalk. Giving the large screwdriver a twist it released the hold on the puck. I found the easy way. FYI. Keep that in mind for and if you ever decide to go with the urethane mounts. The steel looks great and the washer are also great. I will clean them up a bit and paint them. I didn't want to remove the mushroom mounts from my current build until I had immediate replacements. I like to lube and run a thread chaser up thru the cab threads where these body bolts mount. Then I use some silver grade never seize to complete the job. Copper grade works just as well and so does wheel bearing grease. Never force a body bolt out. Patience and spray lubes and anti seize fluid helps. Rocking the bolt back and forth and spraying the bolt excessively helps also. Good Luck on your projects. i hope to have a great report and keep my M1009 project on page 1 of the CUCV thread. Happy 4th of July.
Attachments
-
 144.7 KB Views: 16
cucvrus
Well-known member
- 11,478
- 10,505
- 113
- Location
- Jonestown Pennsylvania
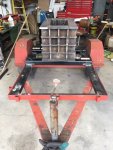
I had some time after work and wanted to get something completed on the M1009 project. I broke out the Energy Suspension body mount kit and went to town. I am home alone and getting ready to go away for a weekend mountain trip to work on my Rock Crusher.
The Kit
 Using the steel mushrooms from the OEM mounts I cleaned and painted the mushrooms.
  Installing the Energy Suspension isolators is very straight forward.
  The instructions are very easy to understand. I only installed 1 side tonight. No use over doing it before time off. I can not let this thread slip to page 2. I must continue to make progress. Tomorrow I will install the right side. This Energy Suspension stuff is nice and easy to work with. Not all M1009's are going to be a cooperative as this M1009 with only 13,000 miles on it and stored inside my barn the past 20+ years.
 WOW. These are the rear rubber mounts and they are hardly even worn or rusty. More later. I want a smile from a friend for this effort. I must do this as a work of art. if it becomes labor I loose interest quickly because so much needs done on my properties all the time. Empty nest here now. If I don't do it, it don't get done. My Wife does help me many times and for that I am grateful. Take Care and Be Safe. I will be doing the left side tomorrow after work.
The Kit
Using the steel mushrooms from the OEM mounts I cleaned and painted the mushrooms. Installing the Energy Suspension isolators is very straight forward. The instructions are very easy to understand. I only installed 1 side tonight. No use over doing it before time off. I can not let this thread slip to page 2. I must continue to make progress. Tomorrow I will install the right side. This Energy Suspension stuff is nice and easy to work with. Not all M1009's are going to be a cooperative as this M1009 with only 13,000 miles on it and stored inside my barn the past 20+ years. WOW. These are the rear rubber mounts and they are hardly even worn or rusty. More later. I want a smile from a friend for this effort. I must do this as a work of art. if it becomes labor I loose interest quickly because so much needs done on my properties all the time. Empty nest here now. If I don't do it, it don't get done. My Wife does help me many times and for that I am grateful. Take Care and Be Safe. I will be doing the left side tomorrow after work.cucvrus
Well-known member
- 11,478
- 10,505
- 113
- Location
- Jonestown Pennsylvania
I wanted to show you the Rock Crusher. It will keel.
Attachments
-
 73.8 KB Views: 23
cucvrus
Well-known member
- 11,478
- 10,505
- 113
- Location
- Jonestown Pennsylvania
I seen that the M1009 project was about to slip to page 2 in the CUCV section. Not this time. Today I replaced the left cab mounts. I made progress and will be able to use the original rear body bolts. 


 I have all the body mounts installed on the main body. Correction the upper body mounts. Gravity is holding the body on the frame at the moment. I hope to get the radiator core support mounts changed tomorrow. Also get the lower part of the new mounts installed. I have some wire brushing to do on the lower cab mount washers and some painting. I was out looking for a few rare parts and managed to find a right fender that I saved many years ago. Shame it has zero rust but it is damaged beyond what I would fix. It does have the battery brackets attached to the fender and a hood hinge. I will utilize it in a cool project I am working on. More on that later. I will post that progress under my CUCVRUS projects thread. Take Care and Thanks for looking. This body mount kit is a must have to get theM1009 back to new condition. I also want to clean the windshield pinch weld area out tomorrow. I have a GNR concert to attend tomorrow night so I must get cracking early.
I have all the body mounts installed on the main body. Correction the upper body mounts. Gravity is holding the body on the frame at the moment. I hope to get the radiator core support mounts changed tomorrow. Also get the lower part of the new mounts installed. I have some wire brushing to do on the lower cab mount washers and some painting. I was out looking for a few rare parts and managed to find a right fender that I saved many years ago. Shame it has zero rust but it is damaged beyond what I would fix. It does have the battery brackets attached to the fender and a hood hinge. I will utilize it in a cool project I am working on. More on that later. I will post that progress under my CUCVRUS projects thread. Take Care and Thanks for looking. This body mount kit is a must have to get theM1009 back to new condition. I also want to clean the windshield pinch weld area out tomorrow. I have a GNR concert to attend tomorrow night so I must get cracking early.- 4,031
- 3,475
- 113
- Location
- Peoria, Illinois
Say hello to slash and axel!! Welcome to the Jungle, we got fun and games!!! Just like your projects!!
NICE!!
NICE!!
cucvrus
Well-known member
- 11,478
- 10,505
- 113
- Location
- Jonestown Pennsylvania
In an attempt to raise the European happiness level I present a right M1009 door that has been repaired. It had light dents that required a thin coat of Rage. Not Rage from me. This Rage.  Sort of like Rage against the machine.
A light coat of glazing and this door is finished. I was doing an inventory of all my parts to complete my final 2 M1009's. No light at the end of the tunnel yet but progress is being made daily on multi projects. Take Care. I also attended the GNR concert last night so yesterday was a 100% successful day. Be Safe.
Sort of like Rage against the machine. A light coat of glazing and this door is finished. I was doing an inventory of all my parts to complete my final 2 M1009's. No light at the end of the tunnel yet but progress is being made daily on multi projects. Take Care. I also attended the GNR concert last night so yesterday was a 100% successful day. Be Safe.
cucvrus
Well-known member
- 11,478
- 10,505
- 113
- Location
- Jonestown Pennsylvania
Keeping to my word I started sanding the pancake mixed CARC tan paint from the nice rust free GM fender.  Nice loader marks have been there 25 years and I stored these damaged fenders. Back then I could buy Genuine GM fenders for about $125.
  I sanded the fender with 80 grit for about an hour. My goal was a 1/2 of the fender. I cheated and sanded the front half.
  I also spent some time on my art piece. I'm allowed.
The fender has a lot of dirt and sprayed in rust proofing but these are all things I prefer dealing with over rust.
 Rust just plain sucks and that about all I am going to say about that. I also did some finish putty on the door and then it was time for resting.
  Get up and do it again. Take Care and Enjoy the Great weather. Tomorrow I hope to make more progress. Sanding CARC is one of my favorite hobbies. I love it. It burns thru 80 grit sand paper in about 2 minutes. The packing slip adhesive was a true joy. It is gone forever and this fender will be able to live again. Repurposing is great.
Nice loader marks have been there 25 years and I stored these damaged fenders. Back then I could buy Genuine GM fenders for about $125. I sanded the fender with 80 grit for about an hour. My goal was a 1/2 of the fender. I cheated and sanded the front half. I also spent some time on my art piece. I'm allowed.The fender has a lot of dirt and sprayed in rust proofing but these are all things I prefer dealing with over rust.
Rust just plain sucks and that about all I am going to say about that. I also did some finish putty on the door and then it was time for resting. Get up and do it again. Take Care and Enjoy the Great weather. Tomorrow I hope to make more progress. Sanding CARC is one of my favorite hobbies. I love it. It burns thru 80 grit sand paper in about 2 minutes. The packing slip adhesive was a true joy. It is gone forever and this fender will be able to live again. Repurposing is great.cucvrus
Well-known member
- 11,478
- 10,505
- 113
- Location
- Jonestown Pennsylvania
On the way home I seen some wood along the road with a sign that had my price on it. FREE. Nice clear 1 X 10 clear pine boards. Free. I see a happy Wife. We like building bird houses out of clear pine boards. Especially painted wood in an Avocado color.  She spent the evening pulling the nails and sorting the good from the bad. While she done that I worked on sanding the left fender.
 That bottom part of the fender is like new. Stored in my barn since 1996.
  The only damage is the forklift and loader damage is an easy fix.
  I completed the right door and set the left door on the stand and ground out the area I am not happy with. I will get working on that later this week. Maybe Friday. I have other things to tend to the next few days.
 Take Care and Thank you for looking. I have myself busy again. Same as it always is.
She spent the evening pulling the nails and sorting the good from the bad. While she done that I worked on sanding the left fender. That bottom part of the fender is like new. Stored in my barn since 1996. The only damage is the forklift and loader damage is an easy fix. I completed the right door and set the left door on the stand and ground out the area I am not happy with. I will get working on that later this week. Maybe Friday. I have other things to tend to the next few days. Take Care and Thank you for looking. I have myself busy again. Same as it always is.- 8,229
- 20,782
- 113
- Location
- Charlotte NC
.On the way home I seen some wood along the road with a sign that had my price on it. FREE. Nice clear 1 X 10 clear pine boards. Free. I see a happy Wife. We like building bird houses out of clear pine boards. Especially painted wood in an Avocado color. View attachment 841435 She spent the evening pulling the nails and sorting the good from the bad. While she done that I worked on sanding the left fender. View attachment 841436 View attachment 841437That bottom part of the fender is like new. Stored in my barn since 1996. View attachment 841438 The only damage is the forklift and loader damage is an easy fix. View attachment 841439 I completed the right door and set the left door on the stand and ground out the area I am not happy with. I will get working on that later this week. Maybe Friday. I have other things to tend to the next few days. View attachment 841440View attachment 841441 Take Care and Thank you for looking. I have myself busy again. Same as it always is.
Nice! So your wife preps the wood, you cut it to size maybe, then you guys can knock them together and paint the birdhouses. That is a cool side project while you work on your trucks... Definitely a good way to keep you guys working together on stuff. Good Deal!!
And that fender looks sharp!
Last edited:
cucvrus
Well-known member
- 11,478
- 10,505
- 113
- Location
- Jonestown Pennsylvania
 Remember the fender dent from the loader?
  It pretty much gone. Being dented for over 25 years was long enough. I spent some time with a prybar , dolly and hammer. A light coat of filler and it is a good OEM GM fender again. Option was Chinese new ones or fixed rust free originals. That was an easy choice. I want to use all the best when I can. I will sell the knock offs some day or use them when it don't matter.
  This bolt was stripped in the hole. i fought it out and re tapped the threads. Good as new. that was a factory bolt error. I tried welding a nut on the bolt, vise grips and cutting a slot in it. Last resort I drilled it out and it caught at the end and went thru. I used another bolt and re tapped the hole. It will hold a fender on again. Goal Met. That's All Folks. Good Night.
cucvrus
Well-known member
- 11,478
- 10,505
- 113
- Location
- Jonestown Pennsylvania
Today I started out early and can now say both doors are completed on the outside. Both Fenders are completed on the outside. When I say completed they are straight and the body work is completed on them all. The hood is 95% prefect and I am going to just sand and use it the way it is. I also wire wheeled the windshield pinch weld jamb clean and removed the cowl seals, hood hinges, wiper transmission and have the parts stored for cleaning and refurbishment. I will show how to lubricate the wiper transmission and the hood hinges when the time comes. These old trucks need some serious lube on a few of the concealed parts. The drivers door upper hinge also need new bronze bushings installed. Many older trucks/cars need this done and it makes a world of difference when the door opens and closes. Oil again plays a major part in keeping these parts operational. No pictures the camera was dead and I was busy. I will get pictures tomorrow. It is just straight doors and fenders. The hood has the OEM GM paint on it. The red hood was just a cover while I was storing it. Take Care and Be Safe. I will be mowing the rest of the day. Fun, Fun.
cucvrus
Well-known member
- 11,478
- 10,505
- 113
- Location
- Jonestown Pennsylvania
Keeping my word to those that are following this thread I was out getting ready for another project and snapped a few pictures of the body parts. Technically speaking all the body work/dent removal and repair has been completed. I must get to Harbor Freight and pick up a few spray guns. I have the primer and will try and get the parts all set up for primer. I must still sand and prep the inside of the left fender , doors, and hood. That may take a bit of time but it must be done. Not slacking off on any tasks.  That is the repaired driver side fender. Both doors are completed on the exterior. I still have to scuff the inside of the doors.
  A little advise is if you are going to spend the time and money to repaint any vehicle it is only done correctly if all the glass and weather strips are removed. This pinch weld area is always a n area that is wet and rusty. This truck had a minor rust starting at the joints were the A pillar meets the roof line top and bottom. I used the cup brush and cleaned it all out. I followed up with an acetone wash and used the 3M rolok 2" scuff pad and went around and cleaned it till it was smooth and even.
 I removed the windshield wiper transmission and the hood hinges to do a factory finish and also at the same time find any trouble spots that will be a nest for rust.
  The right fender I had prepped a few years back for a customers truck.
  He wrecked the truck before I could do the work. I just kept the fender in stock. It is already painted in 383 CARC on the inside.
  That is also the original GM hood with the factory hood. I will post more progress as it happens. Thank you for the support. I hope it is helpful to get you motivated to do some work on your vehicle projects. Be Safe.
That is the repaired driver side fender. Both doors are completed on the exterior. I still have to scuff the inside of the doors. A little advise is if you are going to spend the time and money to repaint any vehicle it is only done correctly if all the glass and weather strips are removed. This pinch weld area is always a n area that is wet and rusty. This truck had a minor rust starting at the joints were the A pillar meets the roof line top and bottom. I used the cup brush and cleaned it all out. I followed up with an acetone wash and used the 3M rolok 2" scuff pad and went around and cleaned it till it was smooth and even. I removed the windshield wiper transmission and the hood hinges to do a factory finish and also at the same time find any trouble spots that will be a nest for rust. The right fender I had prepped a few years back for a customers truck. He wrecked the truck before I could do the work. I just kept the fender in stock. It is already painted in 383 CARC on the inside. That is also the original GM hood with the factory hood. I will post more progress as it happens. Thank you for the support. I hope it is helpful to get you motivated to do some work on your vehicle projects. Be Safe.Sezzo
Well-known member
- 152
- 308
- 63
- Location
- Bamberg (Germany)
Rick, which anti-rust primer will you use here? Take care.Keeping my word to those that are following this thread I was out getting ready for another project and snapped a few pictures of the body parts. Technically speaking all the body work/dent removal and repair has been completed. I must get to Harbor Freight and pick up a few spray guns. I have the primer and will try and get the parts all set up for primer. I must still sand and prep the inside of the left fender , doors, and hood. That may take a bit of time but it must be done. Not slacking off on any tasks. View attachment 841870 That is the repaired driver side fender. Both doors are completed on the exterior. I still have to scuff the inside of the doors. View attachment 841871 A little advise is if you are going to spend the time and money to repaint any vehicle it is only done correctly if all the glass and weather strips are removed. This pinch weld area is always a n area that is wet and rusty. This truck had a minor rust starting at the joints were the A pillar meets the roof line top and bottom. I used the cup brush and cleaned it all out. I followed up with an acetone wash and used the 3M rolok 2" scuff pad and went around and cleaned it till it was smooth and even. View attachment 841872 View attachment 841873 I removed the windshield wiper transmission and the hood hinges to do a factory finish and also at the same time find any trouble spots that will be a nest for rust. View attachment 841874 The right fender I had prepped a few years back for a customers truck. View attachment 841875 He wrecked the truck before I could do the work. I just kept the fender in stock. It is already painted in 383 CARC on the inside. View attachment 841876 That is also the original GM hood with the factory hood. I will post more progress as it happens. Thank you for the support. I hope it is helpful to get you motivated to do some work on your vehicle projects. Be Safe.
cucvrus
Well-known member
- 11,478
- 10,505
- 113
- Location
- Jonestown Pennsylvania
 Cool picture of a leaf spring repair. If Women don't find you Handsome they should at least find you Handy. Don't laugh it worked. Temporary repairs are just that temporary. If it gets you back home and off the side of the road it is a great idea. Just Be Safe.
- 8,229
- 20,782
- 113
- Location
- Charlotte NC
.View attachment 841890Cool picture of a leaf spring repair. If Women don't find you Handsome they should at least find you Handy. Don't laugh it worked. Temporary repairs are just that temporary. If it gets you back home and off the side of the road it is a great idea. Just Be Safe.
That's a heck of neat idea!
The pair of crow bars with the hook is just perfect fit for a temporary repair.
Having two spreads the weight and keeps it from rolling out of place supporting both sides of the spring.
Dang-it-all... Now I have one more thing to throw in the truck - just in case.
cucvrus
Well-known member
- 11,478
- 10,505
- 113
- Location
- Jonestown Pennsylvania
I always use PPG paint products. I never gave a lot of thought about anti rust. I never really believed in anti rust. Steel rusts from every angle. I am only working on 1 surface of a multi surfaced steel part. I do my best. But here is what I have as an option.Rick, which anti-rust primer will you use here? Take care.
Shop-Line System Selection Guide
Etch Primer
JP310 Chrome Free Etch Primer
I have used acid wash and epoxy sealer in the past. That toxic stuff is hard to get and I also use sealer on every paint job. I do my best and like I always say I am an hobbyist that learns as I go. I have been doing it for many years and the trucks I get to work on lately with the exception of the current builds are not always in the best of condition. I am trying to make the best job I can with what I have to work with. I depend on friends and experience to achieve the best end result I can offer. Far from perfect. But I done what I could to renew and preserve the vehicle I am working on. I am still going to continue to prime and sand the parts I currently have ready. I need to get the edge painted done and get the parts assembled back onto the main body. I have fresh body parts everywhere at the moment. last time I had to do rework on finished parts. Take Care and Be Safe.
Sezzo
Well-known member
- 152
- 308
- 63
- Location
- Bamberg (Germany)
JP310 Chrome Free Etch Primer and JP33X 2K Urethane Sealer could be a solid combination. Primer surfacer is an option but should not be necessary. If you want to reach 100% maybe think about the surfacer. Just thinking and discussing from my experience. If I would do another new paint job I would use primer, surfacer and sealer before topcoat. And before that I would always make sure that there won't be any unwanted chemical reactions between these coats and the 1K topcoat. Your master-piece, your decision. Take care.I always use PPG paint products. I never gave a lot of thought about anti rust. I never really believed in anti rust. Steel rusts from every angle. I am only working on 1 surface of a multi surfaced steel part. I do my best. But here is what I have as an option.
I was thinkingShop-Line System Selection Guide
us.ppgrefinish.com
Etch Primer
JP310 Chrome Free Etch Primer
I have used acid wash and epoxy sealer in the past. That toxic stuff is hard to get and I also use sealer on every paint job. I do my best and like I always say I am an hobbyist that learns as I go. I have been doing it for many years and the trucks I get to work on lately with the exception of the current builds are not always in the best of condition. I am trying to make the best job I can with what I have to work with. I depend on friends and experience to achieve the best end result I can offer. Far from perfect. But I done what I could to renew and preserve the vehicle I am working on. I am still going to continue to prime and sand the parts I currently have ready. I need to get the edge painted done and get the parts assembled back onto the main body. I have fresh body parts everywhere at the moment. last time I had to do rework on finished parts. Take Care and Be Safe.
cucvrus
Well-known member
- 11,478
- 10,505
- 113
- Location
- Jonestown Pennsylvania
How Much Rust Does My Car Have?
There is only one way to find out . Using the process called automotive chemical stripping and E-coating we strip your vehicle down to bare metal and take a look.
The classic car buyer is often told, “This car has no rust.” Realistically, however, almost no 20, 30 or 50 year old cars are rust-free. The more practical questions would be how much rust exists, where is it, and what can be done about it.
Since most rust is hidden under body filler and paint, our method of choice for rust removal is chemical stripping. E-Coating, an electrically applied sealer, is then used to seal the bare panels to prevent rust from recurring. This process gives our clients the peace of mind to know their classic car restoration will stand the test of time.
The fight is real. Rust never sleeps and will come out and show it's ugly face no matter how hard you try to get it all and stop it. Say what you will. It is there and it is hungry. CUCV's are prime rib to rust. Do my best to keep it at bay. There should be a drug to prevent it. Take Care. I am always learning.
- 114,318members
- 167,211threads
- 2,353,936posts
- 3,239online users