I can definitely relate to that.Your wiring pleases my somewhat compulsive desire for things to line up neatly.
-
Steel Soldiers now has a few new forums, read more about it at: New Munitions Forums!
M37 Restoration Project - Revived
- Thread starter ab705
- Start date

More options
Who Replied?I'm still working on getting my electroplating setup put together and waiting for a couple of supply items. In the meantime, I'll keep working on various parts of the M37.
My M37 was never equipped with backup lights, and I don't think I'd ever have occasion to use the small "blackout marker light" at the right rear of the vehicle, so I decided to keep the marker light, but convert it to a backup light. Re-purposing the old blackout marker light would maintain the original outward appearance of the vehicle and make it easier and safer to back up at night. I already had an old beat-up marker light, but I found a marker light in excellent condition on eBay for a decent price.
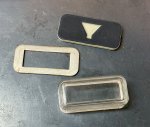
First, I removed the blackout marker lens parts from the light:
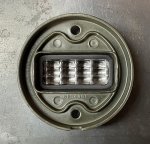
Then I cut out a piece of a backup light lens from another vehicle and installed it in the blackout marker light 'door' in place of the above pieces.
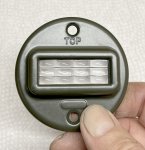
I cleaned and painted the body of the light Marine Corps green outside and white inside to reflect more light.
I installed a bright white 24V LED lamp, sized so that the end of the lamp is at the approximate center of the new lens.
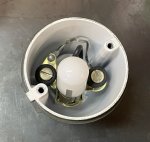
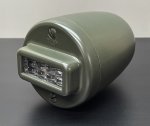
Here's the finished backup light, ready to install (although that may not happen for a while yet). Note: There is a piece of 1/16" flat, clear polycarbonate in front of the lens, but it isn't apparent in the photo below. I installed the flat piece to make it easier to seal the lens and to keep the front of the lens clean.
Since the M37 never had a backup light, I'll have to make a minor wiring modification. I suppose I could probably design some kind of gearshift-related linkage for a backup light switch, but I might just end up installing a manually operated switch on the dashboard, in which case the switch would have a pilot light to remind me to turn off the backup light after backing up.
My M37 was never equipped with backup lights, and I don't think I'd ever have occasion to use the small "blackout marker light" at the right rear of the vehicle, so I decided to keep the marker light, but convert it to a backup light. Re-purposing the old blackout marker light would maintain the original outward appearance of the vehicle and make it easier and safer to back up at night. I already had an old beat-up marker light, but I found a marker light in excellent condition on eBay for a decent price.
First, I removed the blackout marker lens parts from the light:

Then I cut out a piece of a backup light lens from another vehicle and installed it in the blackout marker light 'door' in place of the above pieces.


I cleaned and painted the body of the light Marine Corps green outside and white inside to reflect more light.
I installed a bright white 24V LED lamp, sized so that the end of the lamp is at the approximate center of the new lens.

Here's the finished backup light, ready to install (although that may not happen for a while yet). Note: There is a piece of 1/16" flat, clear polycarbonate in front of the lens, but it isn't apparent in the photo below. I installed the flat piece to make it easier to seal the lens and to keep the front of the lens clean.

Since the M37 never had a backup light, I'll have to make a minor wiring modification. I suppose I could probably design some kind of gearshift-related linkage for a backup light switch, but I might just end up installing a manually operated switch on the dashboard, in which case the switch would have a pilot light to remind me to turn off the backup light after backing up.
- 4,411
- 3,928
- 113
- Location
- Near Austin, Texas
That is spiffy!
Now I know what I am going to put on the empty bracket for the blackout light on the M715 I'm rebuilding. “Imitation is the sincerest form of flattery”.
I was just wondering if I should leave the bracket empty, which doesn't look aesthetically pleasing, or put something there, and if so, what. The truck has the larger style rear lights with all the b/o lights built in, so a redundant b/o light wasn't the best answer.
Cheers
Glad I could give you an idea or two.Now I know what I am going to put on the empty bracket for the blackout light on the M715 I'm rebuilding. “Imitation is the sincerest form of flattery”.
I finally got my electroplating setup working. I'm planning to zinc plate many of the original M37 fasteners, as well as a number of other parts.
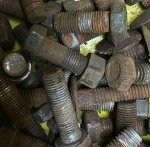
Here's a typical batch of rusted bolts. My preferred method of de-rusting fasteners is glass bead blasting, as it's gentler than many other blasting abrasives, but still effective, and it leaves a finish that I like. If glass bead blasting cleans up the fastener nicely and there isn't any deep rust or other damage, I'll generally re-use the fastener, but if it's a torque-to-yield fastener, or if the technical manual says to replace it, I will always replace it with a new fastener of the correct type.
For plating, I used the "Copy Cad and Zinc Plating" chemicals and "Yellow Chromate Solution" from Caswell Plating and followed the process and safety instructions in the Caswell Plating Manual.
From other reading/research, I also decided to bake the parts immediately after plating to help prevent hydrogen embrittlement, which I have heard is especially important for harder steel parts.
Here are a few photos.
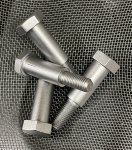
Some headlight mounting bolts right after glass bead blasting.
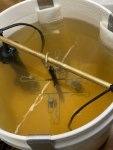
The same bolts in the plating solution:
Baking the bolts right after plating:
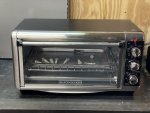
The same bolts hanging up to dry after the chromate conversion coating step:
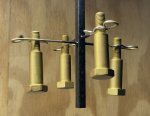
Note: I could have added a 'brightener' from Caswell to the plating solution if I wanted a shinier surface, but I prefer this surface treatment, since my theory is that paint will adhere better to this semi-matte surface than a shiny surface, and since it's a military vehicle restoration, most of the fasteners and other parts will end up being painted.
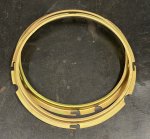
Here are some headlight retaining rings that needed some attention:
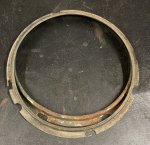
One of the headlight retaining rings after some straightening and bead blasting:
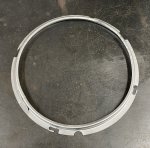
A couple of the headlight retaining rings after zinc plating and a chromate conversion treatment:
WARNING: Be sure to follow all appropriate safety instructions when working with plating chemicals and processes.
Here's a typical batch of rusted bolts. My preferred method of de-rusting fasteners is glass bead blasting, as it's gentler than many other blasting abrasives, but still effective, and it leaves a finish that I like. If glass bead blasting cleans up the fastener nicely and there isn't any deep rust or other damage, I'll generally re-use the fastener, but if it's a torque-to-yield fastener, or if the technical manual says to replace it, I will always replace it with a new fastener of the correct type.

For plating, I used the "Copy Cad and Zinc Plating" chemicals and "Yellow Chromate Solution" from Caswell Plating and followed the process and safety instructions in the Caswell Plating Manual.
From other reading/research, I also decided to bake the parts immediately after plating to help prevent hydrogen embrittlement, which I have heard is especially important for harder steel parts.
Here are a few photos.
Some headlight mounting bolts right after glass bead blasting.

The same bolts in the plating solution:

Baking the bolts right after plating:

The same bolts hanging up to dry after the chromate conversion coating step:

Note: I could have added a 'brightener' from Caswell to the plating solution if I wanted a shinier surface, but I prefer this surface treatment, since my theory is that paint will adhere better to this semi-matte surface than a shiny surface, and since it's a military vehicle restoration, most of the fasteners and other parts will end up being painted.
Here are some headlight retaining rings that needed some attention:

One of the headlight retaining rings after some straightening and bead blasting:

A couple of the headlight retaining rings after zinc plating and a chromate conversion treatment:

WARNING: Be sure to follow all appropriate safety instructions when working with plating chemicals and processes.
Last edited:
- 4,411
- 3,928
- 113
- Location
- Near Austin, Texas
This is true restoration!
Cheers
Cheers
I did some more electroplating of M37 fasteners and other parts yesterday.
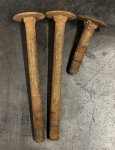
Here are a couple of "before" photos of some rusty 'stair' or 'step' bolts. The threads actually aren't bad; they're just clogged with rust and gunk.
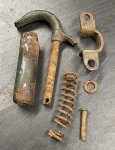
Below is a rusty hood latch that I disassembled. The spring is shot, and I'll have to replace a rivet and roll pin, but I think I can fix it.
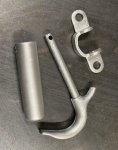
Here are the hood latch parts after glass bead blasting. They cleaned up pretty well.
And below is a portion of a batch of parts that I plated, baked, and passivation treated yesterday, including the hood latch parts (at the lower left). As an experiment, I left these parts in the passivation bath a little longer to form a darker passivated surface. You can compare the color to the two nuts in the photo that have the typical light yellow passivation coating.
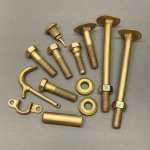
Here are a couple of "before" photos of some rusty 'stair' or 'step' bolts. The threads actually aren't bad; they're just clogged with rust and gunk.

Below is a rusty hood latch that I disassembled. The spring is shot, and I'll have to replace a rivet and roll pin, but I think I can fix it.

Here are the hood latch parts after glass bead blasting. They cleaned up pretty well.

And below is a portion of a batch of parts that I plated, baked, and passivation treated yesterday, including the hood latch parts (at the lower left). As an experiment, I left these parts in the passivation bath a little longer to form a darker passivated surface. You can compare the color to the two nuts in the photo that have the typical light yellow passivation coating.

John Mc
Well-known member
- 251
- 365
- 63
- Location
- Monkton, VT
What temperature are you baking at to reduce hydrogen embrittlement? My experience is limited: several decades in the steel spring wire manufacturing business. We did a lot of heat treament (quench and temper to increase hardness/tensile strength), but we did no plating. Many of our spring-maker customers plated, so I picked up a little bit over the years. Hydrogen embrittlement is a major concern for plated springs, since it can greatly reduce cycle life. My impression was that the the baking they did to reduce hyrdogen embrittlement was at around +/-400˚F. However, I know they were also concerned about altering the properties of the zinc coating: the baking temperature is well below the melting point, but exposing zinc plating to elevated temperatures even below the melting point can reduce it's corrosion resistance. (I can't recall the temperature where that became a concern. Also can't remember if that concern about reduction of corrosion resistant was also time-related or not: was it ANY exposure over some certain temperature, or just prolonged exposure.) Those spring makers would stress relieve some spring designs after forming. This was at a significantly higher temperature, but they only did this on unplated springs.
It's hard to tell from the picture of your oven, since the picture of the temperature knob is not all that clear. I can't tell if there is an indicator pointing to 300˚, or a small notch pointing to 400˚.
It's hard to tell from the picture of your oven, since the picture of the temperature knob is not all that clear. I can't tell if there is an indicator pointing to 300˚, or a small notch pointing to 400˚.
I found a book on electroplating that said high-carbon or high-tensile fasteners should be baked at 200C -220C (428F) for four hours following the plating step. Another source recommended baking for at least four hours at between 375F and 450F.What temperature are you baking at to reduce hydrogen embrittlement? My experience is limited: several decades in the steel spring wire manufacturing business. We did a lot of heat treament (quench and temper to increase hardness/tensile strength), but we did no plating. Many of our spring-maker customers plated, so I picked up a little bit over the years. Hydrogen embrittlement is a major concern for plated springs, since it can greatly reduce cycle life. My impression was that the the baking they did to reduce hyrdogen embrittlement was at around +/-400˚F. However, I know they were also concerned about altering the properties of the zinc coating: the baking temperature is well below the melting point, but exposing zinc plating to elevated temperatures even below the melting point can reduce it's corrosion resistance. (I can't recall the temperature where that became a concern. Also can't remember if that concern about reduction of corrosion resistant was also time-related or not: was it ANY exposure over some certain temperature, or just prolonged exposure.) Those spring makers would stress relieve some spring designs after forming. This was at a significantly higher temperature, but they only did this on unplated springs.
It's hard to tell from the picture of your oven, since the picture of the temperature knob is not all that clear. I can't tell if there is an indicator pointing to 300˚, or a small notch pointing to 400˚.
I bake them at about 425F for four hours immediately after plating. If I'm not sure about the hardness of a fastener, I bake it anyway, just in case.
Note that if I'm dealing with some critical fastener, such as used in components related to steering, brakes, suspension, etc., my personal choice would be to replace the fastener with a new one equal to or better than the original part instead of plating the old fastener. And of course, I will replace any fastener that the technical manuals say should be replaced instead of re-used.
Disclaimer: I am a beginner and amateur at electroplating, and I do not warrant the safety, functionality, or applicability of any information displayed or described in this forum thread.
Last edited:
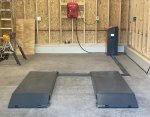
After a brief hiatus, I've started moving on my M37 project again. I brought the chassis home from the storage unit the other day, and sometime this coming week, I plan to move it into our new second garage. I just installed a full-rise scissor-type car lift, and I'm planning to take advantage of the new lift to get most of the undercarriage work (wiring, brake lines, fuel lines) finished before winter, at which time I plan to move it to the second bay in the old garage (my shop) to work on things that are at a more convenient height. At my age, I don't like having to bend over a hundred times a day or work for extended periods while lying on my back.

My new lift:
More posts coming soon.

My new lift:

More posts coming soon.
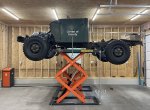
I put the M37 up on my new scissor lift for the first time a few days ago. The lift works great. I weighted the rear end of the chassis to shift the center of gravity so that the CG would be over the center pivots of the lift. I placed two 3" x 5" x 1/4" rectangular tube beams across the tops of the platforms, figuring that they would distribute the load more evenly while giving me a little more working space over the platforms. There are four rubber lifting blocks that contact the frame. I can raise the chassis several inches higher than necessary to stand up under it. It seems to be rock solid, and it doesn't sway at all when I try to shake it. The safety locks work well, and of course I make sure the locks are fully engaged before walking under the lift.
My cunning plan is to try to install the new brake lines, fuel lines, and wiring before winter, after which I would move the chassis to our old garage (my shop), which doesn't have a lift, but I think that most of the other work could be done at a more convenient height, so theoretically no lift should be needed. That would allow me to park my daily driver truck in the new garage over the winter. At least the plan sounds good on paper, although paper-based plans are usually based on a perfect world. We'll see how it goes...
I'm in the process of installing a standby backup generator for our home, which takes priority over the M37 for the next week or so. But things seem to be moving in the right direction.
Last edited:
- 114,300members
- 167,185threads
- 2,353,723posts
- 3,767online users

