• Steel Soldiers now has a few new forums, read more about it at: New Munitions Forums!

  • Microsoft MSN, Live, Hotmail, Outlook email users may not be receiving emails. We are working to resolve this issue. Please add support@steelsoldiers.com to your trusted contacts.


M925A2 Delco Style Alternator

Andyrv6av8r

Well-known member
Steel Soldiers Supporter
1,198
452
83
Location
Spartanburg,SC
all

I have just burned up my second military 60 amp alternator.
I am ordering my new 21si tomorrow , so just for my clarification of the above posts, the 2 small wires don't need to be hooked up? only the pos and neg need hooked up.
if I am incorrect here, any and all input would be greatly appreciated.

V/r
That is correct. I installed one as above and it works fine.20150709_133723.jpg20150709_133731.jpg20150709_134144.jpg
 
Last edited:

CPDOG

Member
74
24
8
Location
SEABECK WASHINGTON
thank you for the reply.

I will post some pics when I am completed.

I found another posting that gave a good part # for another alternator mount that will accept the 21si. i am going to give it a try too. I called my local Cummins dealer and gave them the number and they had to order it from the Cummins plant. if it works I will post pics of it too.


V/r
 

manders

Member
92
0
6
Location
Spokane Valley, WA
As I mentioned above ... I did a lousy job of sharing with this community how I did it, so please excuse the length of this reply and I'll give you my steps.

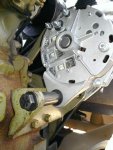
1. Remove the adjustment bracket and the mounting bracket when removing the bad alternator.
2. Take the new alternator and the mounting bracket to Tacoma Screw and find a single long bolt.
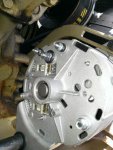
3. Take the alternator, mounting bracket, and new bolt to Home Depot and get a "spacer" pipe of the correct diameter cut to darn near the exact dimension of length. (Darn near ... highly technical term. :p )
4. Pick up a couple neoprene washers while I'm at HD to fit between the spacer on the bolt. (I had an irrational premonition of an annoying high-frequency rattle ... though why I thought I'd be able to hear it is beyond me!!!)
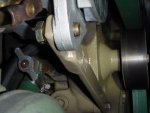
5. Take the adjusting bracket and bolt supplied with the alternator to a local machine shop to mill out the bracket. I emphasized - and paid for! - the importance of this being "true", since I could also imagine doing it myself and screwin' the pooch!!! Better to let the professionals do it ... ;-}

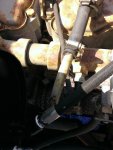
Once back at HQ, the biggest issue I ran into was the need to remove a small coolant overflow pipe just so that I could get a decent angle on wrenching. Besides that, the install was painless.

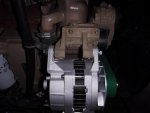
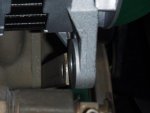
I've had no issues with mine .. 'cept for my choice of belts.

FinalInstallTop.jpg

From what I've read, when using twin belts like these, it's important that they are "matched". I didn't know that when I purchased these, and as they began to stretch into their 'normal' shape, the front one rolled.

I mentioned the "matched" concept to my guy at Napa (an old timer who I have a lot of confidence in), and he'd never heard that phraseology nor could he find anything in ***his*** computer. When I explained the conundrum, his advice was to try and get the same batch number when you select the belts, with the presumption that if they're created from the same material on the same machines and hopefully at the same time ... the tolerances would be very similar.

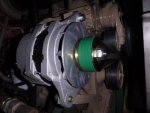
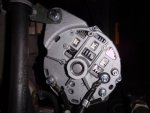
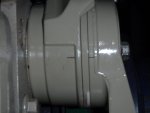
Here's a bunch of pictures. Feel free to contact me if you have any questions.

Good luck ...

MAnders


FinalInstallTop.jpgPositionOnAdjustmentBracket.jpgOverflowPipeBracket.jpgOverflowPipe02.jpgNapaBelts.jpgMilledBrackets02.jpgMilledBrackets01.jpgLargeBoltAndSpacer.jpgFinalConnections.jpgSpacerAndNeopreneWasher02.jpg
 

Attachments

CPDOG

Member
74
24
8
Location
SEABECK WASHINGTON
manders

thank you again for the reply!
I think it looks great by the way!

I cant wait to do mine, burning up my second alt after just 1000 miles was the icing on the cake to do this mod too!

V/r
 

74M35A2

Well-known member
4,145
311
83
Location
Livonia, MI
The original alternator has a reputation for self destruction if under full load most of the time, such as trying to charge a bad battery. Point here is to check your batteries. If you burned 2, then this may be your case.

The Delco clone alternators seem to be working well for people here, which is great. I posted Cummins alternator bracket part number which should directly fit the Delco (clone) alternator, as that mount is referred to as a J-180 "short". The original is a J-180 "long". Difference is spacing of the lower alternator mount brackets. If I remember the bracket was about $90. This is for the Cummins 8.3L engine on M939A2 series vehicles.

You can do the long bolt and spacer method, but be warned this is not really supporting the alternator correctly. Especially if there is no spacer in between the ears on that lower bolt. As it is tightened, it is going to squeeze the front and rear ears together, and one could snap off, or break later with vibration.
 

CPDOG

Member
74
24
8
Location
SEABECK WASHINGTON
74m35a2

thank you also for the reply and the recommendations , I already checked batteries they are good along with other basic simple check first items.

Was it your posting about the part # ?. I referenced you in the above discussion, I had written the # down but not your name, but that input was great. I have since contacted Cummins here at home and they are ordering it today.

I will post pics of it when completed along with pics of my first "catastrophic" self destruction alternator where it seized so bad in the bearing areas that the key inside the pulley broke in half, the pulley was held on only by the nut and the belt flew off and I literally broke down in the freightliner shop parking lot. more to follow, I have bragging rights for this little event....


V/r
 

CPDOG

Member
74
24
8
Location
SEABECK WASHINGTON
All

ok I called spidermarine and I gave them the above pulley data and they still cant find it.
does anyone have the latest part # for the 8 groove serp pulley for the 21si that you can provide for me?


thanks to all
 

74M35A2

Well-known member
4,145
311
83
Location
Livonia, MI
Yes that was p/n info I supplied for the bracket, but recognition not important.

Per info from OP:

http://lmgtfy.com/?q=WAI+208-12003

#1 results leads to:

https://www.ombwarehouse.com/Pulley-8-Groove.html

Measure the shaft diameter of your existing alternator. Even though it uses a keyway and the Delco (clone) does not, it may be able to be used based on shaft diameter and pulley hub depth? I have never tried or done so. I have a garage full of factory brand new, modern, high efficiency, twin internal fan, 100A 24V alternators (J-180 short mount including 8 rib pulley), but I'm lazy and because mine still works, just simply have not changed it out yet.
 
Last edited:

CPDOG

Member
74
24
8
Location
SEABECK WASHINGTON
74m35a2

thanks again for the reply!

I got to the bottom of it, when I called them twice this morning they asked me to call back because they couldn't find the pulley data. so about and hour later I get a call from them and it was the actual service guy and he promptly said we got the pulley and that the people I was speaking to was there answering service (who answer after hours and during the day when all lines are busy) and they assist with basic orders and so on.

so, the #'s are good and my unit is on the way!

thanks again, and when I get it all completed I will post follow on pics.
 

CPDOG

Member
74
24
8
Location
SEABECK WASHINGTON
guys

I did my install and it is awesome....but I still have the problem that prompted me to do this install.

when the engine is running at idle the voltmeter on the dash is in the high yellow range and when I increase the idle it can go all the way into the red and then the meter starts to operate erratically.
I disconnected the batteries and the erratic part stops and it becomes steady but it continues to go from yellow at idle and then into the red at about 1500rpms.
at idle at the battery cable I get 25volts and when I increased the speed it went to 35 volts and could go higher but I stopped to prevent any possible damage. these same readings are reflected at the alternator as well.
when I initially took it for a test drive the abs light came on during the low voltage portion of the cycling event, but only during this part.
I am continuing verifying/cleaning all the ground points. I even took the batteries into napa for load testing and they were averaging 800 cranking amp each and were fully charged too.
all the up front indications point to the voltage regulator, maybe my new 21si got damaged in transit? I am going to take it to napa for a testing tomorrow.

so with this info does anyone have any ideas as to what may be occurring? I look fwd to the replies

V/r
 

74M35A2

Well-known member
4,145
311
83
Location
Livonia, MI
The voltage regulator inside the alternator is "stuck" on full effort. Either the voltage regulator is bad, or if the alternator has a remote voltage sensing lead, this lead is not reporting battery voltage correctly and the alternator is trying to boost system voltage until target charging system voltage is met (28V or so). How many wires do you have connected to the alternator, and from whoever you bought it from, how many are required to operate it? I work for an OE alternator manufacturer, and our remote sense type alternators can be used with or without remote sense, but regardless they have fail-safe setpoints as to where a specified voltage is not exceeded regardless if remote sense is connected or not. I can not say the same of other alternator mfgs, including Delco amd Chinese Delco clones. Also try a temporary ground wire from the battery or engine block to the alternator frame itself, and make sure the alternator does not have a separate ground lug connection post.

Your low system voltage even at idle tells me you have an excessive electrical load on your system, or your batteries are severly discharged. An alternator at full field should be able to hold system voltage above 25.6V even at idle if the batteries are reasonably charged (enough to start the truck un-boosted lets say).

The voltage regularor circuit controls the current through the brushes and into the rotating rotor. It typically does this by switching on and off the ground point of this circuit. It is possible this circuit is grounded as a short within the alternator, especially if it is a $100 Chinese Delco clone. Some work, some don't, but the majority of issues with China made stuff lately is assembly issues. Engines coming with 2 head gaskets stacked atop another, another engine with no head gasket, etc. Material quality is improving, but build quality is lacking, as this stuff is commonly assembled by 13 year old Chinese girls supporting 3 families on her pay.

Connect the minimum number of wires to run the alternator, maybe just the B+, and report back what you have. The batteries are likely not the issue.
 
Last edited:

CPDOG

Member
74
24
8
Location
SEABECK WASHINGTON
74m35a

thanks again for the replies!

I got the 21si alternator from spidermarine. it is 2 wire and I have 2 hooked to it.... a ground and one directly from the battery hot the other 2 are for indications only per them.
as soon as I get home from work I will do your recommended actions and reply back.
the low voltage drain you referred too, could that be a big grounding issue too?

lastly, just for your fyi. I got the new alt bracket from Cummins and it worked fine and looks all original. I will post the pics on my next response.

V/r
 

74M35A2

Well-known member
4,145
311
83
Location
Livonia, MI
The bracket should look original, as it is a Cummins OE part. Did you have to change bolts or belt or did they both carry directly over? I have mine, but have not installed it yet, hence the questions.

Flunky grounds will not create an electrical load. They mostly just contribute to mis-behaving circuits.

Describe the ground you have connected to the alternator. I would think most Delco (and clones) don't use a separate ground, but I am not sure, as I don't use them. Unless this ground goes directly to the alternator case, there is at least a small chance that this is mis-wired. From my memory, grounding a specific point on an older automotive Delco alternator would force the regulator to full field as test. Others here with historical GM automotive experience (or Google) may be of more in the know on this point.
 

CPDOG

Member
74
24
8
Location
SEABECK WASHINGTON
74m35a2 and Manders

thank you both for the responses and support on this little venture!
my install went well except for this little electrical issue, I will get to the bottom of it. but for now I added some pics for you guys hopefully I can contribute back to others who do this. if I missed anything please just ask me, chances are I got a pic of it...

1) as for the upper bracket bolts I used grade 5's and about 3/4" longer as the originals only had about 3-5 threads engaging initially. and I added lock washers too. the original setup only had washers.

2) as for the belt I wanted to stay with original so I had to get a little creative and anal about the process. 1st I installed the old military alt and bolted it into place and reinstalled the belt then I match marked the belt tensioner to the original factory position so as to not install the new one with tensioner out of position (if not the tensioner is too far in one direction it will hard stop and would not operate as intended, so this process will allow the tensioner freedom of movement in both directions) see the pics with the tensioner and match marks. then I removed it all and installed the new upper bracket with the original 4 bolts from the old alt bracket and then installed the new alternator. the lower original bracket was utilized but it came flush with 21si dog ear so I just had to add/fab up and extension to weld on to it. but the trick here is to drill the hole on the extension and attach it to the alt and then clamp it to the original lower bracket while you attach the belt and simply bring the match marks together(this is the anal part ...clamp, re-clamp look at match marks and so on), tighten the c-clamp in its final position and remove it to weld it up. you then have a custom fit up and allows use of the original belt (see pics), then I repainted.

3) while I was in this deep I changed out the tensioner and water pump and bore-scoped the immediate areas in the water pump cavities for corrosion issues and changed the coolant.

4) the ground wire is attached to the body on the 21si. do you think I should attach another ground wire to the engine block or to the frame concerning my little electrical issue? me and the wife have broken out the manuals and are hitting the issue hard...

V/r
 

Attachments

Andyrv6av8r

Well-known member
Steel Soldiers Supporter
1,198
452
83
Location
Spartanburg,SC
74m35a2 and Manders

thank you both for the responses and support on this little venture!
my install went well except for this little electrical issue, I will get to the bottom of it. but for now I added some pics for you guys hopefully I can contribute back to others who do this. if I missed anything please just ask me, chances are I got a pic of it...

1) as for the upper bracket bolts I used grade 5's and about 3/4" longer as the originals only had about 3-5 threads engaging initially. and I added lock washers too. the original setup only had washers.

2) as for the belt I wanted to stay with original so I had to get a little creative and anal about the process. 1st I installed the old military alt and bolted it into place and reinstalled the belt then I match marked the belt tensioner to the original factory position so as to not install the new one with tensioner out of position (if not the tensioner is too far in one direction it will hard stop and would not operate as intended, so this process will allow the tensioner freedom of movement in both directions) see the pics with the tensioner and match marks. then I removed it all and installed the new upper bracket with the original 4 bolts from the old alt bracket and then installed the new alternator. the lower original bracket was utilized but it came flush with 21si dog ear so I just had to add/fab up and extension to weld on to it. but the trick here is to drill the hole on the extension and attach it to the alt and then clamp it to the original lower bracket while you attach the belt and simply bring the match marks together(this is the anal part ...clamp, re-clamp look at match marks and so on), tighten the c-clamp in its final position and remove it to weld it up. you then have a custom fit up and allows use of the original belt (see pics), then I repainted.

3) while I was in this deep I changed out the tensioner and water pump and bore-scoped the immediate areas in the water pump cavities for corrosion issues and changed the coolant.

4) the ground wire is attached to the body on the 21si. do you think I should attach another ground wire to the engine block or to the frame concerning my little electrical issue? me and the wife have broken out the manuals and are hitting the issue hard...

V/r
My charges just fine wired up exactly like yours.20150709_134144.jpg
 

74M35A2

Well-known member
4,145
311
83
Location
Livonia, MI
Yep. That is a Chinese Delco clone (does not say Delco Remy anywhere on it). The regulator is bad on the unit you got. The China production plant probably just tests if the unit makes power or not, and it goes out the door. Spider doesn't test them prior to shipment. You could have a local place test it, but they need a 24V tester. I have one here, but the info provided above confirms you have a bum unit, even though new. Exchange it, and you should be all set. Looks good otherwise.
 

CPDOG

Member
74
24
8
Location
SEABECK WASHINGTON
74m35a2

holy crap!
it even says on the papers with it that it was tested prior to shipping out and has "NEW DELCO" on the sales receipt too. but not on the unit.
thanks again for all the assistance . I will follow up with this when I get it resolved

V/r
 

74M35A2

Well-known member
4,145
311
83
Location
Livonia, MI
A genuine Delco unit has "Delco Remy" cast into the rear housing, but they are not available new for $100 like the clones are. Have them exchange it for another, and put emphasis that is overcharging at 35V so they don't just test that it makes power and deny your claim. Your next one should be OK, they seem to be working well for people here. Some have been running them for years with zero issue.
 
Top
AdBlock Detected

We get it, advertisements are annoying!

Sure, ad-blocking software does a great job at blocking ads, but it also blocks useful features of our website like our supporting vendors. Their ads help keep Steel Soldiers going. Please consider disabling your ad blockers for the site. Thanks!

I've Disabled AdBlock
No Thanks