• Steel Soldiers now has a few new forums, read more about it at: New Munitions Forums!

  • Microsoft MSN, Live, Hotmail, Outlook email users may not be receiving emails. We are working to resolve this issue. Please add support@steelsoldiers.com to your trusted contacts.

Making a light bar over the cab.....Making progress....almost ready to install

Goobs

Member
93
0
6
Location
Round Rock, TX
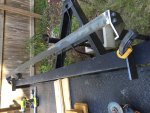
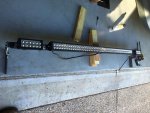
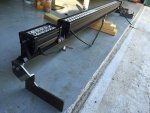
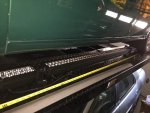
Been working on this light bar trying to figure out the best way to do it with my limited resources.

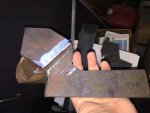
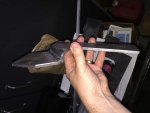
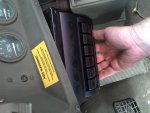
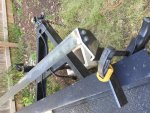
Making brackets to attach to the side of the window frame, then attach 2" x 1" angle across with the lights mounted to. That way I can hid the wiring as well.

I am using a 52" main with two 14" floods on each side. It will be wired so I can turn on just the center, just the outside floods or all. I also have two 7" on each side of the bed and two rear back up lights that I mounted and will wire up all at the same time.

Im happy with it so far.

Whatcha think???

Thanks

Goobs
 

Attachments

98G

Former SSG
Steel Soldiers Supporter
5,921
4,066
113
Location
AZ/KS/MO/OK/NM/NE, varies by the day...
My latest truck has the cab reinforcement and the uprights for the gunring. I'm thinking I'll put a pair of those trilliant floodlights on the rear pair of uprights in such a way that I can turn them around and use them for cargo lights, or have them facing forward as baseline.

I like your light bar idea as well. Be sure and post pics when complete and mounted.

As to posting pics, you're not doing anything wrong. This site just randomly flips them.
 

Andrmorr

Member
274
7
18
Location
Burlington, NC
Would it be possible to mount several lights on the back of the bar facing the rear so you could use them as cargo loading lights? (wasn't sure without seeing it in place)...looks great...
 

Goobs

Member
93
0
6
Location
Round Rock, TX
Got the light bar completed, painted, wired and installed. Now just need to run all the wires and install the stwtiches.

Goobs

lights01.jpglights02.jpglights03.jpglights04.jpglights06.jpglights05.jpglights10.jpglights09.jpglights08.jpglights07.jpg
 
Last edited:

sed6

New member
238
0
0
Location
OKC, OK
What fantastic work! Well done! What was your thinking on the length of the three lights? I know you can't buy an 8' bar, but why two short and one long as opposed to three equal length? Did you consider the cost maybe? Where did you get the lights? And would you consider fabbing just the bracket for sale?
Thanks!
 

Goobs

Member
93
0
6
Location
Round Rock, TX
This entire mount cost me $50.00 in materials and welding and the lights were $175.00 for all 3. Lights came from eBay.

I used a 52" in the center that has spot and flood and then I used 2 14" on the outside. Since the span is so great, there weren't any lights made that would work all in one (unless you are very crafty like a member here that modified two lights and made them into one - way above my skill set). I figured if I need daylight at night, I can turn all three on, If I only need some peripheral light, I can turn on the two outside and if I need some center light (hi-beam on steroids) I can turn on the center.

I also have 2 7" lights on each side of the bed and two backup lights to wire and hook into the switch box. Also putting in a backup camera and 7" color screen, stereo and speakers and a dedicated 12v power supply. Just need time time time.

Thanks

Goobs
 

sed6

New member
238
0
0
Location
OKC, OK
This entire mount cost me $50.00 in materials and welding and the lights were $175.00 for all 3. Lights came from eBay.

I used a 52" in the center that has spot and flood and then I used 2 14" on the outside. Since the span is so great, there weren't any lights made that would work all in one (unless you are very crafty like a member here that modified two lights and made them into one - way above my skill set). I figured if I need daylight at night, I can turn all three on, If I only need some peripheral light, I can turn on the two outside and if I need some center light (hi-beam on steroids) I can turn on the center.

I also have 2 7" lights on each side of the bed and two backup lights to wire and hook into the switch box. Also putting in a backup camera and 7" color screen, stereo and speakers and a dedicated 12v power supply. Just need time time time.

Thanks

Goobs
Awesome. We of course are going to need some nighttime pics as well! :) How'd you cut the metal out? Plasma cutter, CNC, angle grinder?
 
Last edited:

Truckoholic

New member
492
13
0
Location
Colorado Springs, CO
That is awesome! I LOVE your placement! I like the way it is not sticking up above the cab. Makes it look very sleek, and less susceptible to being knocked off by tree branches and things. I've been thinking about doing something very similar on my M925. Except that I am mounting 5 amber 24 volt LED clearance lights right over the windshield right there on mine since clearance lights just make it look more like a truck to me. ha ha But I intend to do something very similar to your light bar too. Actually, I just got an idea! I could do a light bar just like yours, but instead use two shorter bars in the middle and two longer ones on the outside, so the amber clearance lights would be between them in the right spots.

Something like this:

cablights.jpgcablights2.jpg
 

Goobs

Member
93
0
6
Location
Round Rock, TX
Thanks guys. Yes we used a plasma cutting table then ground the edges so they weren't sharp.

I wanted them to be the same height as the roof just for a sleek look. I want a hard top in the future and this should work with a hard top from what I have seen. I also wanted the windows to still open and not hit the wipers.

There was alt of cardboard sacrificed till we had everything just right.

As far as the clerence lights, one option you could do is put the clerence lights on the top part of the angle iron and put the led light bars on the front.
 

sed6

New member
238
0
0
Location
OKC, OK
Thanks guys. Yes we used a plasma cutting table then ground the edges so they weren't sharp.

I wanted them to be the same height as the roof just for a sleek look. I want a hard top in the future and this should work with a hard top from what I have seen. I also wanted the windows to still open and not hit the wipers.

There was alt of cardboard sacrificed till we had everything just right.

As far as the clerence lights, one option you could do is put the clerence lights on the top part of the angle iron and put the led light bars on the front.
Did you save your templates? Perhaps you could scan and PDF them and share them for anyone who wants to make a similar setup?
 

sed6

New member
238
0
0
Location
OKC, OK
Also, help us understand the reason for the 1" or so bump out (or zig-zag) on the brackets. It looks like the lights would fit without the bump out, no?
 

Goobs

Member
93
0
6
Location
Round Rock, TX
No, I don't have the templates, but I could probably make one.

The reason for the bumpouts was if I didn't do that, the mounting brackets for the outside lights would have been right on the endpiece and would have been difficult to mount with the bolts.

Again, my abilities are not that extensive, so I do things that are easiest in my twisted little mind. The angle iron ended up being 75 1/2" long and the spacing with the three lights I used worked out for that measurement. If you get two larger lights, it may work out different that you wouldn't need the bumpouts. Something I didn't think about when I did mine.

I guess it would all depend on the light set up and what you were using. It definitely would have been easier not having to do them.
 

sed6

New member
238
0
0
Location
OKC, OK
The bumpouts look fine, don't get me wrong. They add another dimension and add interest. The whole setup is bad a$$!
 
Top