• Steel Soldiers now has a few new forums, read more about it at: New Munitions Forums!

  • Microsoft MSN, Live, Hotmail, Outlook email users may not be receiving emails. We are working to resolve this issue. Please add support@steelsoldiers.com to your trusted contacts.


Meet Mr Rusty

cucvrus

Well-known member
11,263
9,554
113
Location
Jonestown Pennsylvania
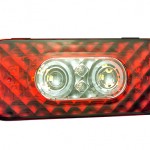
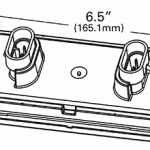
[h=2]54702[/h] [h=3]Integrated Hard Shell[/h]


[h=3]FEATURES & BENEFITS[/h]
  • Innovative patent-pending design combines all Stop/Tail/Turn and Back-up functions into one industry standard size lamp.
  • Symmetrical design meets legal requirements at any mounting angle.
  • LED technology provides less maintenance costs and long life.
  • Reduces inventory, SKUs, and carrying costs.
  • Industry-standard design fits existing mounting grommets, brackets, and flanges.
[h=3]TECHNICAL SPECIFICATIONS[/h]
  • Lens: Red High Impact Acrylic, Clear Polycarbonate
  • FMVSS: 108: I, S, T, R2
  • Voltage Amp: 12V
 

cucvrus

Well-known member
11,263
9,554
113
Location
Jonestown Pennsylvania
Oh NO I am unable to post pictures. My Wife has a new program on the computer and I have not figured it out. Everytime I get good at something it changes. Oh well. More pictures for later. I am working on the trailer/bed for Mr Rusty.
 

cucvrus

Well-known member
11,263
9,554
113
Location
Jonestown Pennsylvania
DSCF5702.jpgDSCF5703.jpgDSCF5704.jpgI have been working on the bed for Mr Rusty. I have this 101? trailer body to install and am using another M1008 cab chassis as a template to get the body mounts and the fuel fill fabricated and figured out. It looks a little crude at this point but I will work it out with the welder and a few extra parts that I have around. If you remember the walls were crushed inward as this trailer was scrapped and I bought it as scrap. I jacked and hammered the sides back out and clamped the 2 X 2 1/8" angle on the top rail. I was going to weld it but decided to bolt it so I did not have to weld the galvanized. I am going to weld the ends fast and the front angle to add strength to the front wall. The fuel fill?? Well lets just say i have a plan. It will take fuel well at this angle now i must make it look nice. Thanks for looking.
 

cucvrus

Well-known member
11,263
9,554
113
Location
Jonestown Pennsylvania
DSCF5705.jpgDSCF5706.jpgDSCF5707.jpgDSCF5708.jpgDSCF5709.jpgAfter doing some careful cutting and grinding and salvaging parts and ideas. This is what I came up for on the fuel fill. I also notched the cross members over the axle hump and cut some wood as a temporary height template. What do you think? This will be mounted to the original bed holes on the frame. I will do it so the bed can be removed with the 8 bed bolts. I will not have to drill thru the bed floor at all to do the mounting and the body will have a set of long sills under it for support. I am keeping the rear bumper and adding a Class 3 frame mounted hitch. This is NOT the chassis I am mounting it on. I am just using it for design/measurements and alignment. I did not want to risk scratching the newly painted cab chassis for Mr Rusty. Thank you for looking. I will be doing some caulking and some cutting to get the holes around the gas fill more pleasing to the eye.
 

Attachments

cucvrus

Well-known member
11,263
9,554
113
Location
Jonestown Pennsylvania
Yes the Grandson tends to be a bit hard on things. He wanted to rake the leaves out of the bed but ended up breaking the rake when he was using it to climb up in the bed. Oh well. They make more.
 

cucvrus

Well-known member
11,263
9,554
113
Location
Jonestown Pennsylvania
DSCF5721.jpgDSCF5717.jpgDSCF5718.jpgDSCF5713.jpgDSCF5714.jpgDSCF5715.jpgDSCF5716.jpgDSCF5719.jpgDSCF5720.jpgDSCF5722.jpgToday I worked on Mr Rusty from sun up till sun down. I made great progress. I added a lot of 1/2" grade 8 bolts today to the truck. It has lots of new steel. The upper channels are bolted onto the original bed bolt holes. I am going to gusset and weld the trailer body to the channel. And weld the bolts on top. That way with the bolts welded the bed could be removed if the need arises. I will be getting the bed ready for paint this week and with some luck and fair weather painting it next weekend. I know the rear bumper braces are very dirty. I will be painting them with some undercoating. They were very bent and needed some fine tuning with the sledge hammer.
 

cucvrus

Well-known member
11,263
9,554
113
Location
Jonestown Pennsylvania
DSCF5723.jpgDSCF5725.jpgDSCF5724.jpgI wired up all the lights and added a pair of license plate lamps. I also ran a pigtail out of the harness to use when I wire the clearance lamps for the truck bed when I install it. One strange thing the tail lamps are on real dim all the time. It is an LED thing I think. I solved the issue by putting the B/O in all off. Any one any ideas????
 

cucvrus

Well-known member
11,263
9,554
113
Location
Jonestown Pennsylvania
DSCF5730.jpgDSCF5731.jpgDSCF5732.jpgAfter 5 months of working on Mr Rusty and tearing it apart and putting it back together. The moment of truth came when I went to get the plow about 10 miles away. I hooked it up plugged it in and it worked. That was a big relief to me. my Son and I went for a ride in Mr Rusty.
 

cucvrus

Well-known member
11,263
9,554
113
Location
Jonestown Pennsylvania
DSCF5734.jpgThis a picture of the new 4 ply front springs with no weight.DSCF5735.jpgThis is with the full weight of the plow. Very little deflection. It used to rest on the axle stops. Now for a nice drive with the plow. DSCF5736.jpgDSCF5737.jpgIt drives nice and smooth. No more bouncing off the cushions and bump stops. Excellent upgrade.
 

cucvrus

Well-known member
11,263
9,554
113
Location
Jonestown Pennsylvania
DSCF5738.jpgDSCF5739.jpgBack home at the garage. Now I need to do an inspection of all the hoses and make sure the plow is ready for Mr Rusty. It used to be that Mr Rusty could not take anymore plowing. the tables have turned. DSCF5733.jpgThe plow has a broken anchor point for the lift chain. That can be real exciting at 60 mph and having the plow fall. Been there done that. Hit an expansion joint on I 81 south and the plow bounced and broke the chain . Very interesting.
 

cucvrus

Well-known member
11,263
9,554
113
Location
Jonestown Pennsylvania
That is a Fisher plow and it cost about $5K when it was new. that is why the owner of the truck did not flip when I gave him the estimate to fix Mr Rusty. You don't just buy good plow trucks for less then $10-$15K these days. And one that has dual alternators posi traction front and rear. It is the plow truck drivers dream to have electrical power like that. I have brand new plow truck that cost $40K and does the same job. A lot more comfortable to drive but none the less a bigger price and a sad day when you dent a fender or door. And that happens plowing real quick in industrial areas. Driveways / parking lots not so quick but in assembly areas everyday something gets bent. Thank you for the compliment. Now I must get the M101 bed welded up and painted. I can hardly wait to post them pictures. I have a few extras in the works for the cargo bed.
 

cucvrus

Well-known member
11,263
9,554
113
Location
Jonestown Pennsylvania
DSCF5745.jpgDSCF5746.jpgDSCF5747.jpgDSCF5748.jpgPainted Mr Rusty's bed today. To give credit where it is due. My Son painted the bed today. He sealed it yesterday and left it dry over night. This is the last week for any painting this year. Thank you for looking.
 

cucvrus

Well-known member
11,263
9,554
113
Location
Jonestown Pennsylvania
DSCF5749.jpgDSCF5750.jpgHard to see in the pictures but . We set the bed on the inverted 3" channel that was bolted to the frame. We used the existing stock mounting bolt holes on the top frame flange. After the channel was cut to length 4 pieces were drilled and bolted fast to the frame. The heads of the bolts and the 3/8" spacers were welded to the channel. The bed was centered and tack welded to the channel. We then removed the nuts from the bolts and removed the bed. Placed the bed upside down and welded and gusseted inside and out the 4 cross members that met the channel. Notice I cut the front bed flange off and welded and bolted a piece of 2" X 2" X 3/16" steel angle in reverse on the top of the front wall facing inward. Cut up a set of CUCV troop seats and welded the slat brackets to the upper rail. that was also capped with the 2 X 2 steel angle. The side rails were really shoved in from the scrapper getting his forks into it. But it is straight again and the damage is covered with the angle. Thanks for looking. Tomorrow is a busy production day. CUCV's and a HMMWV
 
Top
AdBlock Detected

We get it, advertisements are annoying!

Sure, ad-blocking software does a great job at blocking ads, but it also blocks useful features of our website like our supporting vendors. Their ads help keep Steel Soldiers going. Please consider disabling your ad blockers for the site. Thanks!

I've Disabled AdBlock
No Thanks