• Steel Soldiers now has a few new forums, read more about it at: New Munitions Forums!

  • Microsoft MSN, Live, Hotmail, Outlook email users may not be receiving emails. We are working to resolve this issue. Please add support@steelsoldiers.com to your trusted contacts.


My BIG M925A2 Project Truck Is Home

Oldvw2

Member
Steel Soldiers Supporter
169
2
18
Location
Wake Forest, NC USA
The good news is that the floor is mostly flat steel sheeting with very few bends or cuts. The cab superstructure is still solid so it should be fairly easy (with lots of Kroil) to pull the seats, battery box, shifter, brake lever, etc.... and then plasma cut out the bad metal and weld in some new. Probably 12-14 gauge mild steel?

That DCSO truck is like swiss cheese, but I think the battery box is actually pretty solid. I'll check it out Wednesday.
The box and wood battery supports look a lot better than what is in the cab now - the hold-downs and cables(at least the ones that weren't burnt off with a cutting torch) may be useful too.

Chad
 

steelsoldiers

Administrator
Staff member
Administrator
5,245
3,926
113
Location
Charleston, WV
Work Session!

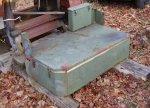
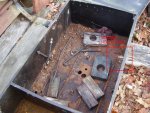
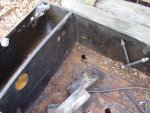
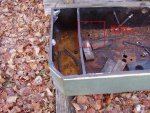
I took half a day to run to Winslow's and work on the 925A2 today. It was a perfect day with sunny weather to dry out all of the much from the weekend. I did a lot of little projects today. I started by pulling the batteries out of the 925 parts truck so I could inspect the battery box. The wood pieces that support the batteries were nice and solid, but the bottom of the box was totally rotted out. The salt water got the best of it over the last 6 years.

The batteries were actually showing a bit of a charge so I carried 2 of them over to my truck along with the good wood supports. The wood pieces in my truck had totally rotted and turned to dust. I cleaned out the junk and straightened out the cables. I put the good wood in the bottom and set 2 batteries in place. I hooked the battery cables up so that I would be ready to slave start it just in case I made a lot of progress today.

Next, I drained the tranny of it's murky Dexron III fluid. It didn't smell burnt or show any water intrusion so that's good. The bad part was that the drain plug was right over top of the x-member so I had to hold a funnel there the whole time it drained.

Once that was done I worked on some of the wiring. Some Nimrod had chopped off about 8 connectors in the dash including some for the battery switch and the run/start switch. I managed to sort a few out and got a connector soldered back on one of them. I really needed a second person to trace the wires back to identify them since the metal tags were gone.

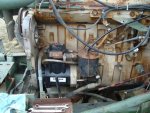
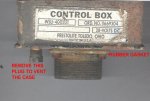
I quit that project and moved on to installing the fuel-burning heater. I got the control box hooked up, but not bolted to the dash. I need to make a little bracket for it. I got the heater unit clamped down to the bracket and the wiring hooked up, but couldn't do the fuel line since it was a different size than what came with my heater. Arggg. :evil:

Since I was stuck there, I decided to put the starter back in and hook up the wiring for it. That was pretty straight forward except I didn't have a 12-point 12mm socket with me to fully tighten the bolts down. :roll:

I am definitely making progress. I should have a freshly rebuilt radiator soon and I have all of my hoses, thermostat, etc... on order. That should take care of the cooling system.

No pics today, sorry. I know, bad steelsoldiers!! I promise I'll get some next time.
 

Oldvw2

Member
Steel Soldiers Supporter
169
2
18
Location
Wake Forest, NC USA
I started by pulling the batteries out of the 925 parts truck so I could inspect the battery box. The wood pieces that support the batteries were nice and solid, but the bottom of the box was totally rotted out. The salt water got the best of it over the last 6 years.
I sure would like to have seen the pics of how that DCSO truck was used. I remember some photos '03 of a 5 ton plowing through lots of standing water on Hwy. 12 :roll: Might explain a lot of things....

Once that was done I worked on some of the wiring. Some Nimrod had chopped off about 8 connectors in the dash including some for the battery switch and the run/start switch. I managed to sort a few out and got a connector soldered back on one of them. I really needed a second person to trace the wires back to identify them since the metal tags were gone.
Having flashbacks to your last 900 series truck yet? The battery switch and start switch were a bear last time since they had cut them so close to the main harness....
 

cranetruck

Moderator
Super Moderator
Steel Soldiers Supporter
10,350
74
48
Location
Meadows of Dan, Virginia
.........
On a crappy note, it looks like we'll be swapping out the battery box. I noticed that several of the loops that the j-bolts hook to were rusted off of the base. Doh! That probably means the cab floor is rusted under the box. I think that truck has had more than a few swims in salt water. Arghhh!!!
Chris, I salvaged the battery box from the parts M925 near here, my intent was to use it as a tool box for the xm757, but it's all steel and very heavy compared to the aluminum used so extensively on the 757...if you can use it, its yours for $50 plus shipping (pick-up?). It does have some rust, but is in good condition.
 

Attachments

Last edited:

steelsoldiers

Administrator
Staff member
Administrator
5,245
3,926
113
Location
Charleston, WV
I sure would like to have seen the pics of how that DCSO truck was used. I remember some photos '03 of a 5 ton plowing through lots of standing water on Hwy. 12 :roll: Might explain a lot of things....

Having flashbacks to your last 900 series truck yet? The battery switch and start switch were a bear last time since they had cut them so close to the main harness....
Thankfully, we only have to trace down 4 of the 7 wires this time. :-D I already soldered one in place. It was the fat one from the battery, 569 I believe. It won't be bad with one person to stick the multimeter probe in the PCB socket and another to check for continuity in the cab. You'll be happy to know that they cut 2 of the wires off very close to the harness :evil:
 

steelsoldiers

Administrator
Staff member
Administrator
5,245
3,926
113
Location
Charleston, WV
Chris, I salvaged the battery box from the parts M925 near here, my intent was to use it as a tool box for the xm757, but it's all steel and very heavy compared to the aluminum used so extensively on the 757...if you can use it, its yours for $50 plus shipping (pick-up?). It does have some rust, but is in good condition.

Thanks Bjorn, but I think it's in about the same shape as the one I have already. I think I can save mine by welding in some new loops to catch the j-bolts. It didn't look quite as bad yesterday since it wasn't filled with rain water and I cleaned all of the rotten wood and rust scale out of it. :grin:
 

steelsoldiers

Administrator
Staff member
Administrator
5,245
3,926
113
Location
Charleston, WV
My Dad and I drove down to Winslow's today and met my Chad for a work session. We knocked out a couple of seat swaps and a tach install on Bkubu's M109A3 and then promptly waded into the 925A2's dash gremlins.

Chad was a soldering machine! We traced down the last of the gauge and switch wiring. Chad soldered on used ends with the proper wire tags from a parts truck. That will make it easier to make repairs in the future. After all of the fun with the soldering torch, we installed the dash cluster along with the battery switch and the off-run-start switch.

We hooked up some old batteries and ran a slave cable from Winslow's 5.9L Cummins powered M35. Once we had 24v to the cab I flipped the battery switch and NOTHING!! Doh!! Must be a bad protective control box. The sealant had failed around the edge of the box and the whole inside was corroded. The circuit board was fried in a few spots as well. Arghhhh!! Good thing we saved one from the 925 parts truck. We got that swapped in, flipped the switch, and we had power to the dash cluster! Yes!!!

Then, we decided to get the fuel-burning heater fired up. It was a overcast, misty, and generally crappy day so it would be nice to have some cab heat. It took a while for the pump to get a prime, but it finally started pumping fuel. My Dad held a waste jug under the hose for a couple of minutes to make sure all of the nasty old fuel was out of the lines. The line from the pump to the heater started leaking in the process. Looks like the liner has failed. Once it started running clean, we hooked it up to the heater and put power to it. It took about 2 minutes for it to start making smoke, but then it took off roaring and making plenty of heat. Thanks Bjorn!! We pulled the hose off so I could bring it to the local NAPA and get a new one made. It sure was nice to have heat even with the engine still apart. That will be nice this winter for further work sessions and even when the truck is on the road.

I also got the air compressor buttoned up and the power steering pump reinstalled. Once that was back on, I wanted to test the starting circuit. Chad revved the deuce up while Dad watched for sparks. I turned the batter switch on and the other switch to the start position. It cranked right over no problem. Looks like it will start and run great once I have an injection pump on it.

Overall it was a very productive day. The truck looks much better with the dash back together. There is still work to be done with some more loose wires to be tracked down and all of the air lines need hooked back up.

Hopefully Chad will post up some pics after while. He was the official photographer for today. Thanks to Chad and Dad for the help!!
 

ATC

Member
152
0
16
Location
Roanoke, VA
Where is the truck located again? Probably too far away for me, but I would love to lend a helping hand and learn a little!

Looks like you have your work cut out for ya, although she's steadily coming along! Best of luck! I can't wait to see it finished...your last truck was amazing :-D
 

steelsoldiers

Administrator
Staff member
Administrator
5,245
3,926
113
Location
Charleston, WV
Nice to hear but you must feed the picture hounds.
:-D Will do Chuck. I promise I will do a big photo update the next time I am down there. In the meantime, Chad will provide a few new shots to satiate your photo needs!

ATC said:
Where is the truck located again? Probably too far away for me, but I would love to lend a helping hand and learn a little!
Thanks for the offer. The truck is at John Winslow's place and that is east of Halifax, NC down 561 highway. I'll shoot you a PM then next time I head down there and maybe you'll have some time to come shop in John's salvage yard and turn a wrench on the truck.
 

ARMYMAN30YearsPlus

In Memorial
In Memorial
3,585
7
0
Location
Parkville, MD
Chris Glad you are making headway on this truck I know from what you have done in the past it will come out shining and I hope to see it soon since I may be home by February this coming year since the Army is not wavering on letting me stay in. I am looking at finding a job in Georgia since the politial winds have changed and Maryland has always been anti gun and and will get worse. I am looking foward to the pictures as well.

God bless,k
 

steelsoldiers

Administrator
Staff member
Administrator
5,245
3,926
113
Location
Charleston, WV
Thanks David. I'll be glad to have your help because it will be crunch time for Aberdeen!!

Here are some updated pics courtesy of Chad. It looks much better with the gauge cluster in the cab!! I need to drill a hole in the cluster to mount the CTIS Over Speed light once I track one down. I have the seats to put in, but I am waiting on a new battery box and some rust repairs in the floor before those go in for good.

In the one pic you can see my Dad hard at work hooking up the fuel line for the heater while standing on the passenger tire. It's hard to reach anything on these trucks without a ladder ;) It was great having all of the Stansbury men together for a work session.
 

Attachments

ATC

Member
152
0
16
Location
Roanoke, VA
Thanks for the offer. The truck is at John Winslow's place and that is east of Halifax, NC down 561 highway. I'll shoot you a PM then next time I head down there and maybe you'll have some time to come shop in John's salvage yard and turn a wrench on the truck.

Hmmm...I will probably have to pass this time. A 5 hour drive is a little far for me. Not to mention, I don't completely trust my Toyota to get me an hour down the road...

Hopefully sometime in the near future though...I'd love to come to a meet & greet!
 

cranetruck

Moderator
Super Moderator
Steel Soldiers Supporter
10,350
74
48
Location
Meadows of Dan, Virginia
............
We hooked up some old batteries and ran a slave cable from Winslow's 5.9L Cummins powered M35. Once we had 24v to the cab I flipped the battery switch and NOTHING!! Doh!! Must be a bad protective control box. The sealant had failed around the edge of the box and the whole inside was corroded. The circuit board was fried in a few spots as well. Arghhhh!! Good thing we saved one from the 925 parts truck. We got that swapped in, flipped the switch, and we had power to the dash cluster! Yes!!!

Then, we decided to get the fuel-burning heater fired up......!
Good progress Chris!

About the control box, trying to "seal" it is a mistake, it has a rubber gasket for the connector and can never be sealed. You need to vent your new one, should be an 1/8 NPT plug on the bottom side somewhere. Open it and leave it open.

If you try to seal a printed circuit board, which generates some heat, within a box, there will be powerful forces at work, the difference in air pressure will pump molecules of water into the box past any rubber gasket or silicone, which will later condense and be trapped within. The only seal that works is a hermetic seal, preferable with an inert gas inside.
I have made thousands of electronic units enclosed in gasketed boxes (my old company for the trucking industry and ocean racing sailboats) and always vented them. Experiments showed that if I didn't, there may be as much as an inch of water sloshing inside within a couple of weeks.

To top it off, the control box I opened here, had lots of non-mil spec parts, so water will kill it fast.
Vent the box!
 

steelsoldiers

Administrator
Staff member
Administrator
5,245
3,926
113
Location
Charleston, WV
Thanks Bjorn. I saved the control box for you. I thought you might want to inspect it for failures as well. The connector was corroded on there pretty good. I had to use some Kroil and a pair of Channel Locks to get it off. The sealant around the edge of the bod just crumbled and rust poured out of it. The box we put on is an older unit from the 925 parts truck. It seems to have a more sturdy design. I will make sure it is vented. I'll get some comparison pics of the 2 boxes as well.
 

ARMYMAN30YearsPlus

In Memorial
In Memorial
3,585
7
0
Location
Parkville, MD
Wow it sure is coming along and the wait to hear the engine come to life is pretty unbearable for me so I can imagine how you feel. Have you located a fuel pump and front dog house yet? I am so surprized a truck of this quality got into such condition in the hands of any military unit. I know if any of my three commands had a truck with even an inch of rust on it we got it in the shop and took it to bare metal and brought it back to servicable. I had M915 tractors with over a million miles on them and they looked tired but were all running and painted. The condition of this truck makes me wonder who was in charge.

God bless you all and have a wonderful New Year, I will get to celebrate before any of you being in Korea and a day ahead.
 

ONTOS66

Member
433
3
18
Location
Franklin, NJ
WOW, what a project. I stand humbled before a project of this magnitude .. the skill, patience (and deep pockets) involved make my feeble fumblings with my cucv projects appear trivial. :wink:

Very interesting to watch the "masters" at work (and play)

:roll:
 

steelsoldiers

Administrator
Staff member
Administrator
5,245
3,926
113
Location
Charleston, WV
Bjorn, thanks for the pic. That looks like the one we just put on. I'll be sure to open the vent.

David, I think I have a line on all of the engine parts that I need. I should know soon. I have a feeling this truck was used as an equipment mover by the Seabees. They have that beefy hitch plate welded on the frame. It's low enough that you could tow a standard equipment trailer with it so they could have been moving a dozer around with it or something. I'd say all of the rust came from running it in and out of the surf. This truck was worked for sure. I think the reason it got sent to the CAN lot and then on to the DRMO was because of rust in the cab and bed.

Preston, it is definitely a big project, but I find this type of project very satisfying. I love to take a truck from the jaws of the crusher and put it back on the road. I am able to do it for a very reasonable price that way too. I cut my teeth on a 1009 CUCV project back in 1995. It just kinda snowballed from there!!
 

WillWagner

The Person You Were Warned About As A Child
Super Moderator
Steel Soldiers Supporter
8,387
2,396
113
Location
Monrovia, Ca.
I just wanna see/hear a vid of it running! Chris, I admire you for your dedication! That's ALOT of work.
 
Top
AdBlock Detected

We get it, advertisements are annoying!

Sure, ad-blocking software does a great job at blocking ads, but it also blocks useful features of our website like our supporting vendors. Their ads help keep Steel Soldiers going. Please consider disabling your ad blockers for the site. Thanks!

I've Disabled AdBlock
No Thanks