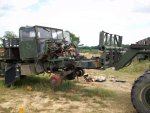
• Steel Soldiers now has a few new forums, read more about it at: New Munitions Forums!

  • Microsoft MSN, Live, Hotmail, Outlook email users may not be receiving emails. We are working to resolve this issue. Please add support@steelsoldiers.com to your trusted contacts.


My BIG M925A2 Project Truck Is Home

steelsoldiers

Administrator
Staff member
Administrator
5,249
3,956
113
Location
Charleston, WV
Well, as you can see, there haven't been any updates in quite a while. Getting our home renovations completed so that we could list our house for sale has consumed most if not all of my spare time.

I did manage to sneak off a few weekends ago to pick up my wheels/tires from John's so that I could get the "new" tires put on. I delivered them to my local tire place. They handle all sorts of farm equipment, etc so they are used to big stuff. They did a remount for my 923A2 and did a great job so I let them redo all 6 this time. Those were loaded onto my trailer along with the dead tires so that I could take the old ones to the landfill and the newly mounted ones to Winslow's.

Today, I planned to go to the tire recyclers and then to John's for a bit. I managed to get to the recycle center around 8 am. Unfortunately, they classified my tires as off-road tires and wanted to charge me $150/tire instead of $140/ton. One of the guys at the landfill told me of another place about an hour from my house that would take them.

I went home, cleaned up the house for the realtor, met with the realtor, got the house listed, and then headed for the new recycle center. I was about a mile from the dump when my left rear trailer tire blew off the rim. It had a slow leak in it because of a screw and finally decided to let go. Arrgggg! I changed the flat beside the road and made it to the recyclers in time to dump my tires. They only charged me $38 to dump them. The tire shop wanted $40/tire and the other landfill wanted over $120. Woo-hoo.

I never made it to John's. I left all of the parts and tools in the Excursion in hopes that I will be able to get down there more often now that the house is listed. I sure hope I can get the truck done before we move!
 

Attachments

Oldvw2

Member
Steel Soldiers Supporter
169
2
18
Location
Wake Forest, NC USA
Ahhh, nothing like the good ol' "mobile home" style rim and tire. I would love to be able to swap out the hubs/drums on that trailer to some regular 5 lug style rims - it would give us a lot more flexibility in selecting tires....
 

decodeme2

In Memorial
In Memorial
447
-3
0
Location
Lothian maryland
Nice Truck!, I will be watching the progress! I have a M923, all orginal. If you need some pics let me know..Also Bruce has the same truck!..All done!..
Kevin..
 

lstmate

Member
301
-1
16
Location
Jasper, IN
Ok Chris..... Now time is drawing close and I have perfect event for your madien trip..... The convention in Evasnville...... You have until August 5 to get her finished and on the road.:grin:
 

steelsoldiers

Administrator
Staff member
Administrator
5,249
3,956
113
Location
Charleston, WV
I finally had a full day to work on the truck. My in-laws are in town for the 4th and my father-in-law volunteered for a work session. We loaded up the Excursion with all the needed parts and tools and then hooked up the trailer with the freshly mounted XL's.

The day started off with the discovery that the truck had fallen off of the jack stands sometime in the last few weeks. Great!:razz::razz: The axles were on top of the stands in some cases and the stands had disappeared into the ground. We made use of some heavy equipment courtesy of Winslow to get the truck in the air and back on its tires. It looks really tough now!

Before we mounted the wheels, we tackled the injection pump. We figured it would be easier to reach everything with the truck on the ground. We removed the old plastic timing pin from the front cover and replaced it with a brand new pin (thanks Will). Then, we tightened up the mounting studs for the IP and slid it into place. That's weird, why is the IP hitting the air compressor?! We went and looked at Winslow's 925A2, which is for sale by the way, to find out what it is supposed to look like. Turns out the rebuilt compressor I got came with a different unloader housing and it was about 1/2" taller than what was supposed to be on there. I had no choice but to steal the top off of a compressor belonging to Joe aka Crash AF. Joe, I promise I will get you another one and put it on your compressor. In the meantime, the one off of my compressor is on there to keep the crud out. The pics include my truck with the oversized unloader and John's for comparison.

Once the unloader piece was swapped out, the IP slid right on. The nuts in between the block and the IP are a serious PITA! :evil: Thankfully I had some crow's-feet sockets with me and we got them snugged down. We already had the engine at TDC, so it was time to get the pump timed. I pulled the timing plug from the IP and lots of oil came out, but the timing pin was gone?? What the heck, US Navy mechanics?? We improvised with some needle nosed pliers. I cleaned the tapered pump shaft and drive gear with brake cleaner before sliding it on. The pump nut was torqued to 15 lb/ft. Then, the timing pins were removed, my FIL held the engine still with a barring tool, and I torqued the gear nut to 80 lb/ft as spec'd by the manual. Once that was done, there were fuel lines to hook up and the lift pump needed replaced.

It was stinkin hot today so it was a perfect day for wrestling 300 lb tires and wheels into place. Thankfully the fork lift and the M816 made for easy lifting. We fought those suckers for about 2 hours before finally getting them off the trailer and snugged down on the studs. I feel like I was mauled by a bear today! What a butt whoopin!

The truck is looking good! Thanks to my FIL, Gene, and David, Winslow's helper who ran the fork lift and the 816. Hopefully it will run next time! Time for bed!!
 

Attachments

steelsoldiers

Administrator
Staff member
Administrator
5,249
3,956
113
Location
Charleston, WV
Thanks for posting Chris! Will you have a place to work on it at your house once you get it rolling?
Well, we are selling our house here in Franklin. I am in the midst of a career change and am not really sure where I am going to end up when it is all said and done. I'll have to keep working on it at John's in the meantime.

I am hoping to have his paint/body guy, David, do some cutting, welding, sandblasting, and painting for me. The floor is pretty rotted right around the throttle pedal, which would be a bit of an inconvenience if the pedal went through the floor :-D

Once I finally get it running, I still need to get the cooling system back together, get the air system together, put the front clip on, and finally the CTIS.
 

jfnemt1ff1

Member
526
1
18
Location
Higgins Lake Mi.
Looks like a little work, nice job so far. They are great looking trucks. I whis I lived near by it would be nice to work on it fits been a while since the goat was done, and I am still waiting to get the bat wing shop here from Michigan. I am looking at some 818 at gl close to me so I might just tow it back.
John
 

steelsoldiers

Administrator
Staff member
Administrator
5,249
3,956
113
Location
Charleston, WV
Yesterday was another 10 hour work day on the truck at John Winslow's. My main priority was to get the fuel system buttoned up and the air bled out. I was hoping to get it to run on diesel. Once I get it running, then I will be able to seal up the engine, mount the accessory drive, install the cooling system, etc...

First thing I tackled was getting the fuel line hooked up to the mechanical lift pump. Unfortunately, the fitting I purchased here at home was the wrong size. I spent the next hour wandering through the junk yard looking for the right one. I found hundreds of fittings, but nothing would work. Finally, I gave up and drove over to the Scotland Neck Napa to get the proper reducer. Once I got that threaded in I replaced the primary and secondary fuel filters and used the lift pump to get fresh fuel to the injection pump.

Once I had fuel to the IP, I needed to get all of the injector lines hooked back up. That was a challenge because they had all been knocked out of allignement when the military guys yanked the IP before the truck was scrapped. It was a real PITA to get them all started, but after about 30 minutes I had them all started loosely.

Last step before cranking it over was hooking up the return line. There is a rubber line with a banjo fitting that goes from the IP to a copper line that runs back to the tank. Some dimwit had snipped the copper line in two under the truck and stole the back half. The remains of the rubber line had a nice mud dobber nest in it. I took off the rubber remains and replaced it with a good line from the parts truck.

Time for some cranking. I borrowed a deuce from John and got out my slave cable. I used that to crank the truck over allowing the stop solenoid and starter to cool off at certain intervals. After quite a bit of cranking I had fuel seeping at 2 of the nuts. Hmmm.... Then, Casey, who was having John work on his truck yesterday, wandered by to see what was up. He manned the ether can and we cranked the engine and ran it for short bursts on ether. Finally we fuel at 4 nuts. Hmmmm.... why is it taking so long to get the air bled out. I loosened the inlet fitting at the pump to make sure we had good fuel pressure and a geyser of fuel covered me, the truck, and Casey. Wow, that's a lot of line pressure! Casey left and I fiddled around some more with the engine. Finally, I loosened the return line fitting and got a burst of air and fuel! I guess the mud dobbers nest bits had continued down into the copper line and plugged it! That would explain the air lock and lack of starting!

I ran out of time and packed up the tools. Hopefully I'll get back in a few weeks to finish the job. I also got the alternator mounted while I was there giving the starter a cool down. One less thing to worry about!!

Pics later. I only had my camera phone to get them.
 

cranetruck

Moderator
Super Moderator
Steel Soldiers Supporter
10,350
75
48
Location
Meadows of Dan, Virginia
Hey Chris, your explanations are excellent, who needs pictures. :)
It must be a pain working away from home, especially when it comes to fittings, I must have 500 total in boxes and can usually find adapters, plugs, JIC types, compression types, nipples etc etc, needed for just about anything, but that would not be the case working in a field some place.
Thanks for keeping us up-to-date.
 

scooter01922

Well-known member
1,721
42
48
Location
Newbury, MA
Keep up the good work, i feel your pain working on a truck far from home. The M35A1 has finally moved to the MV storage location 15 min from home as opposed to its previous resting place 2.5 hours away. Now if only the m108 wasn't 3+ hours north of here. Cheap trucks rock but the location often sucks.
 

steelsoldiers

Administrator
Staff member
Administrator
5,249
3,956
113
Location
Charleston, WV
Bjorn, it is a pain to work so far from home. I could use your fitting supply for sure! John has a decent amount of fittings if there is an emergency or the hardware is closed.

Scott, I hope you can get the 108 relocated too. Those are cool trucks.

Joe, thanks. I hope you get to start on your project again soon.

Here are the pics as promised. They're not bad for Blackberry pics. The first one shows the new lift pump, the solenoid bracket, the new solenoid, the IP, and the injector lines. The return line can be seen coming from the front of the pump. I am going to substitute a section of clear tubing in the meantime so I can check for air etc... I'll just run it into a fuel can until the hard line goes back on.

The second pic is the front of the engine. The shiny gear is for the injection pump. I also got the radiator support bracket mounted on the lower right engine mount. They share bolts with the engine mount so when it was robbed the engine dropped down a bit. I had to apply a bottle jack to the oil pan to get things lined up again. Once I can prove the engine is a runner, I will put the timing cover back on along with a new crank seal, crank balancer, and fan clutch.

The third pic shows the alternator in place. It also shows the badly mangled PS ram stone shield/tranny cooler bracket. I have a good used one to go in its place along with a good, used ram and some flex lines.

The last pic is a front view. It will look a lot better once the smashed bumper is gone, the new winch is mounted, and the hood goes back on. The hood will have to wait until the radiator goes back in. It will be a lot easier to maneuver the rad with the hood off.

That's all for now!!
 

Attachments

steelsoldiers

Administrator
Staff member
Administrator
5,249
3,956
113
Location
Charleston, WV
It's alive!!!!!!

Well, I lucked out and had the day off yesterday, so I figured that was a sign I need to go to Winslow's and do some wrenching!

Even though it rained most of the morning, I had the most productive day I have ever had down there. Usually it is one fubar after another, but I was rolling yesterday.

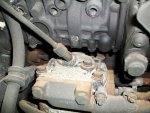
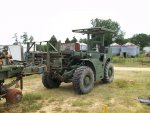
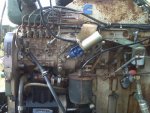
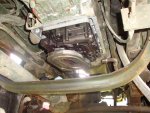
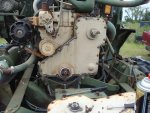
Since I wanted to try and run the engine, I needed to make sure the tranny was freshened up with fluids and filters. I pulled the pan, found some nastiness in the bottom, swapped out the filter, put on a new pan gasket, swapped the pick-up tube o-ring, and torqued the pan back down. The biggest PITA was trying to get the dip stick tube nut to come loose! I had to break out the 24" pipe wrench to get it started!! I completed the tranny service with a fresh spin-on filter in the engine compartment, a new dip stick, and a case and a half of Dexron 3.

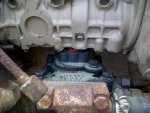
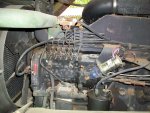
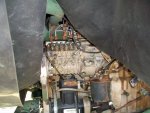
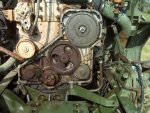
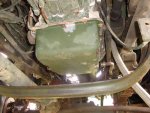
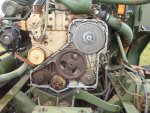
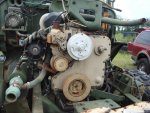
Next up was closing up the engine. I cleaned everything up in the timing gear case in prep for the gasket and cover. I lathered both sides with RTV sealant, put on the new gasket and torqued the cover into place. I had to use an alignment tool supplied with the new crank seal to align the cover. Once that was done, I was able to beat the new seal in place over the crank. That was probably the 2nd biggest hassle of the day since it wanted to wobble all over instead of going in straight!

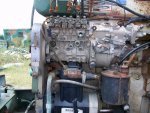
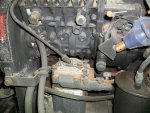
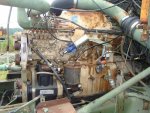
After the cover was done I installed the harmonic balancer, the new fan clutch, the engine oil dip stick tube, and the dip stick. In order to get the fuel system right, I needed to figure out the problem with the return line. Turns out it wasn't downstream in the metal line. There was a mud dobber nest in the bano fitting that bolts to the injection pump! I hate those things!! It took a good bit of jabbing with an allen key and a zip-tie to get that crap out of the fitting. The return was flowing well after that. I ran it into my 5 gallon fuel can so I could keep track of the amount of fuel coming out.

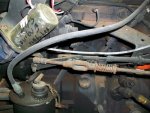
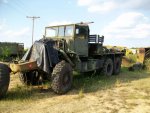
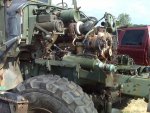
With that done, I hooked up a slave cable to one of John's deuce's to do some cranking. I hoped to get all of the air out of the lines and get it running. After about 10 cranking sessions, I had fuel coming out of 5 of the 6 nuts at the pump and the engine would sputter a bit. I tightened all of the nuts down and cranked some more. It sputtered and sputtered and finally roared to life with a big cloud of smoke and some pissed-off bees!! I guess they had a home in the muffler!! LOL!!

I am psyched that it runs!! I wish you could here the engine in the video better! That dang deuce roaring in the background about drowns it out. There was a nice turbo whistle so I know that it is good. Yes!!!! :)

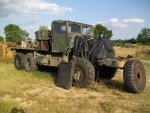
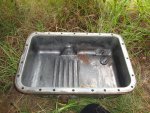
Next time, I will get the cooling system put back together so I can let the engine site there and idle for a while so I can dump the oil, swap out oil pans and put in new oil and a filter.

It's coming together y'all! I'll post the pics and video tonight! What a project! It sure feels good to make some real progress!
 

steelsoldiers

Administrator
Staff member
Administrator
5,249
3,956
113
Location
Charleston, WV
As promised, here are some pics of yesterday's session and a video of the engine running. I forgot to mention that I also got a new fuel line installed for the fuel-burning heater and test-fired it yesterday too. The old one poured fuel all over the exhaust :shock:

The engine you hear running at the start of the video is the deuce next door. I had it idled up to supply more juice to the 925A2. You can't really hear the 8.3 purring, but you can see a nice smoke cloud drifting away. I think that's where the pissed off bees came from. :twisted:
 

Attachments

Top
AdBlock Detected

We get it, advertisements are annoying!

Sure, ad-blocking software does a great job at blocking ads, but it also blocks useful features of our website like our supporting vendors. Their ads help keep Steel Soldiers going. Please consider disabling your ad blockers for the site. Thanks!

I've Disabled AdBlock
No Thanks