• Steel Soldiers now has a few new forums, read more about it at: New Munitions Forums!

  • Microsoft MSN, Live, Hotmail, Outlook email users may not be receiving emails. We are working to resolve this issue. Please add support@steelsoldiers.com to your trusted contacts.

My M813 gets a turbo!

US6x4

Well-known member
Steel Soldiers Supporter
1,238
2,272
113
Location
Wenatchee, WA
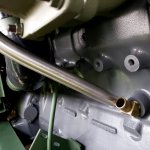
To change the direction of the tank's outlet pipe i sourced a 1 1/4" mandrel bent 90° stainless elbow with rolled beads from a fuel filler neck company and then shortened one leg to allow it to fit between the tank pipe and the engine block.

20210611_090841.jpg
20210612_174807.jpg
20210612_174802.jpg
The TIG guy said that "walking the cup" was especially difficult on this because the polished stainless was so slippery.
20210612_174923.jpg

Now I just need to find a heavy-duty yet flexible radiator hose to connect this elbow to the oil cooler? housing.
 
Last edited:

US6x4

Well-known member
Steel Soldiers Supporter
1,238
2,272
113
Location
Wenatchee, WA
This weekend was all about freshening up the paint on the RH side of the engine. Before I always thought my engine had OD Green and Cummins industrial tan parts added to a charcoal gray engine, but after degreasing and pressure washing it I'm convinced that the entire engine is still gray. There was a lot of 383 green overspray on the block just above the frame rail which made it hard to discern.

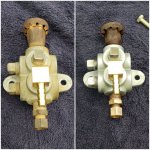
Degreased and pressure washed 3 times, then ground down rust with angle grinder & cupped wire brush, then again with dremel tool & tiny wire brush, then scuffed with maroon scotchbright, then blown off with air hose, then washed/scrubbed with sudsy car wash, rinsed, and blown off dry with air hose. Got it masked up and then gave it 2 coats of Cummins charcoal gray.

Maybe I had a flair up of CDO or something because I also ran a thread chaser down every tapped boss on the block to clean up the threads.

20210717_160255.jpg
20210717_163500.jpg
20210718_165230.jpg
20210718_202427.jpg

It's interesting to see what's gray and what's green; kinda gives you clues as to what Cummins supplied and what AM General supplied such as the dipstick tube, the road draft tube, and all of the little brackets bolted to the block which were green. I'm just going to maintain the colors that I find and if its just all rust I'll paint things that hang off the engine 383 green while the block will stay gray.
 

Mullaney

Well-known member
Steel Soldiers Supporter
Supporting Vendor
7,769
19,877
113
Location
Charlotte NC
This weekend was all about freshening up the paint on the RH side of the engine. Before I always thought my engine had OD Green and Cummins industrial tan parts added to a charcoal gray engine, but after degreasing and pressure washing it I'm convinced that the entire engine is still gray. There was a lot of 383 green overspray on the block just above the frame rail which made it hard to discern.

Degreased and pressure washed 3 times, then ground down rust with angle grinder & cupped wire brush, then again with dremel tool & tiny wire brush, then scuffed with maroon scotchbright, then blown off with air hose, then washed/scrubbed with sudsy car wash, rinsed, and blown off dry with air hose. Got it masked up and then gave it 2 coats of Cummins charcoal gray.

Maybe I had a flair up of CDO or something because I also ran a thread chaser down every tapped boss on the block to clean up the threads.

View attachment 839997
View attachment 839998
View attachment 840000
View attachment 840001

It's interesting to see what's gray and what's green; kinda gives you clues as to what Cummins supplied and what AM General supplied such as the dipstick tube, the road draft tube, and all of the little brackets bolted to the block which were green. I'm just going to maintain the colors that I find and if its just all rust I'll paint things that hang off the engine 383 green while the block will stay gray.
.
Clean and Sharp looking!
Very nice indeed.

Lots of work to bolt it all back together, but it will look brand new when you are finished.
 

US6x4

Well-known member
Steel Soldiers Supporter
1,238
2,272
113
Location
Wenatchee, WA
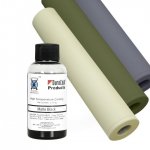
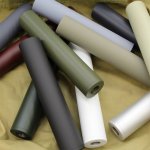
Well, I'm getting down to the nuts & bolts details and I've been painting parts as they're ready. For the high temp parts (manifolds to exhaust stack) I'm using Dura Heat 2.0 and I finally got far enough along to get a start on that. This paint is made for firearm suppressors and it can handle up to 1500° F so it will be good enough for my operating range. Their od green looks like a match for 383 green so that's a plus.
DuraHeat_94614515-534b-44a1-8425-cd42b935fbcc_1024x1024.jpg


All the parts have been degreased, roughed up with scotchbright, washed clean, masked off with powder coating tape, and hung up.
20210720_120111.jpg
20210721_130855.jpg
20210721_130905.jpg

Since the parts and paint are so spendy and I don't know this HVLP equipment, I had the paint applicator at work spray the first coat of this wet paint on and he nailed it! This first coat on these 4 pieces used about $80 worth of paint...yikes! It will get a second coat and then a 20 minute bake in the oven at 350°F after it air dries. The painter said this stuff flashed over to flat & rough as soon as it laid on (almost instantaneous).

I had to order more paint to have enough to finish the other parts so there will be more to follow on this subject.
 

Attachments

Last edited:

WillWagner

The Person You Were Warned About As A Child
Super Moderator
Steel Soldiers Supporter
8,546
2,786
113
Location
Monrovia, Ca.
You can trim up to an inch off of the rubber elbows to gain clearance if needed. I had to do that many times when putting new engines in old machines. Mark them, use silicone spray to lube the cut and a new razor knife. The cuts will look factory.
 

US6x4

Well-known member
Steel Soldiers Supporter
1,238
2,272
113
Location
Wenatchee, WA
You can trim up to an inch off of the rubber elbows to gain clearance if needed. I had to do that many times when putting new engines in old machines. Mark them, use silicone spray to lube the cut and a new razor knife. The cuts will look factory.
Good idea, Will - I'll take a closer look at that when I get to final assembly
 

US6x4

Well-known member
Steel Soldiers Supporter
1,238
2,272
113
Location
Wenatchee, WA
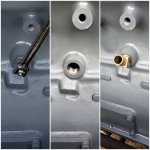
While I'm waiting for paint to dry i have time to catch up on household stuff and replenish the drained supply of brownie points I've cashed in working on this turbo. The only change I've done recently is to remove the pipe plug and replace it with the oil drain tube fitting.
20210724_133339.jpg
 

US6x4

Well-known member
Steel Soldiers Supporter
1,238
2,272
113
Location
Wenatchee, WA
A lot of progress has been made on painting parts and getting them ready to install. I had to reorder paint twice now which is a 1 week delay each time but I've got about 97% of the parts finished 😁

I drilled & tapped a bunch of holes in scrap angle iron to hold my manifold bolts and that worked out pretty well.
20210728_091143.jpg
20210729_090417.jpg
During the first coat. It takes 3 days to paint: first coat 1 day, second coat on day 2, bake on the third day.


This is after the bake
20210730_130239.jpg
20210730_130301.jpg
20210730_160328.jpg
For a color comparison the suppressor paint matches the CARC on the heater inlet pretty close, but my 383 green i use is a little greener. The colors look more different in pictures than with the naked eye.


Here are all my parts except the 3 u-bolts saddle clamps, the 3 pressure pipes, and the stack heat shield.
20210730_170138.jpg
20210730_170208.jpg
20210730_170214.jpg
20210730_170226.jpg
20210730_170304.jpg
 

US6x4

Well-known member
Steel Soldiers Supporter
1,238
2,272
113
Location
Wenatchee, WA
The reservoir tank needed a lot of attention internally as there were large amounts of rust scale that came out and continued to come out of it. I pounded the out side with hammers without denting it, then filled it with sharp gravel and shook the crap out of it and then filled it with sand to shake and roll around inside. This is what came out:
20210511_175509.jpg
20210608_153750.jpg

Eventually I picked up some Evapo-Rust to swish around inside it and get it clean. After a couple coats of paint I painted on a 'NO STEP' stencil like you would see under the hood of a hummer.

20210730_170253.jpg
 

US6x4

Well-known member
Steel Soldiers Supporter
1,238
2,272
113
Location
Wenatchee, WA
@WillWagner was right about pulse manifolds having smaller ports for higher velocities. This mismatch seems a bit much, but the new metal gaskets are what came with the manifold so maybe they're compatible. I typically don't like things that impede airflow like that and it's a challenge to keep myself from trying to blend it in (port match).

20210730_175513.jpg
20210730_175505.jpg
 

WillWagner

The Person You Were Warned About As A Child
Super Moderator
Steel Soldiers Supporter
8,546
2,786
113
Location
Monrovia, Ca.
The gaskets are the same for both port sizes. Does it run yet I want to see a video!
 

US6x4

Well-known member
Steel Soldiers Supporter
1,238
2,272
113
Location
Wenatchee, WA
The work today involved all sorts of small stuff. To start with i plugged the old air horn bolt holes using some neoprene bonded rubber washers to seal out water & noise (ok, maybe just water...). Now I'm thinking one of these might get removed to run the filter-minder hose up to the turbo air intake pipe.
20210801_073147.jpg
20210801_073305.jpg


Then the reservoir tank bracket got mounted up. I'm able to use one of the lower bolts to hold the air horn wire loom clamp that was relocated. I like it when things can perform more than one function.
20210801_150620.jpg
20210801_150612.jpg

Next I bent the brake vent line over so the air vent manifold could be mounted to the side of the tank.
20210801_152538.jpg
20210801_212655.jpg
The vent manifold got scrubbed down with some napa aluminum brightener. There was not much room left to mount this and I even had to use some indented hex pipe plugs to clear the tank.
20210801_170158.jpg

I mocked up the new air horn location finally and I think I should have done that before I painted the firewall...
20210801_192034.jpg

Other things I did today was re-install the exhaust temp probe, hook up some wiring, install the dipstick tube, and test fit the road draft tube (will need to shorten it about 7").
I'm building my way out from the block to the fender layer by layer.


Right now I have more parts ready to go than I have time to work on and that's good but exhausting. This is where I left off:
20210801_192020.jpg
 

US6x4

Well-known member
Steel Soldiers Supporter
1,238
2,272
113
Location
Wenatchee, WA
I finally tackled the turbo oil drain pipe which I wasn't looking forward to because of compound bends needed to go 10" down, 7.75" inward and 1.75" forward. I took many measurements with squares, plumb bobs, and tape measures. I made a 3d model as best I could and then grabbed a piece of 1" o.d. stainless hydraulic tubing and put it in the tube bender.
20210803_165533.jpg
20210803_165541.jpg

The first bend was bent up 50° and the second bend was 8.75" down stream and bent to the left at 15°. The extra tubing length needed to grab hold of the bender dies got trimmed off and the tube got inserted into a 1/2" thick stainless flange that the laser cut out after I copied the shape of the gasket that came with my turbo.

20210803_171148_03.jpg
It took quite a few iterations of cutting and fitting to get things to line up & fit. Once aligned some lines were added to maintain the orientation so the TIG welder guy could seal it up.

20210804_060233.jpg
20210804_090418.jpg
20210804_090618.jpg

First pass
20210804_091111.jpg

After second pass to push slag to the outside of the weld and after a quick smoothing up of a few high spots.
20210804_111002.jpg
20210804_131506.jpg
All done and roughed up with a stainless wire wheel to be ready for the suppressor paint. Now its time for the final test fit.
20210804_161945.jpg
Bingo!
 
Last edited:

WillWagner

The Person You Were Warned About As A Child
Super Moderator
Steel Soldiers Supporter
8,546
2,786
113
Location
Monrovia, Ca.
Just be aware, you will most likely need to add some sort of flex between the hard engine mounted parts and the chassis/fender mounted stuff. It will break at some point in time just due to the acceleration twist. Your work is beautiful!
 

US6x4

Well-known member
Steel Soldiers Supporter
1,238
2,272
113
Location
Wenatchee, WA
Thanks Will and duly noted. So when the truck accelerates will the valve cover torque to the right or torque to the left (driver side)?

In your years of wrenching have you ever seen a flex pipe used in a 90° corner?
 
Top
AdBlock Detected

We get it, advertisements are annoying!

Sure, ad-blocking software does a great job at blocking ads, but it also blocks useful features of our website like our supporting vendors. Their ads help keep Steel Soldiers going. Please consider disabling your ad blockers for the site. Thanks!

I've Disabled AdBlock
No Thanks