• Steel Soldiers now has a few new forums, read more about it at: New Munitions Forums!

  • Microsoft MSN, Live, Hotmail, Outlook email users may not be receiving emails. We are working to resolve this issue. Please add support@steelsoldiers.com to your trusted contacts.

Need Some Help with Rear Axle Seal "blow out"

Commander5993

Active member
Steel Soldiers Supporter
The bearings are clearance fit on the spindle and can and will spin which wears down the spindle. My truck has worn spindles.
I'm going to check out of the spindle and bearings today. Tried to look up the specs for the spindle in the TM's and see what the min tolerance is, but didn't find it. I'll look some more today. They show it as an "axle housing" starting on page 243 in the TM9-2320-289-34p DEPOT MAINTENANCE manual. But they dont even label it, let alone show specs.

So even if a bearing has spun, which at this point is quite likely, I'm not sure exactly what I will have to do/replace to fix it.
 
Last edited:

Commander5993

Active member
Steel Soldiers Supporter
Mine is worn down 2-3 thousandths. I just put new bearings on and ran it. Wheel speeds aren't very high, this is a fairly forgiving application.
Yeah, thats basically the conclusion I came to also. I cleaned the spindle a bit more and inspected it closely. Other than the groove on the "back wall" of where the inner bearing race rubbed, you could see markings on the spindle shaft itself but I couldn't really feel anything. So I think it will be fine. I think the inner race of the bearing got warm enough to expand slightly and thats what let it slip on the spindle shaft. But it couldn't have done this very long or it would have made some grooves. So I'm glad I caught it when I did.

Ordered nearly $300 in parts from Rock Auto yesterday, supposed to be here late this week. I'm going to try to move the shelf that is on the other side of the truck so I can get to the passengers rear wheel to begin taking it apart. Want to have something to look at when reassembling the drivers side, and vice versa. Just makes it easier, as I haven't had to replace brake shoes and such for quite a while now. I like working on pads and rotors a lot better, but I'm not going to spend the $ to convert the rears on this truck, although I read some people have done so. Would have been nice though.

Ordered 2 gallon of 80w-90 Valvoline gear oil, better price than 6 quarts and always good to keep some on hand. Might get some more DOT 5 brake fluid. And I need some more brake cleaner too...

I'm also looking to go ahead and replace the front wheel bearings and probably brake pads. Not sure what else in the front would need to be replaced, or good to just go ahead and replace while I'm at it. Pretty sure both calipers, rotors, and brake hoses are good, might look into replacing the hoses anyway though. I'll take a look at them when I get to it. But won't be able to get to the front wheels until I get these rear wheels done, as I have to turn the truck around in the shop. Going to work on some other odd and ends while I'm waiting on the parts. Need to change the oil in the transfer case, might get that done tomorrow or the next day.

Wasn't intending on spending this money on the truck right now, but I need the truck and don't want to let something go that will just end up costing me a lot more later on. Let alone not having the truck when I really need it to pull my trailer or other work.
 

87cr250r

Well-known member
1,267
1,991
113
Location
Rodeo, Ca
Look at the diaphragm on your master cylinder lid. If it's soft and swollen you've got the stew.

If the system is contaminated it goes after the rubber stuff. Use compressed air to blow out the hard lines and then renew the rubber components. Hoses, masters, and rear wheel cylinders are cheap through Rock Auto. They have caliper seal kits for the front to save some money. Calipers are super easy to rebuild, just don't be tempted to use compressed air to push the pistons out. It's loud and messy.
 

nyoffroad

Well-known member
944
690
93
Location
Rochester NY
It sucks not having enough room to move and work. I have a 3 car garage but one stall is taken up with tool boxes, compressor, lathe, mill and benches. The other two bays are 20'x20' that's good side to side but not so good end to end. Many times I have to work with the door open and half the truck outside. I usually paint them in halves, backed in the door is closed on the hood and bed gets painted the I reverse it and paint the rest. SUCKS!
 

Commander5993

Active member
Steel Soldiers Supporter
It sucks not having enough room to move and work. I have a 3 car garage but one stall is taken up with tool boxes, compressor, lathe, mill and benches. The other two bays are 20'x20' that's good side to side but not so good end to end. Many times I have to work with the door open and half the truck outside. I usually paint them in halves, backed in the door is closed on the hood and bed gets painted the I reverse it and paint the rest. SUCKS!
Yeah, floor space is a premium, always need a bigger building. But do what I can, have made it work. And normally I would often have half a vehicle inside, but its been snowing, sleet, and now we've got about 2 inches of rain in the past 36 hours and they're still giving more. In anycase, I was just able to fit the truck in, had about 2 inches to spare :) Better than out in the weather working on a gravel drive way, done that for a very long time.
 

Commander5993

Active member
Steel Soldiers Supporter
Look at the diaphragm on your master cylinder lid. If it's soft and swollen you've got the stew.

If the system is contaminated it goes after the rubber stuff. Use compressed air to blow out the hard lines and then renew the rubber components. Hoses, masters, and rear wheel cylinders are cheap through Rock Auto. They have caliper seal kits for the front to save some money. Calipers are super easy to rebuild, just don't be tempted to use compressed air to push the pistons out. It's loud and messy.
Haven't got to the front yet, but I do believe I remember the last time i had the master open the rubber seal was harder to go back in than it should have been. That may be why.

Just looking at parts on Rockauto, to rebuilt the front calipers with all new rubber seals & boots, brake hardware kit, bleeder screws (cause I know if I don't order them for $4 for 2, I'm sure to brake at least one...) it would cost about $38 to rebuilt both sides.
On the other hand, they also have Cardone Rebuilt calipers which also include the brake hardware kit are $29 each + $29 core. So... would have to send cores back, but for the extra few $ might be good to just replace the entire caliper. I don't know if Cardone is a good brand or not though.
I don't know, I'll think about it. Still another $47 for a master. Looks like another $300 at least to rebuild the front end with new seals and bearings, which I know the bearings need replaced. The current one's are too bad, but they do have some wiggle room.

Just got all the parts in for the rear, plus they must have accidently sent me a random differental gasket that I didn't order. I thought I might have put it in the cart by accident and didn't see it, but I rechecked my order and its not on there. :shrugs:

Anyway I did get the passenger side axle and hub pulled. Drum has a number of grooves, probably needs to be turned. The drivers side drum was smooth, probably from all the oil :rolleyes: The seal on the passengers side was beginning to leak, had a little oil inside the drum but nothing like the drivers side. So that'll save me $50 in brake clean... well $5 to $10 for kerosene anyway.
 

Commander5993

Active member
Steel Soldiers Supporter
Hey guys, I was going to make a post with some updates on the passengers side.
BUT I have run into a problem. All the small parts and pieces from the drivers side brake, some of which were just floating around in the drum. I had put them into a can with cleaner to break down all the gear oil "tar" off of them. Just pulled them out of the can and started going through them this morning to finish cleaning them. Under some gunk, I found a pin that is chewed up and wore flat on one side.

brake lever pin.jpg

brake lever pin 2.jpg


After going through the TM and looking online, I was able to figure out this pin is a part of the "parking brake lever" which connects to the parking brake cable. This pin has what is left of some splines which means it was pressed into the lever, and it is listed and shown as being "one part" in the TM. Here is a photo of the parking brake lever, and the hole on the left end is where this pin is supposed to be, it's probably "wallowed out" if I had to guess.
**The green solution is Krud Kutter rust remover, which I have it and other parts in right now. It removes rust and leaves a rust resistant coating after the parts are pulled out and allowed to dry. Figured it wouldn't hurt to clean everything up as much as possible.

parking brake lever.jpg


On the end of the pin, there what the TM lists as "WASHER,SPRING TENSI". I do have that part, it looks like a regular washer, except it is thin and "bowed" to make it into kind of a spring to put tension against the inside of the brake shoe. A new one would probably be good though. There is a groove in the pin where this washer would seat. Don't understand why the AC Delco brake hardware kit wouldn't come with that washer, but there is also two other pieces that are missing from the kit too so...

Parking Brake Lever listed as "8" circled below (washer is 9) from TM9-2320-289-34P page 274:
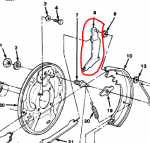
Parking brake lever from TM.PNG

There is two part numbers listed, one is drivers side, the other is passengers side. BUT the TM doesn't actually specify which part number is for which side:roll: . But the two part numbers for the parking brake levers are: 334307 & 334308

[EDIT: Found another site with the same part numbers. Looks like the 334307 is the LH (Drivers side) and 334308 is RH (Passengers Side) LInk to that page:
GM Parking Brake Lever Diagram ]

The "spring washer" is: 5454797

BUT HERE is my problem. This part has been discontinued by GM. AND There does not seem to be ANY OTHER Company that is making replacements. I can't find one on any of the regular parts sites or even Rock Auto. Whether listed as a parking brake "lever" or other part, or by crossing the GM part numbers above.

Anyone know anywhere one could be had? Or any other ideas??


As an endnote, I also found the self adjuster gear was worn and beat up pretty bad, guess from the other parts hitting it. So I'm going to have to order those kits to. So Looks like the truck is going to be sitting for another week... or better. Can install the new races and bearings into the hubs in the meantime. Put races in the freezer, thought it might shrink them just a bit, maybe make it a little easier to install. Especially since i don't have a press.

I would have gotten to this stuff yesterday, but night before last I went into my house and the power was out. Checked main breaker and it was on. Went to the sub box on the pole and the breaker for the line going to my house was Also On... which didn't make any sense. Turned breaker off as it was late, dark, and raining.
I looked into it yesterday and my Dad came out and wanted to see if he could help, checked power at breaker on the pole was 240v. But power at the main breaker in my house was only showing 7 Volt. So I knew it had to be a short in the line... but still do not understand how or why the breaker at the pole didn't kick out. I told Dad I was going to let it go until next week, as I wanted to get the truck done and thought I was going to have to dig up the whole line which would have taken 2 or 3 days.
In any case, while Dad and I were looking at the line where it goes into my house, the Heavenly Father brought it to my mind to take my voltage meter and stick the prongs into the dirt. I asked my Dad if he thought it might work, neither one of us had ever heard of doing such a thing. But I started up by the house which showed nothing. Then went down to the pole where it was showing about .5 volts. Got about 20 feet from the pole and started getting 10 to 20 volts. Kept testing areas and found the highest voltage showing 68 to 72 volts. So I took my mattock and started to dig, found the wire. I began to pull it up by hand and it broke in half as soon as I pulled on it. I had dug RIGHT ON TOP of Exactly where it had Completely Burned in to. Even the ground wire. Couldn't have hit it like that if I had a pro electricians metal detectors and other tools.
In any case, cut both ends off, soldered in a patch wire, and used marine shrink tubing on everything. Put a larger piece of shrink tubing over the entire patch, and then sealed both ends with some rubber hose filled with silicone caulking just as an extra measure. Got power back on yesterday evening. But lost the day working on the truck. Anyway... didn't' mean to get into all that.
 
Last edited:

87cr250r

Well-known member
1,267
1,991
113
Location
Rodeo, Ca
The GM 14 bolt axle is one of the most highly produced axles. They are always in junkyards. Should be easy to find parts.

You could also go the industrial supply route.


You can get a knurled pin and cut your own groove, maybe with a hacksaw.

McMaster-Carr Page:
https://www.mcmaster.com/pins/half-knurled-dowel-pins

Or, you could drill use a clevis pin, you may have to drill the hol a bit.

McMaster-Carr Page:
https://www.mcmaster.com/pins/clevis-pins-with-retaining-ring-groove-6

A little tack weld on the flange will keep the pin from falling out during assembly. This is the route I would take.
 
Last edited:

GopherHill

Well-known member
475
1,255
93
Location
Thomaston, TX
The GM 14 bolt axle is one of the most highly produced axles. There are always in junkyards. Should be easy to find parts.

You could also go the industrial supply route.


You can get a knurled pin and cut your own groove, maybe with a hacksaw.

McMaster-Carr Page:
https://www.mcmaster.com/pins/half-knurled-dowel-pins

Or, you could drill use a clevis pin, you may have to drill the hol a bit.

McMaster-Carr Page:
https://www.mcmaster.com/pins/clevis-pins-with-retaining-ring-groove-6

A little tack weld on the flange will keep the pin from falling out during assembly. This is the route I would take.
Maybe for the best to get an axle from a salvage yard.
 

Commander5993

Active member
Steel Soldiers Supporter
Still looking for the parking brake lever, hopefully will hear back from Hillbilly Wizard.

In the mean times I need to get the spindle nut socket for the rear. I would just take it to a parts store and get a "loaner", but the closest auto parts store that has loaner tools like this is about 40 miles away, these days its just not worth driving 160 miles (2 round trips - 1 to pickup & 1 to take back) for a $12 to $20 socket. Plus would rather just have the tool if I ever have to remove them again or re-torque them. Which I also have to find the torque specs and sequence as well.

In any case, the spindle nut itself has 6 round holes for a socket to fit onto, which I would have thought the socket would have had round pins that fit these holes. I have searched here on SS, but was able to come up with any info concerning what the correct socket would be.

14.jpg

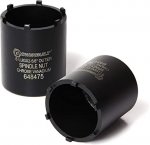
However, all that I can find are 2-5/8" sockets with 6 square pins. This spindle nut is listed as being 2.65" OD, which 2-5/8" = 2.63", so I think the socket size is close enough. But would the square pins be correct?? Such as this one linked below on amazon:

16.jpg


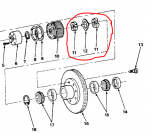
Also trying to figure out what socket is needed for the front, but I haven't taken it apart yet to see the nut. But after searching a lot in the TM, I think I finally found them... It appears there are two nuts (labeled as 11) that would take a socket with 4 pins. Then another "nut" (labeled as 12) in between that appears would take 4 "slots" ? BUT the one labeled as 12 may not actually be threaded, it might just act like a "lock washer" between the other two.

However the one's that are both labeled as "11" have Two Different part numbers. And from what I can find, they look similar but looking at slot spacing, I'm not sure they take the same socket. Also from the specs I have been able to find, it listed one of them as being 2.5" and the other being 3".

Hard to explain, but this is a screen shot from the TM9-2320-289-34p on 297. They are labeled as 11 (two of them) and 12.

Front Spindle nuts.PNG


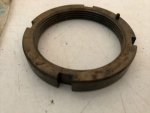
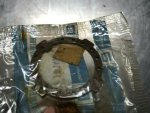
This is the best photos I can find for these via part #:

15582233

18.jpg

14038051

19.jpg


14050679


17.jpg

So does anyone know if both nuts that are labeled as "11" take the same socket? Or two different sockets?? And does 12 take a socket at all??
 

Commander5993

Active member
Steel Soldiers Supporter
I can't remember exactly but I think the Dana 60 front and 14 bolt rear take the same socket. Both nuts use the same socket. 12 is a washer.
Well, looking at the TM and looking up the part numbers, the front shows 4 pin/slot nuts. I don't see how a 6 pin socket would fit. But I'll wait until I get the front apart and see, have to order the parts for the front then anyway. Get the rear done first and go from there.
 

adf5565

Well-known member
375
688
93
Location
Tioga, PA
For the 14 bolt, I bought this one. Performance Tool W1270 Ford/Gm 4 Wheel Drive Lock Nut Tool https://a.co/d/daBUeaG

I’ll be able to let you know tomorrow if it works cause I’m planning on pulling mine apart to change the drums. The first time I had it apart I didn’t use a socket but it’s probably better to do it to spec.

For the Dana 60 front, both nuts use the same socket. I bought this one cause I was in a pinch but I’m sure you can find it cheaper.


nyoffroad

Well-known member
944
690
93
Location
Rochester NY
Still looking for the parking brake lever, hopefully will hear back from Hillbilly Wizard.

In the mean times I need to get the spindle nut socket for the rear. I would just take it to a parts store and get a "loaner", but the closest auto parts store that has loaner tools like this is about 40 miles away, these days its just not worth driving 160 miles (2 round trips - 1 to pickup & 1 to take back) for a $12 to $20 socket. Plus would rather just have the tool if I ever have to remove them again or re-torque them. Which I also have to find the torque specs and sequence as well.

In any case, the spindle nut itself has 6 round holes for a socket to fit onto, which I would have thought the socket would have had round pins that fit these holes. I have searched here on SS, but was able to come up with any info concerning what the correct socket would be.

View attachment 890658

However, all that I can find are 2-5/8" sockets with 6 square pins. This spindle nut is listed as being 2.65" OD, which 2-5/8" = 2.63", so I think the socket size is close enough. But would the square pins be correct?? Such as this one linked below on amazon:

View attachment 890659


Also trying to figure out what socket is needed for the front, but I haven't taken it apart yet to see the nut. But after searching a lot in the TM, I think I finally found them... It appears there are two nuts (labeled as 11) that would take a socket with 4 pins. Then another "nut" (labeled as 12) in between that appears would take 4 "slots" ? BUT the one labeled as 12 may not actually be threaded, it might just act like a "lock washer" between the other two.

However the one's that are both labeled as "11" have Two Different part numbers. And from what I can find, they look similar but looking at slot spacing, I'm not sure they take the same socket. Also from the specs I have been able to find, it listed one of them as being 2.5" and the other being 3".

Hard to explain, but this is a screen shot from the TM9-2320-289-34p on 297. They are labeled as 11 (two of them) and 12.

View attachment 890661


This is the best photos I can find for these via part #:

15582233

View attachment 890663

14038051

View attachment 890664


14050679


View attachment 890662

So does anyone know if both nuts that are labeled as "11" take the same socket? Or two different sockets?? And does 12 take a socket at all??
Been awhile but look closely at the nut in pic #1 at about one o'clock there's a small pin. that is the 'inside' nut and the pin MUST face out! Then the washer PN12 goes on and line up the tab on the inside (11 o'clock pic #2) and at the same time the pin slides into one of the holes on PN 12, then the other nut #11 goes on. I've seen it all differant ways but thats the correct way. When lineing up the first #11 and #12 it's better to back the nut off to line up the rather than tighten it.
 
Top
AdBlock Detected

We get it, advertisements are annoying!

Sure, ad-blocking software does a great job at blocking ads, but it also blocks useful features of our website like our supporting vendors. Their ads help keep Steel Soldiers going. Please consider disabling your ad blockers for the site. Thanks!

I've Disabled AdBlock
No Thanks