• Steel Soldiers now has a few new forums, read more about it at: New Munitions Forums!

  • Microsoft MSN, Live, Hotmail, Outlook email users may not be receiving emails. We are working to resolve this issue. Please add support@steelsoldiers.com to your trusted contacts.


No help needed with M109 Restore..

Katahdin

Active member
1,303
23
38
Location
Scarborough, ME
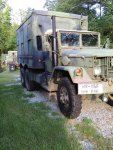
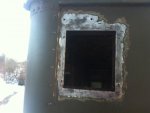
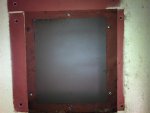
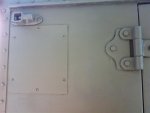
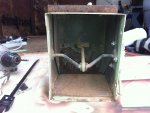
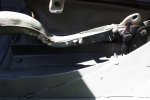
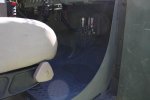
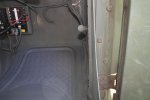
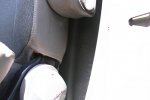
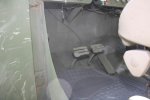
Thought I'd bump this thread with some pics from my weekend. My fan door was rusty and leaky, and like others have said: "useless," so I removed it and installed a patch. I think the paint came out pretty good considering it I was doing it in 35-45 degree temps. I used a small paint gun and tuned it down so I could apply very light coats. I made sure to paint both sides of the patch because in my experience so far the rust most likely occurs in areas that have been primed but not painted. I used a light coat of RTV to seal in the patch and rivets because I had them around and thought they would look and hold better than sheet metal screws.
 

Attachments

scottjhl

New member
136
1
0
Location
Loxahatchee, FL
I just read the ENTIRE THREAD!!!!!!!!!!!!! Omg, what a read. Great job to the OP and to Katahdin as well..

I am just wondering what updates there are to the OP's 109.

*subscribed* Keep it up!~
 

jmoneysmithmas

New member
72
0
0
Location
Montana
Subscribed! You have a talent for explaining your work process, and I appreciate the prices and descriptions of your aftermarket parts and supplies. You've given me a lot of good information to think about and consider for my 109 project... especially the 12v power setup. Keep up the good work, and I'm anxious to see what you do next.
 

peashooter

Well-known member
1,039
204
63
Location
Hanover, minnesota
looks good katahdin, those blowers are noisy and worthless. I ran across a plastic Jabsco unit (354000-0010, for marine use i think) that I got free and am mounting there instead. Not sure if I'll use it much but it blows a whole lot more air and is much quieter.
 

goldneagle

Well-known member
4,422
838
113
Location
Slidell, LA
I know its been a while but I finally got some more work done to the M109. I finally cut the templets out for the cab insulation. They were very accurate. I cut all the insulation pieces that cover the wall behind the seat (6 pieces) , the 2 vent sides, the 2 firewall pieces and the 2 cowl pieces. The templets for the floor and hump were not included in the set. (I would have included them if I were making up a set)

I have to say that Tom did a great job on the templets he provided. All the pieces fit snug. Didn't need to use a lot of Spray glue. #77.

I started by installing the 6 back panels. They went in fairly easy. just had to reach behind the seats to get them in. The 2 corned pieces really went in well. I did not have to use any glue on those 6 pieces.

I did use glue on the 2 vent panels since I decided not to cut out the opening for the vent. I do not use those vents.

The next day I worked on the firewall and cowl panels. The passenger side required me to disconnect the batteries because I had to dismount the 2 fuse panels I installed last year. I also had to remove the glove compartment in order to reach the top of the firewall. I installed the insulation panel on the firewall and also the cowl piece. It made a big difference having the glove compartment out.

Once the insulation panels were installed I remounted the fuse panels and reconnected the batteries.

I tried to install the firewall insulation on the driver side, but that proved to be a lot harder. The bottom part went on well but I could not reach up high enough to get the insulation around the air lines and wires. Because of my girth I was not able to lay under the dash and reach up to tuck the insulation panel as well as the cowl piece.

I took the truck to my mechanic friend's place and had his skinny mechanic finish installing the insulation panels on the driver side firewall and cowl. He had no problems getting it done. Great fit!

I cut a piece of insulation 10" by 10"In. I cut a slightly smaller diameter hole in the center then the shifter base. It fit nice and tight. i used the spray glue to hold it in place. I cut a 8" by 8" piece of insulation and cut a smaller diameter hole in it to fit around the steering column. I glued it over the existing insulation in order to seal the openings around the steering column and shifter.

Saturday I decided to start installing the floor insulation and cover. After a lot of searching I decided to use the vinyl shower floor liner. It comes 5 foot wide and is sold by the lineal foot. Just under $6 per lineal foot. I bought 5 feet of the material. It is about 1/16" thick and very flexible. It is also very rugged.

I removed the passenger seat from the truck and started to install the insulation. All went smooth. Once i got the insulation installed I measured out a 2-1/2' by 4' piece of vinyl. The vinyl installation went well. I reinstalled the seat on top of the vinyl and bolted it to the floor. By the time I had that done it was time to quit. I just don't have the energy I once had and didn't want to wrestle with the driver side seat!

I am glad I didn't work on the driver side floor insulation until today. It took hours to install the insulation around the pedals as well as the trap door for the master cylinder. It was also more work to install the vinyl cover over the insulation. In the end I succeeded and reinstalled the driver seat. Bolted it down to the floor using the original seat anchor spots. At that point I was exhausted from the heat and work. I decided to adjust the seats and the mirrors tomorrow.

I am also going to Walmart tomorrow to look for floor mats. The vinyl is great as a protection layer for the insulation, but it is too slippery for a floor mat. I am going to get some Crylon Fusion in OD green to spray over the exposed insulation to help blend it in. I am also thinking of painting over the vinyl floor cover. This way it will blend in better. The floor mats will be either black or brown.

I did not take any pictures of the insulation install, but they basically look like the ones in this thread added by another member. I will take pictures of the finished install and the floor mats on Monday.
 
Last edited:

goldneagle

Well-known member
4,422
838
113
Location
Slidell, LA
Today I finally got a chance to go out there and finish the cab insulation job. Got rained out since I last posted. I purchased some SUV floor mats at Advanced Auto and installed them over the vinyl I installed the other day. I also purchased some Krylon Fusion green CAMO paint. I spray painted over the Insulation and vinyl mat. Blended right in! Enjoy the pictures.
 

Attachments

goldneagle

Well-known member
4,422
838
113
Location
Slidell, LA
Today I decided to replace the vent tubing going from the fuel tank the engine valve cover breather tube. I found a break in the tube over the batteries when I was trying to reconnect the batteries after the insulation installation. The old tubing was 3/16" steel tubing with flair ends.

When I removed the old tubing and realized I could not use my 1/4" copper tubing with the existing fittings. I removed the 90 degree fitting from the top of the fuel tank and matched it up with a 1/4" 90 degree compression fitting I had in stock. I was also able to find a 1/4" compression fitting that fit the vent tube on the engine side.

I used a piece of vinyl shower floor liner over the batteries to make sure I didn't short them out during the installation. I ran the copper tubing to engine side and attached it to the greater tube. I then adjusted the slack to make a clean run to fuel tank. Once I got the length marked I cut and installed the tubing to the 90 degree fitting on top of the fuel tank.

In order to secure the tube in place i took some 1/2" rubber hose and cut three 4" pieces. I slit the hose in order to wrap it over the fuel return tubing in 3 locations. i then used black wire ties to secure the 1/4" copper tubing to the fuel return tubing. Job done.

I'll try to get pictures tomorrow.:grd:
 

goldneagle

Well-known member
4,422
838
113
Location
Slidell, LA
On Sunday I went to visit Tim and picked up the Winch I bought from Sirblissful as well as the 7 mounted tires 11.00-20 XL's on Deuce rims. Had a great time talking MV's and swapping stories.

I had my Road Service guy come by Monday to work on my tires. Had to remove a very good spare off a rusty rim. It was stuck so bad he had to use a hydraulic bead breaker many time to break the bead. The design of the spare carrier on the Deuce is ****ty! It let water sit on the edge of the rim and ring lock and rusts them out!

We took 1 of the original 9.00 tires and used the clean rim to replace the rusty spare. We then removed the two worn tires from Tim's to reuse the rim, flap and tube with my 2 new tires delivered from GA at the rally. The 4th tire was the best of the batch from Tim's.

The next best 2 went to replace the tires on my M105 trailer. This way the trailer will match the truck in height.

Truck and trailer both look great! Pictures to come soon.
 

Dukeman

Member
188
0
18
Location
Albuquerque, NM
I'm new here and am very much enjoying your work. You come up with quality solutions and your workmanship is outstanding. I have a question. I have been trying to inspect a M109A2 or maybe A3, I'm not sure, here locally for about two weeks now. The owner has been out of town on business and his company is holding him over longer then he would like. Anyway, when I do get to inspect this deuce I would like to know, can you see the deterioration of the box floor from underneath the vehicle? It seems this was the major time and energy consumption of your rebuild so far and I would like to be prepared for that if I ever get to look at this thing. I don't want it to be a surprise, and maybe a bargaining tool should it look in bad shape.
 

Katahdin

Active member
1,303
23
38
Location
Scarborough, ME
Since you're in the SouthWest (thinking drier climate) you might have better luck finding a rust-free 109 than us guys on the East Coast.

My 109 had a pretty healthy undercoating that masked the floor rot from underneath. When you get inside the box look for rotted floor wood, chances are there will be rust under it. Also there will be a bad musty smell. Some of the floor I was able to pry up with just my fingers, that's a really good indicator the floor is rusted through. Follow the screws that fasten the wall panels near the floor. Are they rusted? Can you pry the panel away from the wall? Yup, there are floor rust issues.

If there's any rust or bubbles in the ceiling panels than there's probably a roof leak and/or condensation damage. I would also recommend climbing up onto the roof, look for rust holes and rivets in bad shape. Also look for mold or mildew on the walls.

The wall panels, however, will mask a lot of problems. Unfortunately you're probably not going to be able to take those off before you pay for it.

Given these boxes are decades old I think they're all going to leak and need some TLC. You're probably better off replacing the floor anyway, you don't know what chemicals or mold may have gotten into them over the years.
 

Dukeman

Member
188
0
18
Location
Albuquerque, NM
yeah, it is so dry here I get amazed at what you guys deal with in rust damage. I have just never seen anything like that here. Owners research shows vehicle was originally dispatched to White Sands Missile Range, and believes it stayed there its entire life. So, maybe, just maybe it won't be that bad. I am biting my fingernails waiting for this guy to get back to town so I can look at this baby. I have a jeep YJ, 1987. It has been in NM its whole life. Sat out in the sun, never garaged. There is not a speck of rust on it. The sun does a job on rubber and interior, but the rust just doesn't happen.
 

goldneagle

Well-known member
4,422
838
113
Location
Slidell, LA
Since you're in the SouthWest (thinking drier climate) you might have better luck finding a rust-free 109 than us guys on the East Coast.

My 109 had a pretty healthy undercoating that masked the floor rot from underneath. When you get inside the box look for rotted floor wood, chances are there will be rust under it. Also there will be a bad musty smell. Some of the floor I was able to pry up with just my fingers, that's a really good indicator the floor is rusted through. Follow the screws that fasten the wall panels near the floor. Are they rusted? Can you pry the panel away from the wall? Yup, there are floor rust issues.

If there's any rust or bubbles in the ceiling panels than there's probably a roof leak and/or condensation damage. I would also recommend climbing up onto the roof, look for rust holes and rivets in bad shape. Also look for mold or mildew on the walls.

The wall panels, however, will mask a lot of problems. Unfortunately you're probably not going to be able to take those off before you pay for it.

Given these boxes are decades old I think they're all going to leak and need some TLC. You're probably better off replacing the floor anyway, you don't know what chemicals or mold may have gotten into them over the years.
Very good explanation of what to look for.

Definition of DAMMED YANKEE is a northerner that moved down south and stayed.
 

M1031CMT

New member
356
12
0
Location
Ontario
I agree as well. A good explanation.

It can be hard to find an M109 with a good box, but they are out there. One suggestion I always give is not to be in a rush to buy a truck. I am like everyone out there, and would always want something as soon as possible. But a purchase like this could cost you big money in the end if certain things come up later on because you didn't take your time.

I am lucky in the sense that my floor was in very good shape. But I did have issues with holes in the roof (one big enough to stick my two hands into) which I didn't know about till I got her home.

Oh and btw goldneagle, good job on the truck!
 

goldneagle

Well-known member
4,422
838
113
Location
Slidell, LA
I agree as well. A good explanation.

It can be hard to find an M109 with a good box, but they are out there. One suggestion I always give is not to be in a rush to buy a truck. I am like everyone out there, and would always want something as soon as possible. But a purchase like this could cost you big money in the end if certain things come up later on because you didn't take your time.

I am lucky in the sense that my floor was in very good shape. But I did have issues with holes in the roof (one big enough to stick my two hands into) which I didn't know about till I got her home.

Oh and btw goldneagle, good job on the truck!
Thanks for the compliment! I plan to have it blasted and repainted as soon as I sell the M52A2 truck.
 

Trainman

New member
66
0
0
Location
Ladson SC
Wow. What a mess! But it looks like you are getting through it. Best of luck and I will be watching for its completion!! RUST SUCKS!!!!:evil:
 
Top
AdBlock Detected

We get it, advertisements are annoying!

Sure, ad-blocking software does a great job at blocking ads, but it also blocks useful features of our website like our supporting vendors. Their ads help keep Steel Soldiers going. Please consider disabling your ad blockers for the site. Thanks!

I've Disabled AdBlock
No Thanks