• Steel Soldiers now has a few new forums, read more about it at: New Munitions Forums!

  • Microsoft MSN, Live, Hotmail, Outlook email users may not be receiving emails. We are working to resolve this issue. Please add support@steelsoldiers.com to your trusted contacts.


No help needed with M109 Restore..

goldneagle

Well-known member
4,428
858
113
Location
Slidell, LA
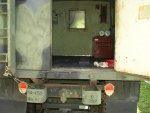
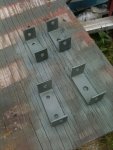
Felt energetic today so I decided to tackle the fog lights installation. I fabricated some tilt brackets from 1-1/4" x 1/8" flat stock. I bent it up into u-shaped brackets. One is slightly smaller than the other to allow one to fit inside the other. These brackets will become the tilt mechanism for the lights. I fabricated 4 pieces, 2 for each light. I primed and painted the brackets.

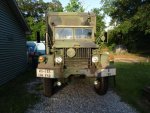
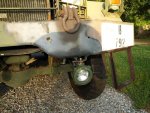
I drilled 2 holes in to the lower triangle bumper support on each side. Attached the brackets to the bumper with 2 bolts each. Then I attached the 2nd half of the bracket to the mounted half with 2 bolts on the sides.

Once the brackets were secured it was time to add the lights. I attached the ground wire from the fuse panel to the center bolt on the light and attached it to the bracket. Did the same tot the other side.

I ran 14/4 SJOW cord to through the firewall to a switch in the dash. The other end was attached to the 2 lights I just installed. I used the black and red wires for the hi and low levels of light. I used the green and white wires to ground each light.

In the cab I installed a 30 amp on - off- on switch in the dash. i ran a new line to the new fuse panel. I tied in the red and black to the hi and low screws on the switch. I attached the green and white wires to the ground bar on the fuse panel. Installed a fuse and the job was done. When I turned on the switch on one light went out, but the other was working fine. i tried the other element and both lights came on, but the bad one went out after a few seconds. I think the bulb had a air leak and the elements burned up.

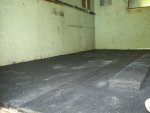
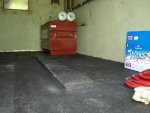
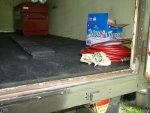
I am attaching pictures of the install.
 

Attachments

goldneagle

Well-known member
4,428
858
113
Location
Slidell, LA
Curious why you mounted them under the bumper instead of on top.
When I was growing up and cars had real bumpers they used to have fog lights mounted below the bumper. Also in the case of my truck the headlights are already mounted lower than the newer Deuces. If I mounted the fog lights on top of the bumper they would be almost on the same level as the headlights. The whole idea of the fog light is to keep at at a different angle than the headlights.

Here is some info from WIKI:

Front fog lamps

A pair of yellow fog lamps
Front fog lamps provide a wide, bar-shaped beam of light with a sharp cutoff at the top, and are generally aimed and mounted low.[10][11][12] They may be either white or selective yellow. They are intended for use at low speed to increase the illumination directed towards the road surface and verges in conditions of poor visibility due to rain, fog, dust or snow. As such, they are often most effectively used in place of dipped-beam headlamps, reducing the glareback from fog or falling snow, although the legality varies by jurisdiction of using front fog lamps without low beam headlamps.
 

Bighurt

New member
2,347
46
0
Location
Minot, ND
Curious why you mounted them under the bumper instead of on top.
Fog lights work best when closest to the roadway.

I myself would have mounted them above the lowest protective point. In a off road vehcile things below that point usually get clipped right off. For me this would be in the bumper. Of above the axle...wonder what that would be like...LOL
 

Sirblissfull

New member
470
7
0
Location
New Mexico
I myself would have mounted them above the lowest protective point. In a off road vehcile things below that point usually get clipped right off.
That is exactly what I was thinking.

Being from Colorado I am more used to Snow then Fog. Mounting them under the bumper means they will be buried in snow or covered in it about 18 inches earlier. I think the difference in height would be negligible between 18 and 36 inches from the ground. Around here they have to be mounted higher then the snow plow.

Since Zev is a transplanted Swamp rat I guess he is not too worried about blizzards in Louisiana.
 

goldneagle

Well-known member
4,428
858
113
Location
Slidell, LA
That is exactly what I was thinking.

Being from Colorado I am more used to Snow then Fog. Mounting them under the bumper means they will be buried in snow or covered in it about 18 inches earlier. I think the difference in height would be negligible between 18 and 36 inches from the ground. Around here they have to be mounted higher then the snow plow.

Since Zev is a transplanted Swamp rat I guess he is not too worried about blizzards in Louisiana.
When I lived in NJ we mounted the fog lights low for fog. We were not concerned about snow damage. In NJ we usually didn't venture out on the road until the plow had cleared the roads.

As far as the truck is concerned, i plan to use it mostly on the road. Therefor I want the best positioning for road use.
 

zout

Well-known member
7,744
154
63
Location
Columbus Georgia
If it were my truck - I would have mounted em where I wanted them. I would have to throw my .02 cents in for where they are at to be effective for road hazzards and fog.

There were a couple members here as well if I recall correctly that made cut outs in their front bumpers to get them up and out of the way due to their locality.

Those are awesome looking lights.
 

goldneagle

Well-known member
4,428
858
113
Location
Slidell, LA
Gee I thought someone would comment about the tilt brackets I fabricated for the lights. They would be useful for top or bottom mounting! This way you can adjust the angle of the light and not blind the driver in front of you......:neutral:
 

tm america

Active member
2,600
23
38
Location
merrillville in
I agree about they need to be closer to the ground to be effective as fog lights But they are in a very bad spot if you take it offroad.. If you had mounted them back farther they would be protected by the bumper on steep aproach angles and still give the same lighting effect.. I would mount them off of the bottom of the frame near the motor mount crossmember.. then you won't have to worry about the if you hit the trails
Oh and nice fab job on the brackets....I would make the step where it can swing to so it you hit something with it it wont bent into the tire and cause damage to the tire..
 
Last edited:

Sirblissfull

New member
470
7
0
Location
New Mexico
Ahh Zev you know shes the prettiest girl at the dance!

Your fabrication work makes me jealous heck I had to hire Soni to have a chance at making any improvements on the M820A2.
 

goldneagle

Well-known member
4,428
858
113
Location
Slidell, LA
Ahh Zev you know shes the prettiest girl at the dance!

Your fabrication work makes me jealous heck I had to hire Soni to have a chance at making any improvements on the M820A2.
Thank you for the compliment! Actually she is an ugly duckling right now! I have been busy doing all the mechanical updates and mods first. She will have to wait to get a facelift.

I decided to put Horse Stall Matts in the back. The paint I used on the floor was over-tinted and never hardened properly. I was going to repaint it but decided on the 3/4" thick rubber mats instead. They will protect the plywood and provide a non-slip surface that will handle anything I throw in there. 4 mats will cover the entire back of the truck.

Tractor Supply has them for $40 for 4' x 6' pieces. All I need is to trim 6" off 2 of the mats for wall to wall coverage. :grd:
 

goldneagle

Well-known member
4,428
858
113
Location
Slidell, LA
nice GE. im going to use horsestall mats for the cab of my truck after i lay down some brand of sound deadening.
Don't you think it's a bit overkill? The ones I am using in the box are 3/4" thick! In the cab I was going with 1/8" thick truck bed mat or shower floor vinyl. This way I can go over the hump with it. Does anyone have any other suggestions for materials to cover over the insulation?
 

goldneagle

Well-known member
4,428
858
113
Location
Slidell, LA
Ok, as I stated yesterday, I went to Tractor Supply and got 4 of the Horse Stall 4' x 6' rubber mats. I was able to install 2 of them from front to back without modifying. After careful measuring and snapping a chalk line I was able to cut the access material from the mat to make it fit. Now i have two 6' x 6" wide rubbers strips 3/4" thick. I am sure I will find a use for them.

It was easier to cut them than I thought! All it took was 3 passes of the utility knife while bending the rubber to allow the knife to cut through. Here are the pictures!
 

Attachments

muddog

Member
343
0
16
Location
Spartanburg SC.
GE Tractor Supply also sales a thinner mat that you can use for the inside of the cab. Not sure how thick they are but we have them in the store I work at part time. I think they are about 3/8 inch thick. I may get a couple to put in my trucks after I do a little painting on a truck or two.
Harold.
 

big block 88

Member
862
17
18
Location
Topeka/Kansas
Very nice, I am going to TSC tomorrow to get some mat for my cab while the seats are out.

All you fabricaotrs on here kill me I see all these good ideas and want to do them myself.
 

big block 88

Member
862
17
18
Location
Topeka/Kansas
I agree about they need to be closer to the ground to be effective as fog lights But they are in a very bad spot if you take it offroad.. If you had mounted them back farther they would be protected by the bumper on steep aproach angles and still give the same lighting effect.. I would mount them off of the bottom of the frame near the motor mount crossmember.. then you won't have to worry about the if you hit the trails
Oh and nice fab job on the brackets....I would make the step where it can swing to so it you hit something with it it wont bent into the tire and cause damage to the tire..

I would say judgeing from his step placement and design aswell as his foglight location he may not be hardcore offroadin it???
 
Top
AdBlock Detected

We get it, advertisements are annoying!

Sure, ad-blocking software does a great job at blocking ads, but it also blocks useful features of our website like our supporting vendors. Their ads help keep Steel Soldiers going. Please consider disabling your ad blockers for the site. Thanks!

I've Disabled AdBlock
No Thanks