• Steel Soldiers now has a few new forums, read more about it at: New Munitions Forums!

  • Microsoft MSN, Live, Hotmail, Outlook email users may not be receiving emails. We are working to resolve this issue. Please add support@steelsoldiers.com to your trusted contacts.

No help needed with M109 Restore..

zout

Well-known member
7,744
154
63
Location
Columbus Georgia
GE - last thing I baked in my wife's oven - I got an a** whooping - it was baking on ceramic in my Harley header pipes for my drag bike - she did not. care one iota

Truck is looking good - get a pic of that Vanner when you get er hooked up.
 

goldneagle

Well-known member
4,434
868
113
Location
Slidell, LA
UPDATE:

I am happy to announce that I have installed the Curt Class IV hitch on my M109A2. Curt Manufacturing 15605 IDC Receiver Hitch"
Automotive; $186.58 18,000 lbs. Load Rating, 1800 lbs. Tongue Weight.

It was a project! I had to move the copper air lines out of the way to be able to drill the 6 holes required. Drilling against gravity is a pain! Had to elongate the first hole on each frame because the brass fitting from the air lines were in the way of inserting the bolts. I managed to get the 6 bolts and flat spacers into place. Then I reattached the air line fittings. Once the air lines were tight I raised the hitch into place and attached the 6 nuts to secure it. Once I tightened the nuts the hitch install was done!

I took pictures of the installed hitch as well as the LED lights I installed. I also added pictures of the plywood I installed in the rear of the cab to hold my First Aid Kit and Battery Equalizer.

I used two Insulated 1" wire straps and 2 small 90 degree angles to attach the board. I will paint or cover the plywood later!
 

Attachments

goldneagle

Well-known member
4,434
868
113
Location
Slidell, LA
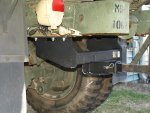
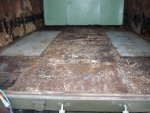
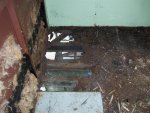
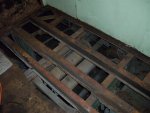
I had read one thread about a M109 camper conversion and that OP mentioned a couple times the metal cover or liner or something like that on the bottom of the box. This had led me to believe that there was a sheet metal cover over the underside of the box that enclosed the ribs/joists (Whatever you want to call them) and of course closed in the bottom side of the floor.

Is this not the case? In looking at the pictures on this thread it sure looks like there is no cover/liner closing off the bottom.

Just wondering for clarification.

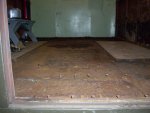
Assuming there is no metal covering, I think the plan to undercoat it after the wood seasons/dries some is very sound. I would look into one of the commercial bed liner products. That stuff is all but nuclear bomb proof. They do make do it yourself kits but putting it on the bottom and getting 100% seal/coverage could take a very long time and would be pretty difficult to be sure you have absolutely no gaps. On the inside to protect against something like leaking or burst plumbing the do it yourself stuff would be real easy if you did it before you installed anything and the floor was still bare. Bring it up an inch or two onto the wall and you have a completely waterproof tub over your floor. As you make holes in the floor for plumbing and so forth you can reseal them with some more of the coating and be good to go till your at least 102... :)

I only mention this because in all my years water has caused me more problems than just about anything else. Broken/leaking pipes, leaks in the roof, shower enclosures that do not seal 100%... Home, truck, RV, storage buildings, steel conex boxes... they all leak sooner or later and when they do it is never good. So now I go way nuts overboard to protect against the damage and to try my best to prevent it from leaking in the first place.

Stage 1 is to try to seal up the outside as best that can be done. Stage 2 is to assume it is going to get wet and build it/protect it so that when it does get wet it can stay that way for months (if undetected) without causing any harm.

92? My grandmother lived to 106 and was sharp as a tack to the last day. Not sure I want to be replacing flooring at 92....lol.... :) (Of course at that point I just might not care anymore..... Sigh..)
The sheet metal was on top of the joists not below them. The joists were exposed to the road conditions. They had the whole underside of the box undercoated. The sheet metal rusted due to the water leaks from above (leaks from open windows and leaking roof) not from below.
 

goldneagle

Well-known member
4,434
868
113
Location
Slidell, LA
You're doing an outstanding job troop!![thumbzup][thumbzup]

Maybe we will see it at Timster's LA Rally??:-D
It depends on you PB. My wife and I will be there for sure! It's the one rally I can definitely can afford to drive to. We also love to visit our friends Tim, Pam and Jesica.
 

muddog

Member
343
0
16
Location
Spartanburg SC.
Looking good , gets the wheel rolling in my head as to what I want to do to my 109. Keep up the great job, I will be following to the end on this project.
Thanks Harold.
 

zout

Well-known member
7,744
154
63
Location
Columbus Georgia
Well - ya all get a practice run at the rally/gathering over there and come to the REAL RALLY = the GA 2011 Rally where ya will have more fun ya ever had with your pants on - pictures do not even begin to explain what you will miss - if you miss this one.

You park that 109 betweeen me and PB so he does not keep me awake at night cause that CAMO group is a roudy bumch of fellas (and gals) and that four legged critter will chew your legs off just for the fun of it.
 

papabear

GA Mafia Imperial 1SG
13,508
2,383
113
Location
Columbus, Georgia
:shock:
zout;761925 You park that 109 betweeen me and PB so he does not keep me awake at night cause [B said:
that CAMO group is a roudy bumch of fellas (and gals) and that four legged critter will chew your legs off just for the fun of it.
[/B]

I'm tellin Baby Bear what you said!!!rofl

Better be prepared when you come down to the compound next time:shock::shock::roll:


Katahdin

Active member
1,303
23
38
Location
Scarborough, ME
I'm a little late to the floor party but thought I'd bump the thread with some progress I made this weekend, at least I brought pics!

The corner boards came out without much effort due to the rust and water damage but the middle boards were fastened down pretty good and were a PITA. After some trial and error what seemed to work best for me was crosscutting the boards with a jigsaw every 3-4 feet or so, then drill some quick 1/2" relief holes in the wood around the floor bolts then pop them up with a wrecking bar. Usually the board would split down the middle along the bolt and relief holes.

There was a lot of crumbled rust and dried tar pieces under the floorboards but the frame rails seem pretty good, could even see some primer on top of the rail and where the undercoating spray couldn't get to it.

After some broom work and compressed air cleanup I went to work grinding down the bolts, I hope to get the rest of the sheet metal cut up later this week, then I'm heading to Tampa/St. Pete for a week of Florida sunshine.
 

Attachments

goldneagle

Well-known member
4,434
868
113
Location
Slidell, LA
Since I am basically done with my trailer project I decided to install a Coolant Bypass Filter on my M109. I found a great deal for one on Ebay. It was for a Powerstroke Engine. Got the base with bracket and 2 filters for $28 shipped! Went to Home Depot and NAPA for fittings Spent over $80 for fittings and one gallon of antifreeze!

I took out the 3/4" plug from the side of the water pump and installed a 3/4" to 1/2" reducer. Had to loosen the alternator to make room to install a 1/2" 90 degree elbow. Then I installed a 1/2" ball valve and 1/2" NPT to 1/2" barb fitting.

Removed the 1/2" plug from the manifold next to the temp. probe. Installed 1/2" brass pipe and 1/2" ball valve. installed another 1/2" NPT to 1/2" barb fitting.

I use a piece of C channel and a 1/8" strip of aluminum to make a mount for the filter assembly on top of the fender on the passenger side. I drilled 2 holes through the fender and using the flat strip to reinforce the fender metal. I inserted the bolts through fender washers and then through the holes in the aluminum strip before going through the holes in the fender. Then I lined up the holes in the C channel and installed a flat washer, split washer and then nut. This sandwich is meant to protect the thin metal of the fender from the stress of the bracket mount. Once the C channel was secured in place I bolted the bracket from the filter housing to the C channel.

Once the filter housing was secure in place I installed a 3/8"NPT to 1/2" barb fitting on one side and a 3/8" 90 degree elbow and 3/8"NPT to 1/2" barb fitting on the other end. Attached the 1/2" heater hoses to the barb fittings. Added some Antifreeze to the radiator to make up for some of the lost fluid during the project.

Pictures are attached...
 

Attachments

goldneagle

Well-known member
4,434
868
113
Location
Slidell, LA
This past weekend I finally got around to doing some needed wiring for my truck. Had to do 4 wiring jobs together.

1 Run #2 cables to the Battery Equalizer mounted in the back of the cab.

2 Run #6 cable to a new 12 volt fuse panel under the dash.

3 Run #6 cable to a new 24 volt fuse panel under the dash.

4 Install the battery equalizer.

I started by pulling the battery tray so I would have room to work under the cab floor. I popped out one of the metal plugs in the floor behind the passenger seat. I was too small for 3 #2 cables. Using a hole punch I enlarged the hole to fit a 1-1/4" PVC male adapter. Secured the male adapter in place with the 1-1/4" nut and anti-short. I used #2 welding cables I had in stock. Paid $18 for 50 feet on clearance sale at HD. I had to run 3 lengths of the cable with lugs on the end. One for ground, one for 12 volt and one for 24 volt. Ran the cables behind the seat and attached to the Equalizer.

I drilled a hole for a 1" Romex connector near the firewall on the passenger side of center. I ran a 6/4 SO electric cord from the battery box location to the hole I drilled through the floor. Secured it in place with the Romex connector and lock nut. This cable has 4 conductors -so I had enough to tie in both fuse panels.

To protect the wiring to the fuse panels from overloads I installed some fuses near the batteries and tied the lines to the fuse panels to the fuses. I had some 50 amp 12 volt auto reset fuses. Used 1 for the 12 volt panel and 2 in parallel for the 24 volt panel.

I installed some stainless steel 1/4" bolts and nuts on the Solargizer. Drilled 5 holes in the hood on the passenger side near the hinge. The 5th hole was larger to accommodate a grommet and feed the wire through. I used 2 sets of nuts on the 1/4" bolts. The 1st layer is used as a spacer -so the panel would be raised off the hood metal. Under the hood went a layer of split washers and then 1/4" nuts to secure. I ran the wire around the air filter housing and through a 3/8" hole in the firewall that I had fitted a grommet into.. I wrapped the wire in 1/4" split loom and tyewrapped to the air line I had already run for the air ride seats. I drilled another 3/8" hole through the floor above the battery box and installed a grommet. Fed the wire through into the battery compartment.

I bent some leftover sheetmetal to attach the 2 fuse panels to. I made an offset bend to allow me to mount one side to the bump in the firewall and the other side to the firewall below the glove box. I attache the 2 fuse panels to the new mount and attached the assembly tot he firewall with self tapping screws. then i attached the #6 wires to the panels. Each fuse panel has a small ground (-) bar with spade connectors for the lines going to devices. (This way i can run a good ground wire for each circuit I wire.)

Now it was time to tie it all together. Once all the wires were terminated properly I wired them into the batteries and fuse blocks next to the batteries.

I will take some pictures tomorrow.
 
Top