• Steel Soldiers now has a few new forums, read more about it at: New Munitions Forums!

  • Microsoft MSN, Live, Hotmail, Outlook email users may not be receiving emails. We are working to resolve this issue. Please add support@steelsoldiers.com to your trusted contacts.


Reproduction smoke grenade control box - Blank Version COMPLETE!

HDN

Well-known member
1,969
4,738
113
Location
Finger Lakes Region, NY
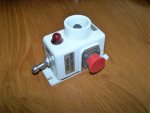
I completed a blank version of this box which can be seen here. Holes can be drilled into the blank to fit whichever switches, buttons, cannon plugs, etc. are desired.

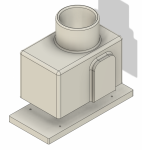
This was a request from a member here. This is a control box for a vehicle smoke grenade launcher. My references are only from pictures on the internet with pretty good orthographic angles. I don't have an actual box to measure from, but I think I got it close enough that once I get a real-life dimension of some part of the box, I can scale the 3D model to proper size. I think the print would be good enough for display on a car show vehicle.

Control Box Mockup 10.10.2023.jpg

Isometric front.jpg

Many of the hole sizes are estimates since I don't know the actual size of the switches, electrical connections, and the arm lamp.
 
Last edited:

HDN

Well-known member
1,969
4,738
113
Location
Finger Lakes Region, NY
The area I'm most concerned with are the screw slots on the mounting plate. Though the nice thing about slots and the ABS plastic that I plan to print this with is that it can be cut or sanded to size. I prefer to be as accurate as possible, but that's only possible when I have the actual part in-hand to reverse-engineer.
 

WillWagner

The Person You Were Warned About As A Child
Super Moderator
Steel Soldiers Supporter
8,392
2,405
113
Location
Monrovia, Ca.
Anyone have one on their FAV and could add some dimensions here?
Was this only on FAV? The M60s, M551, M901 we have all have smoke grenade tubes, the M551 tubes are being fabbed up, but I think all have the controls inside. If it is the same I can see what I can do to at least get accurate measurements. Let me look next week. But someone needs to remind me, it is a week away!
 

HDN

Well-known member
1,969
4,738
113
Location
Finger Lakes Region, NY
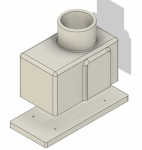
A friend of mine has a HMMWV he built with reproduction smoke grenade launchers on it, and he had a control box from which he gave me overall measurements. I think I have this pretty close now:

1698522245124.png

Overall dimensions including mounting plate are 4.25" L x 2" W x 3.25" H. The bump-out for the cannon plug adds another 3/16" to the width on one side.

I think I'll leave this as a blank for now (meaning no holes except for pilot holes for mounting the box to the mounting plate) until I can get an actual box in-hand to completely reverse-engineer. In this way I could add whatever size switches, buttons, lights, or connectors I want. 3D-printed ABS plastic can be drilled-out like any other plastic, though when it comes to fasteners like wood screws or sheet metal screws, the 3D print needs to be treated like wood in the sense that there is a weakness along grains, or in this case layer lines.
 

Crapgame

Well-known member
624
316
63
Location
Navarre, FL
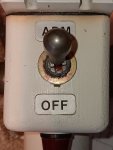
Decals are 18 point font,
SMOKE
LAUNCHER

is 43/64" x 1 11/26" black on thick aluminum foil.

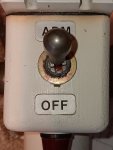
ARM, OFF & FIRE are 25/64" x 49/64" x black on thick aluminum foil


Toggle Switch is a 2 pole, 2 position Off/On, Locking Toggle, an examples being Honeywell 1NT1-6F, Eaton Cutler Hammer 8503K, the mil-spec being MS24658-22D. You can find them NIW for about $30-40, comes with 2 hex nuts, a single tooth lock washer and an inside toothed lock washer. Switch requires 1 hole 15/32" for the toggle and a smaller hole for the lock washer:
Arming Switch1.jpg

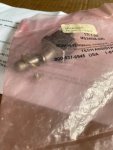
Example MS24658-22D Single Pole Off/On Locking Toggle Switch Kit:
MS24658-22D Single Pole Toggle Switch Kit.jpg
 

Crapgame

Well-known member
624
316
63
Location
Navarre, FL
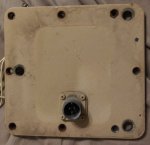
LVOSS Arming/Firing Switch connector pinout:
Arming/Firing Box side of the the cable is a MS3106R14S-6S, 6 socket Connector

Pinout: (This is from the HMMWV GMV 2x4 barrel LVOSS type cable)
A=24VDC Positive B=24VDC Negative (I don't know what you should do for circuit surge protection)
C=Left Red D=Left Black
E=Right Red F=Right Black

Cable to LVOSS main housing connector is a MS3106R14S-7S 3 pin socket connector
 

Attachments

Crapgame

Well-known member
624
316
63
Location
Navarre, FL
The area I'm most concerned with are the screw slots on the mounting plate. Though the nice thing about slots and the ABS plastic that I plan to print this with is that it can be cut or sanded to size. I prefer to be as accurate as possible, but that's only possible when I have the actual part in-hand to reverse-engineer.
The Arming/Firing Unit I have, the short side screw spacing is 15/16" center to center, the long side is 4 3/16", use #10-32 screws.
A friend of mine has a HMMWV he built with reproduction smoke grenade launchers on it, and he had a control box from which he gave me overall measurements. I think I have this pretty close now:

View attachment 909240

Overall dimensions including mounting plate are 4.25" L x 2" W x 3.25" H. The bump-out for the cannon plug adds another 3/16" to the width on one side.

I think I'll leave this as a blank for now (meaning no holes except for pilot holes for mounting the box to the mounting plate) until I can get an actual box in-hand to completely reverse-engineer. In this way I could add whatever size switches, buttons, lights, or connectors I want. 3D-printed ABS plastic can be drilled-out like any other plastic, though when it comes to fasteners like wood screws or sheet metal screws, the 3D print needs to be treated like wood in the sense that there is a weakness along grains, or in this case layer lines.
One detail, may not be important enough. These housings are sand cast aluminum alloy. They use a "pattern" made of wood, plastic or foam to pack green sand around to form the outer shape of the housing. Then a "core" is made of green sand that is set into the green sand to form the hollow cavity. In order to get that outer shape "pattern" out of the packed green sand it is made with a 2-3 degree slope on each side to allow the pattern to be removed from the packed green sand without damaging the shaped sand. So the top part where the radiused edges are should be about 1/16" smaller on each side than the bottom where the base plate attaches.

As an example, my Arming/Firing Box, the base is 2.0175" wide x 3.5235", the top just before the radiused edges is 1.966" x 3.0254565". The radius is about 0.125"

The firing button protective collar is 1.562" OD at the top and 1.6025" OD diameter right above the radius where it joins the main box. Inside diameter is 1.2605" The inside recess would be wider at the bottom where the button hole is drilled, to allow the pattern to be removed from the packed green sand.

Same for the firing button protective collar, it is sloped inside and out to allow the pattern to be pulled from the packed green sand.

Green Sand is a mix of sand, clay, oil and other addittives the binds the sand together to create the smoothest possible surface finish, and be durable enough for the foundry crew to move the casks from the packing table to the molten metal pour area.

Casks are the box frame shaped containers the green sand is packed around the pattern to form the part shape. Some are 2 separate frames that can be joined together for casting larger parts, with a parting line, using a mold release agent like talcum powder so the 2 frames can be packed/rammed separately then joined for pouring the molten metal. Each side of part will have sloped sides for the pattern to be removed so the center will be slightly larger than the ends.

The pattern is made slightly oversized, you must factor in the shrink rate for the cast metal alloy to be used. An example 7071 Aluminum, you would have about 5/32" shrinkage per foot, so each dimension you would multiply by 1.15625 to make your pattern oversized so the room temperature cast part meets the final dimensions specified.

Anybody can pack the green sand around a wood pattern. IT is all the vents, troughs and funnels that is the craftsman's secret, stuff learned from years working in the trade, to cast a part with minimal chance for air pockets or parts of the green sand walls failing, leaving a big chunk missing from the metal casting.

To help you find an LED or incandescent bulb lamp, the red warning light to show it is armed, is a bubble lens 0.5625" OD at the base x 0.445" high, plus a black plastic washer between the red bubble lens and the housing, 0.635" OD x 0.1" thick.
 

HDN

Well-known member
1,969
4,738
113
Location
Finger Lakes Region, NY
The Arming/Firing Unit I have, the short side screw spacing is 15/16" center to center, the long side is 4 3/16", use #10-32 screws.

One detail, may not be important enough. These housings are sand cast aluminum alloy. They use a "pattern" made of wood, plastic or foam to pack green sand around to form the outer shape of the housing. Then a "core" is made of green sand that is set into the green sand to form the hollow cavity. In order to get that outer shape "pattern" out of the packed green sand it is made with a 2-3 degree slope on each side to allow the pattern to be removed from the packed green sand without damaging the shaped sand. So the top part where the radiused edges are should be about 1/16" smaller on each side than the bottom where the base plate attaches.

As an example, my Arming/Firing Box, the base is 2.0175" wide x 3.5235", the top just before the radiused edges is 1.966" x 3.0254565". The radius is about 0.125"

The firing button protective collar is 1.562" OD at the top and 1.6025" OD diameter right above the radius where it joins the main box. Inside diameter is 1.2605" The inside recess would be wider at the bottom where the button hole is drilled, to allow the pattern to be removed from the packed green sand.

Same for the firing button protective collar, it is sloped inside and out to allow the pattern to be pulled from the packed green sand.

Green Sand is a mix of sand, clay, oil and other addittives the binds the sand together to create the smoothest possible surface finish, and be durable enough for the foundry crew to move the casks from the packing table to the molten metal pour area.

Casks are the box frame shaped containers the green sand is packed around the pattern to form the part shape. Some are 2 separate frames that can be joined together for casting larger parts, with a parting line, using a mold release agent like talcum powder so the 2 frames can be packed/rammed separately then joined for pouring the molten metal. Each side of part will have sloped sides for the pattern to be removed so the center will be slightly larger than the ends.

The pattern is made slightly oversized, you must factor in the shrink rate for the cast metal alloy to be used. An example 7071 Aluminum, you would have about 5/32" shrinkage per foot, so each dimension you would multiply by 1.15625 to make your pattern oversized so the room temperature cast part meets the final dimensions specified.

Anybody can pack the green sand around a wood pattern. IT is all the vents, troughs and funnels that is the craftsman's secret, stuff learned from years working in the trade, to cast a part with minimal chance for air pockets or parts of the green sand walls failing, leaving a big chunk missing from the metal casting.

To help you find an LED or incandescent bulb lamp, the red warning light to show it is armed, is a bubble lens 0.5625" OD at the base x 0.445" high, plus a black plastic washer between the red bubble lens and the housing, 0.635" OD x 0.1" thick.
This is extremely helpful, thank you!
 

HDN

Well-known member
1,969
4,738
113
Location
Finger Lakes Region, NY
I think I've got it now. Those measurements for the stickers and fillets really helped, thank you @Crapgame :)

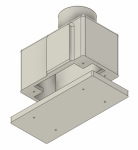
1699217644457.png 1699217689549.png

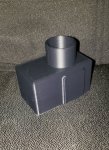
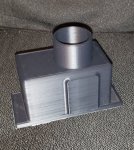
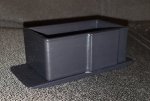
This is a blank, so anyone who wants a box can drill their own mounting holes as well as holes for switches, buttons, whatever is desired! I do have pilot holes designed so that one can use whatever sheet metal fastener they want to screw the box to the baseplate.

L x W x H dimensions: Baseplate is 4.5" x 2" x 0.25". Control box alone is overall 3.5" x 2" x 3". Add 0.125" to the width for the electrical connector bump-out. The box walls are 4 mm thick, or a little over 1/8". Button shield is 0.125" thick.
 

Crapgame

Well-known member
624
316
63
Location
Navarre, FL
Quick question: the enduser is likely to use progressing grit sandpaper to reduce the print lines, although the original has a rough cast finish on most sides.

Wouldn't the box itself be better when combined with a 2" x 4.5" x 3/16" thick aluminum base plate to take most of the stress? One can cut one themselves from scrap or go to www.onlinemetals.com to buy a single piece of aluminum bar stock cut to order.

Also, I have been working on my own "pattern" to have the LVOSS main housings cast in aluminum but I no longer live near a metal foundry. I used to be able to deal direct with a metal casting foundry up in Denver, CO but doing test shots and corrections through UPS isn't efficient. Original aluminium launchers fetching $800 + on ebay; the 3D plastic printed ones are subject to weather and UV light that weaken and break down the plastic making them prone to damage.

The main housing would be cast 7071 Aluminum Alloy, cast using a core to form the hollow backside (and to reduce the material cost), so one can install the electrical or pneumatic launch system of their choice. Then 4 individual barrels can be constructed to launch actual smoke signals, or, in my friend's case, to launch pre-rolled T shirts via compressed air during Mardi Gras parade.

Then to protect your parts, there were dust covers made from 1000d Cordura Nylon, to cover all 4 barrels with a hood, to keep birds and insects from making nests in them, to keep rain and snow out, and to stop the whistling as you travel at highway speeds. The original black rubber "condoms" are expensive and hard to find. Sunlight, heat, and UV light all break down the rubber/silicone rubbers in a short time, making them harden, crack then fall apart. Some types of "Armor All" style automotive dressings can be UV resistant to help reduce the deterioration of your rubbers.

Each and every piece of your Restored Military Vehicle or Resto-Modded Military Vehicle are an investment, some pieces have not been manufactured in years or decades or even since WWII. Some parts on your Vehicle can no longer be replaced, originals now Unobtanium. Military Vehicle Parts made from Rubber, Silicone or other Petrol-oil-Gas derivative substances have a shelf life. Many of them begin breaking down the second they are made. This phenomenom seems accellerated since the EPA enviro-nazi movement, you can find plastic polymer or rubber based parts still in the original 1942 made pressed paper box, that are still like new when you take it out of the box. Then others, look at the simple LC-2 ALICE Rucksack, the main flap, the green rubberized underside of the main flap, I've seen rucksacks made from the 1990s on that are otherwise never mounted on a frame or carried by shoulder straps but that flap lining is already gone, peeling away or sticky like honey.
Protect what you can.
 

Crapgame

Well-known member
624
316
63
Location
Navarre, FL
The Arming/Firing Unit aluminum foil labels, I worked with Greg at www.dataplates.net to have the specialized, unique labels and identification plates on the SF Ground Mobility Vehicle GMV HMMWVs reproduced on the black coated aluminum plates. He does foil labels, too.
 
  • Like
Reactions: HDN

HDN

Well-known member
1,969
4,738
113
Location
Finger Lakes Region, NY
Quick question: the enduser is likely to use progressing grit sandpaper to reduce the print lines, although the original has a rough cast finish on most sides.

Either that or the surface can be smoothed with acetone vapor.

Wouldn't the box itself be better when combined with a 2" x 4.5" x 3/16" thick aluminum base plate to take most of the stress? One can cut one themselves from scrap or go to www.onlinemetals.com to buy a single piece of aluminum bar stock cut to order.

That's an interesting idea. The box's walls are 4 mm thick, which I believe will provide plenty of strength for this application. If something does whack it hard enough to cause it to de-laminate at the layer lines, an aluminum insert can help hold it together. I really have no concept of how strong 3/16" aluminum is - it wouldn't bend easily, would it?

Also, I have been working on my own "pattern" to have the LVOSS main housings cast in aluminum but I no longer live near a metal foundry. I used to be able to deal direct with a metal casting foundry up in Denver, CO but doing test shots and corrections through UPS isn't efficient. Original aluminium launchers fetching $800 + on ebay; the 3D plastic printed ones are subject to weather and UV light that weaken and break down the plastic making them prone to damage.

I'm glad you mentioned the UV degradation. I was originally going to print this with ABS believing that it was actually pretty UV-resistant, but I was mistaken. From what I've read, ASA is a really good plastic for this application, so I'm going to buy a spool of that to use instead!

The main housing would be cast 7071 Aluminum Alloy, cast using a core to form the hollow backside (and to reduce the material cost), so one can install the electrical or pneumatic launch system of their choice. Then 4 individual barrels can be constructed to launch actual smoke signals, or, in my friend's case, to launch pre-rolled T shirts via compressed air during Mardi Gras parade.

Now I want a set of T-shirt launchers for my truck! LOL! I wouldn't mind printing inert replica smoke grenade launchers if I could get measurements of the actual device. They might look nice on the trunk of my Chrysler 200? :p

Then to protect your parts, there were dust covers made from 1000d Cordura Nylon, to cover all 4 barrels with a hood, to keep birds and insects from making nests in them, to keep rain and snow out, and to stop the whistling as you travel at highway speeds. The original black rubber "condoms" are expensive and hard to find. Sunlight, heat, and UV light all break down the rubber/silicone rubbers in a short time, making them harden, crack then fall apart. Some types of "Armor All" style automotive dressings can be UV resistant to help reduce the deterioration of your rubbers.

If one wanted to make the condoms, I can see making some kind of mold for black silicone rubber that would be UV-resistant. I'd even like to try and make truck steering knuckle zipper boots in that fashion.

Each and every piece of your Restored Military Vehicle or Resto-Modded Military Vehicle are an investment, some pieces have not been manufactured in years or decades or even since WWII. Some parts on your Vehicle can no longer be replaced, originals now Unobtanium. Military Vehicle Parts made from Rubber, Silicone or other Petrol-oil-Gas derivative substances have a shelf life. Many of them begin breaking down the second they are made. This phenomenom seems accellerated since the EPA enviro-nazi movement, you can find plastic polymer or rubber based parts still in the original 1942 made pressed paper box, that are still like new when you take it out of the box. Then others, look at the simple LC-2 ALICE Rucksack, the main flap, the green rubberized underside of the main flap, I've seen rucksacks made from the 1990s on that are otherwise never mounted on a frame or carried by shoulder straps but that flap lining is already gone, peeling away or sticky like honey.
Protect what you can.

Amen!
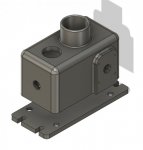
See my comments in green. Thank you for your insight :tank:
 

HDN

Well-known member
1,969
4,738
113
Location
Finger Lakes Region, NY
I FINALLY got the mounting plate to print without warping. It seems Polymaker ASA may leave a residue on the print bed that affects adhesion, unlike the eSun ABS I use. I had to wash the bed with dish soap to solve the adhesion problem.

The blank is functionally done! I have some post-processing to do to make it look nicer.

20231115_173540.jpg
 

HDN

Well-known member
1,969
4,738
113
Location
Finger Lakes Region, NY
Acetone vapor smoothing of ABS and ASA 3D prints hasn't been a science. However, I'm working on making it one since I'm not a fan of eyeballing stuff. I'd rather calculate parameters to get consistently good results.

I'm experimenting with a process that consists of a warm acetone vapor bath. Care needs to be taken that acetone vapor is not exposed to an open ignition source. My setup consists of a single electric stove burner and a small pot with a glass lid.

I think I'm getting close to the results I want. My desired outcome is a smooth outer surface where, when painted, layer lines aren't discernable.

Here's a failed print of a box I used for an experiment:

20231121_192051.jpg
 
32
89
18
Location
NC
Acetone vapor smoothing of ABS and ASA 3D prints hasn't been a science. However, I'm working on making it one since I'm not a fan of eyeballing stuff. I'd rather calculate parameters to get consistently good results.

I'm experimenting with a process that consists of a warm acetone vapor bath. Care needs to be taken that acetone vapor is not exposed to an open ignition source. My setup consists of a single electric stove burner and a small pot with a glass lid.

I think I'm getting close to the results I want. My desired outcome is a smooth outer surface where, when painted, layer lines aren't discernable.

Here's a failed print of a box I used for an experiment:

View attachment 911105
Fascinating thread and nice work on the acetone vapor bath.
 

Csm Davis

Well-known member
4,152
376
83
Location
Hattiesburg, Mississippi
The Arming/Firing Unit aluminum foil labels, I worked with Greg at www.dataplates.net to have the specialized, unique labels and identification plates on the SF Ground Mobility Vehicle GMV HMMWVs reproduced on the black coated aluminum plates. He does foil labels, too.
Love the t-shirt launcher idea! How far from Hattiesburg is your friend? Would love to talk to them maybe visit and look at it if able.
 
  • Like
Reactions: HDN
Top
AdBlock Detected

We get it, advertisements are annoying!

Sure, ad-blocking software does a great job at blocking ads, but it also blocks useful features of our website like our supporting vendors. Their ads help keep Steel Soldiers going. Please consider disabling your ad blockers for the site. Thanks!

I've Disabled AdBlock
No Thanks