• Steel Soldiers now has a few new forums, read more about it at: New Munitions Forums!

  • Microsoft MSN, Live, Hotmail, Outlook email users may not be receiving emails. We are working to resolve this issue. Please add support@steelsoldiers.com to your trusted contacts.

Scratchbuilt 1/8 scale M915A1

BrassBuilder

Member
30
0
6
Location
Mitchell, SD
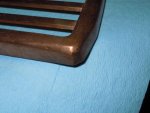
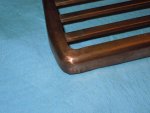
A few pictures of the grille that I built last winter. Now that I've figured out how to beat copper over a wood buck without a bunch of creases and warpage, I think the roof section will be pretty easy now.
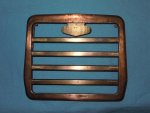
Grille1.jpgOverall shot

grille2.jpgCloseup bottom right corner (bottom driver's side actually)
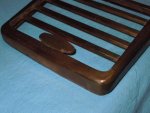
grille3.jpgTop corner

grille4.jpgOther bottom corner

This was a pain to make. This was probably about the 20th try or so before I finally figured it out. But now I know :) What appears to be fairly large "dents"...i.e..the bottom along the middle...are actually very small imperfections. A good coat of primer will take care of all of them.

Built the grille last winter...the radiator this winter....yeah...this shouldn't take much over a millennium to build. LOL.

Mike
 
Last edited:

trukhead

New member
725
5
0
Location
dane/wi
And that, my friends, is my big issue right now. It is harder to do than it appears since I have parts so close together. Compound that with the fact there are 42 "tubes" and around 100 fins (or so), I am looking at approximately 4200 individual solder joints.

Mike
HOw about fluxing and tinning the tubes, then fluxing the fins, then assembling the radiator and then baking it to flow the tinned tubes to the fins.
The brain slowed the rate of spinning long enough for this idea to pop out...... :doghead:
 

BrassBuilder

Member
30
0
6
Location
Mitchell, SD
HOw about fluxing and tinning the tubes, then fluxing the fins, then assembling the radiator and then baking it to flow the tinned tubes to the fins.
The brain slowed the rate of spinning long enough for this idea to pop out...... :doghead:
That is a little different idea than what I tried. I tinned the tubes (actually .016" x 1/4" flat brass), slipped a few fins on, fluxed everything and then used a small butane torch to heat it up. It didn't work as good as I thought. I like your idea, but my problem is to keep 100 or so flimsy .002" thick shim stock straight with a uniform .025" spacing between rows. That is a big problem. I'm thinking of some sort of a frame or jig I could build.

Thanks for the idea though. It gives me something to think about.

There is a radiator manufacturer in town that specializes in aluminum radiators. I was thinking about talking to them about this.

Mike
 

trukhead

New member
725
5
0
Location
dane/wi
How about assembling tinned tubes and fins as described before and sandwich .025 shim stock between each fin and the next fin across the width of the radiator and tighten the stack of shim stock and then connect the stack to one side of a resistance soldering outfit and hook the tubes to the other side of the resistance soldering unit and give it a zap.

Ooh da brain hurts now!:idea: :tin hat:
 

BrassBuilder

Member
30
0
6
Location
Mitchell, SD
How about assembling tinned tubes and fins as described before and sandwich .025 shim stock between each fin and the next fin across the width of the radiator and tighten the stack of shim stock and then connect the stack to one side of a resistance soldering outfit and hook the tubes to the other side of the resistance soldering unit and give it a zap.

Ooh da brain hurts now!:idea: :tin hat:
Hmmmmmm....that is an idea. I've been using .025" aluminum shim stock for a spacer when I was experimenting soldering these individually. Actually, I could probably do something like this, but toss the whole works in an oven and let it bake.

I'll have to contemplate this....while I make another 100 or so more fins.

Thanks

Mike
 

BrassBuilder

Member
30
0
6
Location
Mitchell, SD
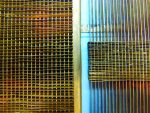
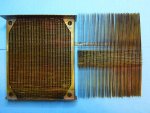
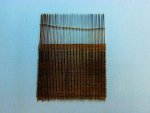
Here is an update of where I am at on the build. I started rebuilding the radiator a few months ago. After shelling out a few hundred for a stereo 3x-90x power microscope, I can finally see what I am soldering. This is going pretty good now. The pictures shows how much closer the fins will be. I am getting almost double in there from what I had before. The space is a lot closer to where I want it too. Hoping to get all the fins soldered and the top and header plates in before I leave for Afghanistan.

Radiator_comp_01.jpg Radiator_comp_02.jpg

The first few fins took me almost an hour each to get soldered in. I'm getting down to 5-10 minutes now. There are 41 individual solder joints. I found controlling the flux to bare minimum helps too. I'm guessing I will have about 150 fins in this. The other one has around 75. So....150 times 41 is a lot of solder joints! (6150 to be exact). I got my work cut out for me.

Mike
 

BrassBuilder

Member
30
0
6
Location
Mitchell, SD
Grrrr.....ran out of fins. Need to stop and make about 50 more. I'll probably go ahead and make the side rails while I'm at it. I want to try to etch them instead of cutting them out of the sheeting.

radiator1.jpg
 

BillabongKong

Member
Steel Soldiers Supporter
107
5
18
Location
Glen Ridge NJ
Fantastic Craftsmanship! I worked for a few years building Arcitectural Models and Museum Exhibits. I know how painstaking and frustrating this work can be. You might want to include a scale in your pictures as reference.
If your so inclined you might send this to Stacey David on the TV show "Gears" I am sure he would feature such fine work and bring favorable public relations to the MV comunity.
I am Subscribed ! Can't wait to see more!
 
Last edited:

BrassBuilder

Member
30
0
6
Location
Mitchell, SD
I should have thought of that myself....

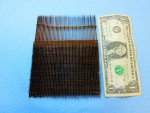
radiator2.jpg

Total tally so far:

88 fins
44 "tubes" (actually 1/4" strips representing tubes)
3872 solder joints (each intersection of the fin and tube gets soldered....one at a time...)

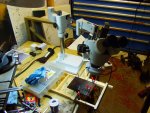
microscope.jpg

The setup so I can see what the heck I am doing. I got a trinocular microscope so that I can eventually get a camera to shoot some video of what I am doing. Just visible behind the microscope is the jaws to the resistance soldering handpiece I am using to solder these. I filed the carbon jaws to fit in between each row of tubes. The syringe has solder flux. I found that using the minimum amount of flux was good. :)

Stacey David would be interested in this?

Mike
 

BrassBuilder

Member
30
0
6
Location
Mitchell, SD
Hope life is treating you kindly and everything is going your way!
I'm in Afghanistan right now :)

Life just can't get any peachier for me LOL.

I'm going to get back on the truck just as soon as I get back. Been itching to work on it again. Working on getting a CAD program down to help me get some parts made.

Should be back in a few months.

Thanks for the followup!

Mike
 

BrassBuilder

Member
30
0
6
Location
Mitchell, SD
I'm baaaaaack!

Hoping to get back on this project soon. I'm going to start over on the radiator. After I figured out a technique, the last few fins that I soldered in look a lot better than the first few that I soldered. I'm also going to etch the fins out of .003 brass instead of the .004 that I was using. I used .005 on my first radiator. I'm also going to try to find some thinner aluminum to use as a spacer between the fins. I want these as close together as I can get them. In theory, I should be able to get an extra fin in after everything 3-4 rows since I am using .001" thinner brass.

I'll post updates. I got all the material on hand...just need to get the workshop cleaned up and working on new artwork for the photo etch mask.

Stay tuned.

Mike
 
Last edited:

jw4x4

Active member
1,082
6
38
Location
Dayton, Ohio
Great to have you back. Your build is captivating, to say the least. We are all eagerly awaiting updates (pics) on your progress.
 

trukhead

New member
725
5
0
Location
dane/wi
Heyy! Welcome back!! How about aluminum foil, pop cans, beer cans for different thicknesses of aluminum stock! Cheap and readily available is always nice! Great to see you back and on the build![thumbzup]:beer:or pop whatever your choice!
 
Top