• Steel Soldiers now has a few new forums, read more about it at: New Munitions Forums!

  • Microsoft MSN, Live, Hotmail, Outlook email users may not be receiving emails. We are working to resolve this issue. Please add support@steelsoldiers.com to your trusted contacts.


Successful Deuce Recovery

silverstate55

Unemployable
Steel Soldiers Supporter
2,068
855
113
Location
UT
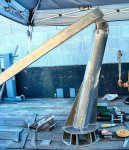
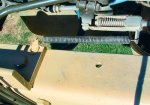
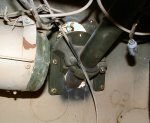
This is typically what I start a fabrication project with: rusty old steel I salvaged last year from my Grandfather's old farm...I spent nearly 2 years cleaning his old farm up in order to be able to sell it, and I salvaged several tons of used steel from there. I grind the rust off, then get the smaller pockets of rust with a braided wire wheel on my grinder. All of these pieces (except for the 3-inch square tubing) were some part of a couple of home-made agricultural implements my Grandfather made way back when...I cut them all apart to reuse all the steel. The flat pieces were cut into triangular reinforcements for the spindle crane base, the C-channel was used for the under-bed reinforcements, and these leftover pieces will end up on the crane boom itself.

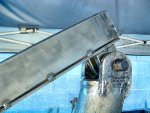
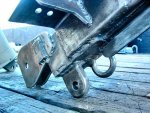
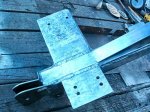
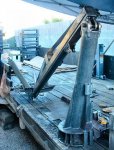
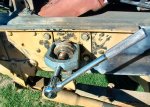
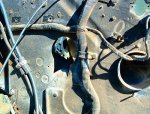
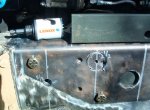
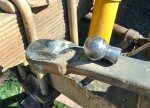
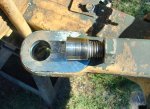
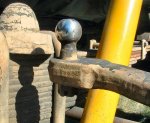
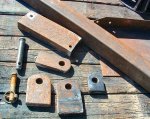
These pieces are being used for the boom on my tailgate crane; the pieces with the 1-inch holes will be the pivot points for the boom, and I'll use the 1-inch pin that I've started to remove the rust from in the left of the photo. They're about 2/3 of the way done as of today, tomorrow I need to finish making them all uniform in size and rust-free, then tack-weld them into place on top of the crane mast. The pivot piece in the lower right of the photo is rust-free and in final condition.
 

Attachments

Last edited:

silverstate55

Unemployable
Steel Soldiers Supporter
2,068
855
113
Location
UT
Been working non-stop on the boom for my tailgate crane; having to grind off rust and scale definitely slows things down. The boom is mostly done now, just have a little bit of cleanup left and then it's ready to paint.

I had a like-new Harbor Freight 8-ton engine lift hydraulic cylinder that was from an aborted project (ATV dump trailer; the cylinder was too slow, so someday I'll install 12-volt hydraulic pump and ram), so I'll use that to lift/lower the boom. I also have a leftover Harbor Freight 3500-pound 12-volt ATV winch that has never been used, it will mount on the end of the boom and connect to a series of pulleys to hopefully make it more efficient in raising/lowering the hook.

The boom is made from 3-inch square steel tubing, capped on each end with 1/2-inch steel plate. The pivots were already drilled for a 7/8-inch opening, and I happened to have an old 7/8" diameter pin for these. The reinforcement plate for the pivots & upper hydraulic lift cylinder mount is 1/2-inch steel plate. A pulley wheel will be mounted on the end of the boom to keep the winch cable fairly straight as it exits the winch, then go through a double-sheave hook and relay through an ATV snatch block; the circular ring mounted on the bottom of the boom front is for the winch cable hook to secure itself to. The top, sides, and bottom of the boom have been reinforced with fully-welded steel pieces. I made sure to weld in short sections to prevent overheating & warping.

The short pieces of round steel tubing welded together in pairs are channels for the power & ground cables to run through, for the winch on the end of the boom that will act as a power hoist.

The primary purpose is to lower/lift spare tires/wheels from the bed, as well as anything else too heavy for me to lift & when a forklift is not available. I hope to also be able to lift/lower barrels full of WMO/UMO as well.

All that's left to do is to fabricate the lower hydraulic cylinder mount & weld it into place, then after painting, wire up the winch and set up the cabling. It's almost done!!
 

Attachments

silverstate55

Unemployable
Steel Soldiers Supporter
2,068
855
113
Location
UT
FINALLY got the dang crane finished...it dragged out much longer than I had hoped for, but at least it's done & done right.

Got it wired up via the 12-volt Flaming River battery cut-off switch (ground wire) and a 40-amp automotive circuit breaker (positive wire near battery box). I soldered & heat-shrunk ALL electrical connections; I also installed 2 sets of spade connections so I can disconnect the winch wiring at the crane base & at the pivot point for the boom/stand.

At the base of the crane I coiled the power & ground wires to allow room for movement; it was too much of a PITA to configure running the wires through the crane core so I went the easy route. The coils should allow for plenty of movement and stretching; all tests so far pass with flying colors.

The pulleys were all left over from previous projects and the double-sheave hook was recovered from my Grandfather's farm. It powers up & down just fine, it should handle spare tires with ease!

Now on to installing my power steering conversion...
 

Attachments

silverstate55

Unemployable
Steel Soldiers Supporter
2,068
855
113
Location
UT
Started removing parts for my power steering conversion; I bought one of M-35Tom's kits (Waterloo Specialties) and sourced a rebuilt steering box from Power-Steer in Dallas, TX.

As always, removing the driver's side tire & fender assembly make things MUCH easier. I just installed fresh engine coolant & recently rebuilt the IP, so I really didn't want to remove these in order to get the steering box out. So, I put a cutoff blade in my grinder & cut the steering shaft off & removed the steering wheel (not shown in photos).

For the drag link, the front adjusting nut wouldn't budge, but the rear did, so I backed the rear adjusting nut out enough to remove it from the steering knuckle. I used a standard Pitman Arm puller and it popped right off. I ground off the 6 rivets holding the external reinforcing plate, and will punch those out tomorrow. I plan on torching off the steering shaft in order to remove the steering box without having to remove the IP or move the engine block.

This manual steering box has pi$$ed me off for the last time...it leaks like crazy, and it was obviously replaced while in military service not long before it was auctioned. The drain plug is a !@#$%^& to remove every stinking time, and a couple of other things really irk me about this particular box. So I will enjoy torching it in as many bits as necessary to remove it.

I'm so excited!!
 

Attachments

silverstate55

Unemployable
Steel Soldiers Supporter
2,068
855
113
Location
UT
That should get the job done,Great Work.
Thanks Dwight, I appreciate the kind & encouraging words!

I hope to be done in time for Veteran's Day, as I was invited to join another group of MVs for the downtown Las Vegas parade. I'll be hitting things hard to try to get everything done in time for it.
 

JCKnife

Well-known member
1,367
46
48
Location
Kentucky
That crane exhibits considerable ingenuity and badassery! What kind of capacity does it have? Looks like you have already put it to work!
 

silverstate55

Unemployable
Steel Soldiers Supporter
2,068
855
113
Location
UT
Thanks Joe! It sure is a heavy ba$tard, difficult to get assembled but it works quite well! I haven't load tested it but it handled all my scrap metal without a hitch...some of the scrap metal pieces were several hundred pounds in weight, the whole truck leans to the passenger's side now...I hope to cash some of it in to help pay for registration this week (once power steering is installed).

Since 95% of the components of the crane were "on-hand" and useable, I tend to over-build for safety's sake as well as efficiency. The little ATV winch never sounded like it was struggling, which is what I was aiming for. I have some heavier items I'll be lifting & moving around in the next 6-12 months, so I'll take photos & report back on my results.
 

silverstate55

Unemployable
Steel Soldiers Supporter
2,068
855
113
Location
UT
More work on the power steering conversion today. Used my cutting torch to cut off the steering shaft, then I removed the air line from the air compressor in order to remove the steering box.

My goal was to install as much as possible without having to disconnect/remove many of the engine appliances and especially not the radiator...I should have made these notch cuts in the radiator shroud several months ago when I had the radiator recored, but I forgot as I was excited to get it all back together. Oh well.

Once the steering box was out of the way, I made some measurements & marked out where I needed to notch the radiator shroud to make the power steering pump fit. I used my pneumatic cut-off tool to make the cuts, then cleaned up the edges with a file to smooth it out. The drain tube was soldered to a piece of the shroud on the side, so I cut it off too as I couldn't reach it any other way. I had to remove the two threaded studs in the IP housing closest to the frame to get the pump to fit, but I eventually got it all into position and cinched down. So I didn't have to remove the radiator nor move the engine block in order to install/remove components, so it made me happy.

I located the 4 blind-nut holes that used to hold the voltage regulator on the firewall; in the photo they are delineated by the red circles. They cleaned out pretty easy, and the power steering reservoir was mounted to the firewall.

Then I drilled all the holes for the reinforcement brackets & installed those (12 holes so far; still 1 more to go tomorrow). It got dark on me with the time change, so I'll get photos first thing in the morning. I'll also mount the new power steering box tomorrow and hopefully get the steering shaft done as well.
 

Attachments

m-35tom

Well-known member
Supporting Vendor
3,021
221
63
Location
eldersburg maryland
warren, looks great! you may have to slide the reservoir down some for the hood to clear??
i had not thought of this additional advantage to having the fender off. (not having to remove the radiator.)

tom
 

silverstate55

Unemployable
Steel Soldiers Supporter
2,068
855
113
Location
UT
warren, looks great! you may have to slide the reservoir down some for the hood to clear??
i had not thought of this additional advantage to having the fender off. (not having to remove the radiator.)

tom
Hi Tom, yes I will slide the reservoir down to clear the hood...as it is, it will clear, but I'll slide it down an inch or so to ensure that there won't be any issues. I've taken it out of the ring clamps to paint it, so when I remount it, it will sit just right.

Removing the radiator makes mounting the power steering pump MUCH EASIER; I had to remove the 2 outer threaded studs to get it to fit, but I got it on. I had just filled it with fresh SCA coolant a couple of months ago & didn't want to have to drain it & refill it...so I was on a mission! :D
 

silverstate55

Unemployable
Steel Soldiers Supporter
2,068
855
113
Location
UT
Sometime when the steering column & box were replaced before this truck was auctioned, the firewall was cut to (I assume) ease installation/maintenance of the steering column. I couldn't have this, it was bugging the crap out of me, so I straightened out the cut/bent portions and rewelded the cuts to get it back to normal.

Much better! Now I need a new gasket to surround the steering column, to keep the dust/dirt out....
 

Attachments

silverstate55

Unemployable
Steel Soldiers Supporter
2,068
855
113
Location
UT
Back to the power steering install!

A new 1-1/2" hole is required to be drilled for the steering box adjusting nut to clear; otherwise, the box will not sit flush against the frame. I picked up a hole saw from Lowe's for less than $12, and it worked perfectly. I had a cup of water handy to cool the saw so it didn't dull out; I would drill for several seconds, then dip the hole saw in the water to cool it & retemper the tool steel. It sliced right through the frame & the reinforcement plate like they were butter! Total time from when I started plugging my drill in to the extension cord until the hole was drilled was less than 10 minutes. And the hole saw blade tips are still sharp!

Mounted the steering box on the frame, and drilled the third required hole. I hand-sharpen my drill bits, so they are typically so sharp that you just use the weight of the drill itself to keep the bits against the cutting surface, otherwise they try to cut in too deep with any pressure and jam....dipping them occasionally into a cup of water to keep the cutting edges cool & hardened makes it feel like you're drilling through wood.

I had to drill 2 additional 3/8" holes through the top of the interior reinforcement plate, for the grill guard support bracket to fit again (holes are outlined by 2 red circles in photo). The holes through the frame were used as guides to drill through the reinforcement plate.

In total, I had to drill 14 new holes in this frame area: 2 on the front spring hangar; 4 on the side of the frame for the interior reinforcement; 2 on the top of the frame for the frame reinforcements; 2 on the top of the interior frame reinforcement (through the existing frame holes) for the grill guard reinforcement bracket); 1 for the steering box adjusting nut; and 3 for the steering box mounts.

I just discovered that I may have to drill one additional hole on the top of the frame for the bracket that holds the end of the throttle linkage...I'm still looking for something else to bolt it to, if not, I'll have to drill an additional hole. I'll cross that bridge when I come to it, I suppose.
 

Attachments

silverstate55

Unemployable
Steel Soldiers Supporter
2,068
855
113
Location
UT
The tapered ball stud needed to be removed from the steering arm in order for the the new drag link to fit in. I struggled quite a bit trying to get the stupid thing out...it's a tapered fit, but after several minutes of hammering it with a 12-lb sledge, it wasn't budging at all. I heated it up, still nothing...soaked with penetrating fluid, NOTHING. Put a 36-inch pipe wrench on it with a cheater pipe, NOTHING. DANGIT!!

So I used a cut-off wheel in my grinder to remove the top portion in order to drill out the remainder. I drilled a 1/2-inch hole all the way through the thickness of the steering arm, and after a couple of solid strikes from the 12-lb sledge it finally popped free. Good grief, this was one of the hardest things to do!
 

Attachments

silverstate55

Unemployable
Steel Soldiers Supporter
2,068
855
113
Location
UT
The throttle pedal return spring was connected to a tab that bolted into the old manual steering box...I didn't feel like drilling any more holes, so I welded the old tab to the new reinforcement bracket. Problem solved!
 

Attachments

silverstate55

Unemployable
Steel Soldiers Supporter
2,068
855
113
Location
UT
Hooked up all the power steering hoses & lines today...pretty self-explanatory (I hope), as this was the only way I could get everything to fit & line up.

I added some fuel lines to protect the steel lines, and some red heater hose over the return line to protect it from chafing/rubbing (2 spots I was worried about with this line). The hoses only fit one way, and the steel tubing fits onto compression fittings on the rubber hoses. The large suction hose fit between the frame & engine block without rubbing on anything, but I may try to add some rubber-coated clamps to it later to prevent it from swaying & rubbing on anything.

The reservoir has a lot of mounting play engineered in, so you have quite a bit of flexibility in how you want/need to mount it with the return hose. This way worked best for me, placing the least amount of tension on the return hose and the least amount of rubbing on anything. I did place a 3/4-inch heater hose over it as a protective sleeve, and used hose clamps to keep it in place.
 

Attachments

silverstate55

Unemployable
Steel Soldiers Supporter
2,068
855
113
Location
UT
Got the steering column (uppper & lower) installed today, as well as the steering wheel. I opted to cut the steering opening in the front of the cab wall much larger to allow for more leg room under the steering wheel.

Nobody makes more work for themselves better than I do...the firewall fix I did the other day was nullified by the new cut I made; I should have waited as I would have just needed to make one horizontal cut at the bottom of the area I repaired, and would have been done. Oh well.

And then to make things worse, when I was cutting the opening larger, my grinder with cut-off wheel got away from me and sliced right into the primary wiring loom next to it...4 wires cut right through, several others nicked. So I spent the majority of my morning cutting open the loom, splicing/soldering/heat-shrinking the cuts to repair them. Got done just in time to get ready for work at my "Day Job." I'm an idiot... :doh:

Someday I'll need to fabricate some sort of filler panel or rubber/vinyl gasket to fill the holes left around the steering column opening. But at least it's coming along and I should be able to make it to the DMV by Friday.
 

Attachments

Top
AdBlock Detected

We get it, advertisements are annoying!

Sure, ad-blocking software does a great job at blocking ads, but it also blocks useful features of our website like our supporting vendors. Their ads help keep Steel Soldiers going. Please consider disabling your ad blockers for the site. Thanks!

I've Disabled AdBlock
No Thanks