• Steel Soldiers now has a few new forums, read more about it at: New Munitions Forums!

  • Microsoft MSN, Live, Hotmail, Outlook email users may not be receiving emails. We are working to resolve this issue. Please add support@steelsoldiers.com to your trusted contacts.


Successful Deuce Recovery

silverstate55

Unemployable
Steel Soldiers Supporter
2,068
855
113
Location
UT
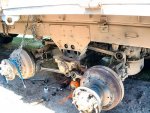
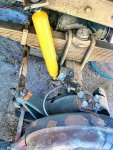
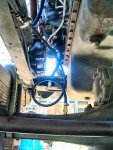
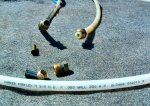
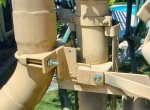
Received the final 8 torque rod bushings late Thursday, so I spent all day Friday pressing them back into the torque rods, then reassembling the entire rear suspension...thank God for whomever invented air tools! I installed 1/4-inch fuel line as axle remote breather lines, connected them to a "T" fitting, and ran the length inside the frame to connect with the front axle remote breather hose when I get it installed later this week. It will terminate somewhere in the engine compartment, with a small fuel filter on the end to keep dirt & contaminants out.

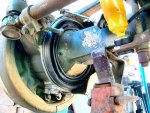
I didn't like the cracking starting on the rear brake lines, so I went to my local All-Hose shop and had them fabricate 2 braided stainless steel replacements while I waited; the price was cheaper than ordering NOS replacements. Reconnected both driveshafts and torqued/greased them properly.

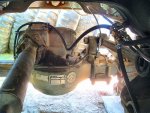
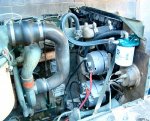
Finished installing all new coolant hoses and received a new thermostat/gasket from Erik's; I'll install it when I'm through flushing the cooling system. Changed the oil filters and drained the old oil out; I noticed that the 2 oil pan drain plugs didn't have gaskets so I purchased 2 copper crush washers from Erik's and installed them to prevent leaks. Then refilled with new 15W-40 diesel oil. I also changed the lubricants in the transfer case & transmission, as well as the steering box. I used Valvoline Synthetic 75W-90 (NAPA #975) in all of these, as they are MT-1 compliant and "Yellow Metal Friendly." I also stared cleaning off Zerk fittings in preparation for fresh applications of grease.

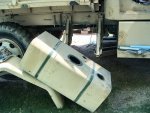
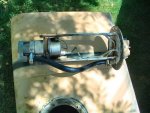
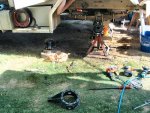
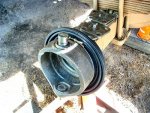
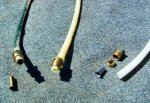
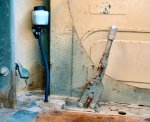
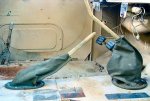
I removed the fuel tank & dismantled it to inspect the interior, and was pleasantly surprised to find NO RUST nor any other contaminants/crap inside. The lift pump looked great, so I replaced the rubber hose on it with a new one and cleaned it up in preparation for reinstallation. I used some industrial-strength detergent inside the tank to clean out any possible contaminants, then flushed it thoroughly and let it dry for more than 24 hours (not hard in such a dry climate here). I also disconnected the fuel supply line from the primary filter, and the return line from the secondaries, in order to flush out the lines with solvent and compressed air...nothing but diesel fuel came out, so no worries there.

When I drained about 25 gallons of diesel fuel out of it, the fuel came out looking great. I had added some Biocide when I brought it home, and it looked like it did its job! I filtered it and placed it in a clean 55-gallon drum while I cleaned the tank. Once the tank was cleaned & dried, I reinstalled everything with fresh gaskets & sealant, then pumped the re-filtered diesel fuel back into the tank, while adding a little fuel treatment & a little more Biocide. I turned on the Accessory switch, cracked the primary fuel filter drain petcock, and instantly it started spewing clean diesel fuel with great pressure! WHEW! I cracked the secondaries and after a few minutes started getting fuel flowing through there too.

I hope to be able to fire her up tomorrow in order to check for leaks/problems with all the new fuel lines I installed, as well as flush out the cooling system and put in fresh coolant.

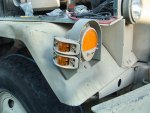
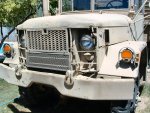
I've also been working on modifying the turn signal housings to accept 2 LED marker lights; one for parking/marker lighting and the lower one for turn signalling, to be fully DOT compliant in case I run across a revenue-hungry jurisdiction. All wiring is soldered together with the military-style connectors, and connected inline with appropriate stock wires. The turn signals themselves have been replaced with LED units I bought from a Classifieds vendor.

The light at the end of the tunnel is getting closer & closer!!!
 

Attachments

silverstate55

Unemployable
Steel Soldiers Supporter
2,068
855
113
Location
UT
Hmmm....batteries are DEAD, even though I've had the 24-volt Solargizer on them for several days. So, I disconnected the bridge cable between the 2 batteries and soldered up some wiring & connectors for my float charger; I'll let that charge up for a couple more days, and in the meantime turn to other tasks.

I decided to get started on tearing down the front axle hubs/drums and replacing the zippered boots. There wasn't major leakage, but the bottoms of each steering knuckle were starting to get greasy & crusty. I had ordered a couple of black Silicone replacement boots from Erik's, along with new inner & outer retaining clamps last week, and got busy on the passenger's side.

I was pleasantly surprised when I found NO water contamination and the stock grease looked great...but I replaced it anyway. I think the hardest part of this whole process was cleaning out the old grease. The tie rod popped right off, so I set it aside and dismantled the entire steering knuckle. Popped out the old oil seal & replaced it with a new one. I took the time to clean off every mating surface and degrease all the parts, as I hate working with dirty pieces. I even broke out the air powered needle scaler and removed heavy paint buildup that I feared would negatively affect the installation of the new silicone boot & reinstallation of the kingpin bushings....also LOTS of wire brush action on the flat mating surfaces to clean off old gunk & prep for new install.

Then came the fun of installing the new silicone boot; the hardest part was stretching it over the kingpins. The inner clamp went on easily enough, but after reinstalling the knuckle and trying to seat the outer edge of the new boot, I discovered why it's handy to have one or more pairs of hands to help...the boot loves to pop right off when you try to stretch it into place around the knuckle.

So I enlisted the help of my Soldiers B & C (metal spring clamps), which did the trick. I had the new outer retaining clamp installed & tightened down in no time. Then everything else went back together with all new grease throughout, and I packed it in good.

I rebuilt the wheel cylinder with another one of Erik's rebuild kits; no rust inside, just good-looking BFS. After a quick hone inside the wheel cylinder, I reassembled the new parts with the help of some silicone spray, and back into the brake backing plate it went. Everything went well and the right front is now done; tomorrow I'll get started on the left front, and by the time that is done the batteries should be all charged up so I can start flushing out the cooling system.

Chugging right along!
 

Attachments

silverstate55

Unemployable
Steel Soldiers Supporter
2,068
855
113
Location
UT
Finished up with the front axle today: installed new oil seals & boots on both sides, reassembled both sides and filled with NGLI #2 (GAA equivalent) grease, installed new NAPA gas shocks, and replaced all 3 front flexible rubber brake lines with custom-made braided stainless steel brake lines from my local All-Hose outlet (same price as NOS replacements). I drained the old lube out of the front axle & replaced it with the remainder of my NAPA gear lube (same as used in the rear axles, 5 gallons just fills all 3 perfectly).

I removed the stock axle breather vent and replaced it with brass fittings and fuel line, tied into a "T" fitting with the rear axles remote breather line and terminated in the engine compartment by the air cleaner, using a small sealed fuel filter as a remote dust/debris filter.

Drained the lubricant from the steering box & replaced it with Valvoline synthetic 75W-90 gear lube (NAPA 975, same as transmission & transfer case). I don't see any more oil leaks nor any seepage, so I can't wait to fire this baby up tomorrow.

I cleaned up the 24-volt alternator charge wire, soldered the wire to the connector to eliminate any fraying/bad connections and then installing new heat shrink over it. I also wire-brushed off any corrosion from the connector, and connected it to my 24-volt alternator. I made up a couple of ground wires (4-gauge; connectors soldered on & heat-shrunk) for both the alternators, 12-volt & 24-volt, and then made up a charge wire for the 12-volt battery & alternator (4-gauge wire, soldered connections & heat-shrunk). I'll have to get photos of these, I can't believe I forgot to photo them today.

I also took a heavy-duty hasp and made a locking device for my fuel cap. I welded it in place, and then primed/painted it. It works! I'll do something similar to the battery compartment door to protect the batteries, when I get a chance.

I took the time to grease every Zerk I could find using the LO throughout the truck.

If I can get the motor started tomorrow, I'll flush the cooling system thoroughly and then reinstall the radiator & driver's side fender.
 

Attachments

silverstate55

Unemployable
Steel Soldiers Supporter
2,068
855
113
Location
UT
I spent the entire day trying to get the engine to start...I bled the fuel lines, even loosening each & every injector line at the injectors; plenty of fuel was getting to the injectors but no fire. Some smoke vapor was coming from the exhaust, so it was obvious that something was getting through. I even pulled each injector out for thorough cleanings and carbon removal...each seemed to be in great shape & gave awesome spray patterns from the tips.

Finally I had to step away for about an hour, as detailed in this post. Turns out when I did my IP rebuild, after making sure everything was cleaned up & installing new O-rings, I had installed the HH 180-degrees out of alignment. So I disconnected everything & re-aligned the HH, IP, and crankshaft to TDC as detailed in this post. Sometimes I can be such a Big Dummy. But it starts & runs great now! Now time to flush the cooling system & refill with SCA Anitifreeze, and then bleed the brakes so I can button up the rest of the body parts and take her for a test drive through the neighborhood.

Geez.
 

silverstate55

Unemployable
Steel Soldiers Supporter
2,068
855
113
Location
UT
Spent most of the day flushing the cooling system; I started with lots of fresh water to try to flush out any possible gunk & debris from having sat so long. I was happy to find that little rust or other debris came out. Even when I flushed it with Prestone cooling flush, it came out clean. I drained out the Prestone cleaner and reflushed with plain water, then drained as much as I could and refilled with FleetCharge Heavy-Duty Diesel Engine coolant.

Reinstalling the radiator was fun (NOT), as well as reinstalling the engine fan. Once the cooling system was completely flushed, I reinstalled the thermostat, made all the final connections around the radiator & hoses, and then installed a NAPA coolant filter unit. The base is part #4019, and is called a Coolant Conversion Kit. The filter itself is part #4071. It uses 5/8" heater hose, the same as used on Deuce heaters. I don't have a heater on my Deuce, so I plumbed the hoses directly to the filter mount.

Last week I had taken the radiator to a local shop; they disassembled it, cleaned off the solder bloom and recored it. It flows & works great now!

In the photo below you can also see the wiring for my dual alternator setup. I used 4-gauge wiring for charge & ground wires. It works like a champ too, my batteries are all charged up now after letting the engine run for about 2 hours today while flushing the cooling system. I installed a new plug & shield on the 24-volt switched wire that used to connect to the old 24-volt generator; I soldered the new plug on, cleaned it up, and it will be used to switch on one of my 12-volt circuits when I get around to installing them. I plan on 2 12-volt circuits, and already have the fuse blocks for them: one will be switched on with the 24-volt switched plug, and the other will be hot for charging items when the 24-volt system is off.

Of course, since both electrical circuits are switched on & off through the battery grounds with the Flaming River locking switches I installed, I'm not worried about anything draining the batteries as long as I remember to always switch the grounds off & lock them.

I had earlier traded my troop seat to Airbornebandsman for an extra driver's spring mount seat; I removed the seat from the base and am installing a new seat shock. I am also starting to fabricate mounts to adapt like-new Toyota FJ bucket seats to the spring bases...I hope to have these done in the next couple of days so I can start mounting up my Super Single radial tires/5-ton combat wheels & adapter plates.
 

Attachments

Last edited:

silverstate55

Unemployable
Steel Soldiers Supporter
2,068
855
113
Location
UT
I learned something interesting about the flexible nylon fuel lines between the IP & the secondary fuel filters today. When I started it up this morning to work on it, there was a pretty good fuel leak coming from the engine compartment...upon further inspection, the fuel leak was coming from ALL 6 of the new hoses & connections I had installed earlier.

I tightened up the fittings as much as possible, but they tightened all the way up to the female fittings, and still leaked. I mean LEAKED, like about 1/2-gallon per hour or more. So, I shut her down & removed the fuel lines.

I still had the original fuel lines on hand, and I immediately noticed a couple of differences: the replacement hose I had purchased was way too thick, making for a smaller opening; and I didn't install the brass plugs into each hose end for the compression ferrule/fitting to tighten against. I used the one-piece fitting with ferrule and it tightened down alright. BUT with nothing but flexible hose underneath it, it had nothing to seat against and allowed leakage between the fitting & the hose.

I managed to remove the stock brass plug ends, but they wouldn't fit in the newer, too-thick fuel hose. So, back to All-Hose I went and got the appropriate hose and fittings; the hose is Parker Parflex N 3/8" O.D. x 0.050" Wall, 250 W.P., UL94HB 000013 3. I also got some new end plugs for the new hose and some new ferrules; I reused the old threaded fittings. I installed these new fuel lines with the appropriate fittings, and all is now well. NO LEAKS.

The photo below shows the old nylon fuel line, with a brass end plug sitting below it & installed in the end; the middle hose is the replacement hose I started with and used one-piece compression fitting; the hose on the right is the new-new replacement hose (proper wall thickness this time) and the 3 proper fittings for a good tight fit (brass end plug, compression ferrule, threaded fitting).

So if you decide to swap these out and want to stick with the nylon & compression fittings like I did (it's pretty cheap, total cost for these parts + new hose was under $25), then please make sure you get all the right parts and don't end up like I did, having to pay twice for the same part (and lots of fuel leakage).

NOTE: I have the LDT-465-1D engine; don't know if other types of MF engines use this type of fuel line between IP & secondary filters).
 

Attachments

silverstate55

Unemployable
Steel Soldiers Supporter
2,068
855
113
Location
UT
Been working like crazy on all kinds of little tasks, trying to get her all put back together so I can drive her.

Couldn't find a lower radiator guard so I made one from metal scraps I had lying around. It will be a while before I can afford to get a winch for this truck, so I might as well protect the newly-refurbished radiator. Also got the new LED turn signal & parking lights installed on the side of the new LED turn signal protector frame.

I bought some 4-inch Walker exhaust sections to make a high-rise air intake. I welded them together, and made a bracket that bolts in to hold the intake. I'll probably add another support bracket if it wobbles too much while driving. But for now I'm happy.

Used a modified sprayer to pressure-bleed all the brakes, since I had replaced all the brake lines & rebuilt all the wheel cylinders. As soon as I cracked each bleeder, I had LOTS of BFS streaming from the bleeders! Not too many bubbles either, I was pleasantly surprised. Now I have a firm brake pedal for the first time!

Found a couple of minor air leaks and fixed them...the truck builds air pressure right away and holds it now. I also installed the remote brake fluid reservoir I purchased from fellow member 197thhhc (Real Custom Trucks), it hasn't dropped its level yet so that must be a good thing. I'll have to get some photos of it when I remember to...I mounted the reservoir on the cab wall to the left of the driver, so it's out of the way but still accessible to service.

Now to take my FMTV wheels to the wheel shop, to have new centers installed so I can finally install my Michelin super single radials and dump the temporary NDCCs.
 

Attachments

silverstate55

Unemployable
Steel Soldiers Supporter
2,068
855
113
Location
UT
Here is a shot of the remote brake reservoir; over a week now since installation & still hasn't dropped its fluid level.

I also installed some canvas shift lever boots; I got them for a great price on an auction site, cheaper than commercial counterparts were running.

Back to working on fabricating brackets to mount these bucket seats to the spring bases.
 

Attachments

silverstate55

Unemployable
Steel Soldiers Supporter
2,068
855
113
Location
UT
I will be curious to know how much the boots help with noise and heat.
John, I'll be happy to report my findings when I finally get to drive her; I'm almost done fabricating seat brackets for the passenger side, then will get the driver's side fabbed. At least then I can putt-putt her around the neighborhood to finalize any issues before heading to the DMV for new title & registration.

Thanks for your encouragement!
 

resqur

New member
104
1
0
Location
Las Vegas, NV
Looks real good. I would like to get a closer look at the dual alternator set-up. I'm finishing up some brake issues on mine right now, but maybe we can meet up sometime soon.
 

silverstate55

Unemployable
Steel Soldiers Supporter
2,068
855
113
Location
UT
Looks real good. I would like to get a closer look at the dual alternator set-up. I'm finishing up some brake issues on mine right now, but maybe we can meet up sometime soon.
Sounds good; I'll be in touch after it's registered & plated.

The dual alternators were real easy to install & wire up...they work great since the batteries charged right up after running for about an hour (both 24-volt & 12-volt).

I'd like to get a look at your truck too.
 

silverstate55

Unemployable
Steel Soldiers Supporter
2,068
855
113
Location
UT
Been working on seat brackets to fit a pair of fairly-new Toyota FJ buckets; I installed a pair of Metal-Tech PRP top-of-the-line off-road seats in my Dad's FJ and he let me keep the stock buckets.

Got the passenger side finished first, as I was afraid if I did the driver's side first I wouldn't get to the passenger side until way later. So this way I force myself to properly finish what I start (and keep the wife happy when she tags along). I used angled, square, and flat stock steel, and a total of 19 pieces of steel went into this passenger-side bracket. A lot of triple-measuring and triple-checking went into this bracket, and the passenger FJ bucket seat bolts right in with some new Grade-5 hardware I picked up just for this project. The fully-welded bracket bolts right in to the existing base unit, so if I ever need to change seats it won't be too hard to do so.

I broke down both seat spring base units to replace the seat shocks, and grind notches in the rear angle-steel bracket for proper fitment. The passenger side base unit was pretty rusty & crusty, so I tore it down and stripped it to be free from rust, then primed with Rust Reformer and painted with Rustoleum Camoflage Sand (after the photos were taken of course).

Now I can use the passenger-side bracket to measure up the driver's side bracket; it should go much easier & quicker than the passenger-side bracket did. Photos will follow.
 

Attachments

Last edited:

silverstate55

Unemployable
Steel Soldiers Supporter
2,068
855
113
Location
UT
WHEW! Finally got the seat brackets completed & the buckets installed into the truck. I intended to keep the driver's side bracket nice, clean, and simple; but when I started examining the driver's seat and the literature on its functioning, I realized that I wanted to keep its features. It has a ratcheting system for height adjustment, and since I had the stock hardware (the Metal-Tech seats don't have this feature, and utilized replacement hardware) I wanted to make a bracket that would allow the use of the stock features.

So, after a little grinding & clashing of the mental gears (and lots of smoke from my ears to show it), I think I came up with a design that would allow for use of the stock seat's existing mechanisms. And it works! Feel free to laugh away at my wire-feed welding results; they aren't pretty but they work. I've never had one of my welds fail, and I wanted a strong bracket that wouldn't compromise safety in the even of a collision.

The photos show the bare-metal bracket before mounting the driver's seat on it. Of course this seat base has a different adjustment mechanism for the seat to slide back & forth on than the passenger's seat base did, so I had to make a couple of minor changes to incorporate that. But it works, and after about an hour of cleaning & soaking with PB Blaster, everything freed up and works just fine. So now both seats can be adjusted up & down as well as front to back.

I installed the driver's seat first, and was able to use the existing blind nuts in the floor for mounting, as well make the current lap belts fit around the FJ buckets. Then I installed the passenger's seat; I was only able to utilize one existing blind nut, so I installed much larger Grade 8 bolts with large graded washers to secure it in place. I had my wife sit in her new passenger seat, and she actually liked it, which surprised me (she likes to pretend to hate my Deuce).

These took a lot of time & effort, but I think that the end results are well worth it.

I've ordered a 3-point seatbelt kit from a member in the Classifieds, and when it arrives I'll look into adapting it to this setup for a safer, better seatbelt solution. Seatbelts have a lifespan, and with as much time as this truck has sat baking in the desert sun, it concerns me about the overall level of safety & usability in these old 2-pointers. We shall see. Now off to lots of little details left to do!

ETA: In the photos above showing the remote brake fluid reservoir, you can see the abundant rust on the driver's side floor; I used my needle-scaler & wire wheel to remove it and coated it with lots of Rust Reformer to seal it before reinstalling the seats.
 

Attachments

Last edited:

silverstate55

Unemployable
Steel Soldiers Supporter
2,068
855
113
Location
UT
Got my re-centered FMTV wheels back from my local fabricator; now it's a matter of cleaning up the back half of the wheels and checking the O-rings, installing new valve stem protectors (3/8" fuel line) and new valve cores. Got 2 tires mounted up and installed, the photos show the new rear tires/wheels as compared to the stock 9x20 tires/wheels. One had an interior beadlock that made installation a snap; the other one I had to manually seat the beads which took me about an hour to accomplish....so now I'm on the lookout for more interior beadlocks to simplify installation!

The tires on the rear are all newer Michelin XML 395/85R20 tires; all have good tread and no signs of cracking/checking/dry-rot. Got these for a good price from 100DollarMan (aka Hundy). The fronts are going to be Michelin XZL 395/85R20s with the Kevlar runflat inserts I bought locally. They sure are heavy when you have to do these by yourself!
 

Attachments

silverstate55

Unemployable
Steel Soldiers Supporter
2,068
855
113
Location
UT
These tires & wheels are killing me! It takes me several days to clean up a pair of wheels, what with all the rust & other detritus all over them. I remove the O-ring to inspect for serviceability, then clean it with silicone spray. I de-rust the inside half of the wheel (strip to bare metal thoroughly with a wire wheel on my grinder, then seal with Rust Reformer), and straighten out the O-ring lip to ensure good seating. I even thoroughly clean each and every locking nut (20 per wheel), since they are pretty crusty & rusty...then I seal them with Rust Reformer. I even remove the old rubber fuel line used as a protective shield around the valve stem, and replace it with new 3/8" fuel line. I have installed all new valve cores to guard against leaky old ones. Each one of the 20 wheel half studs are brushed clean of rust/paint with my wire wheel & grinder.

Then, I thoroughly clean each tire inside & out to remove all standing water, leaves, dirt, rocks, branches, etc... and wipe down the inside of each tire to ensure cleanliness. I even vacuum out each one with my shop-vac to make sure there is no residual debris inside. I use S.O.S. steel wool cleaning pads to clean each bead, to make sure they are all free from rust & other detritus.

I set the inner wheel half on a couple of wood blocks to prop it up off the ground, then soap up the area where the tire bead will slip over to seat its bottom bead...I just use dish soap diluted with a little water and a brush to ensure coverage. I maneuver the tire into position, then set it over the wheel and push down to seat the inside bead (made easy with the soap). The outer wheel half is installed & bolted down; at this point the outer bead isn't close to seating (without a beadlock), so I lift it up onto the tread...while the tire is standing straight up on its tread, a couple of revolutions while pushing it around the yard get the outer bead close enough to start inflating, and after a couple of minutes of air pressure the outer bead slips right into place and the tire inflates just fine (the dish soap helps once again).

Four down, three to go (gotta have a spare!).
 

Attachments

Top
AdBlock Detected

We get it, advertisements are annoying!

Sure, ad-blocking software does a great job at blocking ads, but it also blocks useful features of our website like our supporting vendors. Their ads help keep Steel Soldiers going. Please consider disabling your ad blockers for the site. Thanks!

I've Disabled AdBlock
No Thanks