Does it matter than the trans is in park? I can hook up the linkage again and shift it if does.
It does not matter. You can manually shift the selector on the transmission. Leaving it in PARK is great.
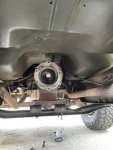
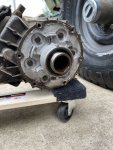
I must remove the starter correct?
Yes. You must remove the starter and the starter heat shield. Thus the starter support bracket must be loosened at the block. The heat shield is slotted so removal of the support bracket is not required.
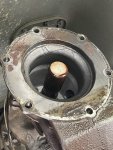
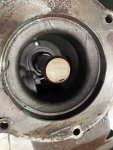
How does the transmission kick down come out? I tried pulling on it but I couldn’t get it to come out. I thought there may be some retainer and I didn’t wanna break it, so I thought I’d ask.
No there is nothing holding it. Firmly grasp it and give it a tug from the capped part. Use a 8mm socket and unscrew the bolt retaining the wire to the case. Same as the 9/16" hex bolt on the bell housing. Remove that wire and clamp. Tie back the cooler lines and the kick down wire.
Are those two bolts on each side the only ones holding the trans mission on? I know those are the ones I gotta swap to the longer bolts, but I was wondering if there are any other bolts holding it on.
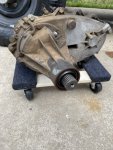
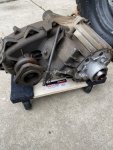
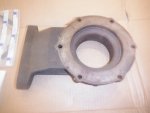
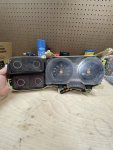
Yes you have 3 bolts to access on each side of the transmission bell. I have attached a picture of a TH400 bell. The picture is of an Olds or Pontiac bell as the Chevrolet has the rounded top of the bell. Bolts are the same. All 3/8" x 16 TPI. Use a 9/16" swivel socket and a long extension. Place the 4" bolts at 3, 9, 11, & 1 o'clock into the block to slide the transmission.
How should I turn the flywheel once I’m in to get to all the bolts?
You can use a screwdriver or opt to purchase a flywheel turning tool. When I first started out I removed the glow plugs and free wheeled the ring gear. I used a prybar to hold the ring gear while I loosened and tightened the bolts. they are 15MM hex head M10 X 1.5 bolts. 6 of them. After you remove all 6 just gently push the converter back a bit into the transmission.
What should I torque everything to? Blue Loctite?
60 ft lbs comes to mind. I would use a bit of the blue lock tite.
Sorry if any questions are dumb or redundant I just wanna go in there prepared and get this done right.
No dumb questions. Many people won't even try what you are doing. So I hope I am helping you along with anyone else that cares to tackle this job. I think you are doing a fantastic job and you are lucky that you can stay focused on the one job. My life is like a shot gun blast. I am happy with it but I must hit targets all over the place and keep things going. Not always ideal but it keeps me happy and busy. Never a dull moment.
Anything else I’m missing or need to know please let me know!
The flex plate/ flywheel / ring gear will fit 2 ways. Only 1 way is correct. The crank has a dowel pin in it to align the bolt holes correctly. By the way the bolts are 11/16" hex head. Shallow socket works. But be sure the counter weight on the flex plate is facing the engine and not facing backwards. The tightening of the flex plate to the crank is simple. The dowel pin is very tight on the flex plate engagement so don't be alarmed if it requires a bit of prying and coaxing to remove it after removing all 6 bolts. Same as installation. Get the bolts started and equally tighten the bolts. It is tight up there but you can do it. Use thread locker on the crank
bolts. Torque 7/16
bolts in an even tightening sequence to 70 ft/lbs. I think you have tis covered. We are all here for you. Report back with any questions or issues. And of course the progress. Thank You. Happy July 4.