• Steel Soldiers now has a few new forums, read more about it at: New Munitions Forums!

  • Microsoft MSN, Live, Hotmail, Outlook email users may not be receiving emails. We are working to resolve this issue. Please add support@steelsoldiers.com to your trusted contacts.

What did you do to your deuce this week?

Aussie Bloke

Well-known member
725
373
63
Location
Lost, out bush in OZ
G'day everyone,.....


Well this morning I got my deuce out so I can get the oil change done,....

As soon as the hood came out from the shed its stored in, it started to spit with rain,...

On the way home it rained.

Forecast for the next 3 days,...

intermittent rain!

sigh,....


Mrmag1 What I did when I replaced the data plates on my winch was lay the old plate on top of the new plate so you then drill through the old hole to get the holes in the right place in the new plate.

New plates went back on as if they had been there all along.


Aussie.
 
Last edited:

Mrmag1

Head of Stuff N' Things
Steel Soldiers Supporter
602
13
18
Location
Hereford Arizona
IMG_20180829_201455.jpg

Aussie, I used a sharpie to the same effect, worked pretty well too.

Also today I replaced all the dash lights and indication lights with LED and all the bulb covers with new ones. Bright and awesome now!
 

Mrmag1

Head of Stuff N' Things
Steel Soldiers Supporter
602
13
18
Location
Hereford Arizona
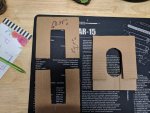
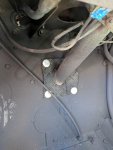
View attachment 739936Well I noticed that the seal between my steering column and my firewall is missing, I looked on here and read what some other had done. I got a lot of ideas but in the end I took my inspiration from my exhaust stack. See the exhaust stack comes out of the front curbside fender on my M35A2, it is held there by two overlapping C shaped plates.

So I made my own out of cardboard first to get all the measurements right.
IMG_20180830_155423.jpg
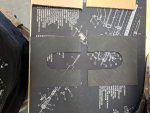
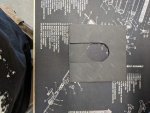
I made ones with a semi circle next (the cardboard plate is 5x5 in and the circle is 5.5 in around and 2.75 in across.

IMG_20180830_155438.jpgIMG_20180830_155453.jpg

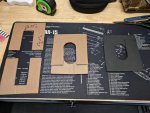
Once I was happy with the fit I made the same thing from rubber using the cardboard as a guide.
IMG_20180830_155419.jpg

Now that my evaluation of materials is done I can use the existing 4 screw holes in the firewall (they are 4 in between every hole H and w) to bolt the rubber around the steering column making a seal so I am not getting roasted every time I drive her.
 

Mrmag1

Head of Stuff N' Things
Steel Soldiers Supporter
602
13
18
Location
Hereford Arizona
Well I noticed that the seal between my steering column and my firewall is missing, I looked on here and read what some other had done. I got a lot of ideas but in the end I took my inspiration from my exhaust stack. See the exhaust stack comes out of the front curbside fender on my M35A2, it is held there by two overlapping C shaped plates.

So I made my own out of cardboard first to get all the measurements right.
View attachment 739963
I made ones with a semi circle next (the cardboard plate is 5x5 in and the circle is 5.5 in around and 2.75 in across.

View attachment 739965View attachment 739966

Once I was happy with the fit I made the same thing from rubber using the cardboard as a guide.
View attachment 739967

Now that my evaluation of materials is done I can use the existing 4 screw holes in the firewall (they are 4 in between every hole H and w) to bolt the rubber around the steering column making a seal so I am not getting roasted every time I drive her.
 

Valence

Well-known member
Steel Soldiers Supporter
2,112
555
113
Location
Davis County, UT
Well I noticed that the seal between my steering column and my firewall is missing, I looked on here and read what some other had done. I got a lot of ideas but in the end I took my inspiration from my exhaust stack. See the exhaust stack comes out of the front curbside fender on my M35A2, it is held there by two overlapping C shaped plates.

So I made my own out of cardboard first to get all the measurements right.
View attachment 739963
I made ones with a semi circle next (the cardboard plate is 5x5 in and the circle is 5.5 in around and 2.75 in across.

View attachment 739965View attachment 739966

Once I was happy with the fit I made the same thing from rubber using the cardboard as a guide.
View attachment 739967

Now that my evaluation of materials is done I can use the existing 4 screw holes in the firewall (they are 4 in between every hole H and w) to bolt the rubber around the steering column making a seal so I am not getting roasted every time I drive her.
Great idea, thanks! This has been a high priority "TODO" item on my list all this year.
 

Aussie Bloke

Well-known member
725
373
63
Location
Lost, out bush in OZ
G'day everyone,.....


Well I take my Deuce back into storage in a few hours, still haven't done the oil change due to rain.
:( :( :(


I to need to fit a seal in the fire wall where the steering go's through.

My cardboard one that was there mostly disintegrated when customs 'cleaned' the Deuce when I imported it.


Well, another job to do,....


Aussie.
 

USAFSS-ColdWarrior

Chaplain
Super Moderator
Steel Soldiers Supporter
18,538
5,820
113
Location
San Angelo, Tom Green County, Texas USA
View attachment 740130

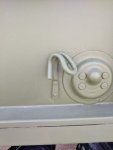
I was going to replace two broken tie downs for the cover but I have no idea how to remove them....
Removal and replacement is relatively easy.

1. Center punch the rivet heads - the two "bumps" on the flattened part of the rods.

2. Drill out the rivet - the drill diameter will be approximately 1/2 of the head diameter - I don't recall the actual dimension. The holes in the replacement parts should be the correct diameter drill to use.

3. Install the new tiedown using either fresh rivets OR round-head screws, lock washers and nuts (OR lock nuts).

4. Optional - to prevent removal of the screws peen the protruding stub of the screws so that the nut just CANNOT back off the threads.
 

Mrmag1

Head of Stuff N' Things
Steel Soldiers Supporter
602
13
18
Location
Hereford Arizona
Removal and replacement is relatively easy.

1. Center punch the rivet heads - the two "bumps" on the flattened part of the rods.

2. Drill out the rivet - the drill diameter will be approximately 1/2 of the head diameter - I don't recall the actual dimension. The holes in the replacement parts should be the correct diameter drill to use.

3. Install the new tiedown using either fresh rivets OR round-head screws, lock washers and nuts (OR lock nuts).

4. Optional - to prevent removal of the screws peen the protruding stub of the screws so that the nut just CANNOT back off the threads.
That was detailed and thorough answer sir. Thank you.
 

77 AMG

Active member
403
62
28
Location
Owingsville, KY
I went and paid on mine some more, and promised her/it that it would not be much longer until time to PCS to the house. I also started to look at a 883 Dodge that just arrived..... (like I don't have enough things to occupy my time....... )
 

77 AMG

Active member
403
62
28
Location
Owingsville, KY
I also got back yesterday evening from a 4 day camping run. SO nice to not have to deal with "phone zombies". As we (the boy and I) were heading home on a different road, we spotted a Deuce sitting over in some weeds, kicked to the back of the field at what looks like a volunteer fire dept. She has a huge silver tank on her back, and weeds almost to her hood surrounding her. I think that I am making a road trip, again, in the *very* near future...... (My son has decide that he also wants a Deuce)
 

jeffhuey1n

SMSgt, USAF (Ret.)
Steel Soldiers Supporter
1,886
1,474
113
Location
Laramie County, Wyoming
I also got back yesterday evening from a 4 day camping run. SO nice to not have to deal with "phone zombies". As we (the boy and I) were heading home on a different road, we spotted a Deuce sitting over in some weeds, kicked to the back of the field at what looks like a volunteer fire dept. She has a huge silver tank on her back, and weeds almost to her hood surrounding her. I think that I am making a road trip, again, in the *very* near future...... (My son has decide that he also wants a Deuce)
.
I got one of my trucks in a similar way. While passing through a tiny village I spotted a mil surplus truck behind the volunteer fire department. It took some sleuthing to get in contact with the fire fighters but once I did, I hit paydirt. It was a M52A2 that was converted into a tanker truck. Once the deal had been struck, I also got quite a pile of 5 ton spare parts. I’m still working on returning the truck to it’s original configuration. It’s been a long journey getting parts, making repairs, installing parts, etc. I hope you can rescue that deuce!
 

Maverick1701

Well-known member
1,433
181
63
Location
Lubbock, TX
Took it for a nice "sunday drive" (on a tuesday). It was the first time in about 2 months I have taken it out.

I noticed the clutch engagement was now at the last 1in to 1/2in of the pedal throw...so that means I need to crawl under the truck and adjust the clutch engagement so I don't gak my clutch.
 

cattlerepairman

Well-known member
Steel Soldiers Supporter
3,248
3,326
113
Location
NORTH (Canada)
Replaced the weatherstripping around both windshield frames, cleaned and repainted the frames and upgraded the wiper arms and blades. Now I can drive in the rain and get damp instead of drenched and I will be able to see to the end of the hood! Progress.

Wiper arms are Anco, blades are Anco 11 inch.


Sent from my SM-T560NU using Tapatalk
 

fpchief

Well-known member
1,041
220
63
Location
South Alabama
On my '72 M109 I took out injectors, had them cleaned and tested, complete fluid swap, new filters all the way around, blew out all fuel lines, troubleshot the in tank pump and found a bad fuse :clinto:, replaced some bad return line and waiting on a couple of fittings, realized i need to do inner seal jobs on all axles, installed injectors, about to do a valve adjustment, and now waiting for my $42 each valve covers to come in. I swear i bought two for $15 a few years ago.
 
Last edited:
Top