• Steel Soldiers now has a few new forums, read more about it at: New Munitions Forums!

  • Microsoft MSN, Live, Hotmail, Outlook email users may not be receiving emails. We are working to resolve this issue. Please add support@steelsoldiers.com to your trusted contacts.

What have you done to your 5 ton this week?

5 Ton John

Member
31
42
18
Location
Mississippi
Wherever they're cheapest. ;)

I had a local filter place that was pretty competitive, but there are some things they're just WAY off on, and these filters were one one of those examples.


They're normally $20-25 a piece, so 6 for $94 is a decent deal. Cheaper to buy them and keep them on hand if you need them, since they don't really go bad.... If you get a bad batch of fuel, you might be replacing them quite a bit...
Thanks for the link. That is a good price. I paid $25 for the small Carquest filter.
 

TechnoWeenie

Well-known member
Steel Soldiers Supporter
1,653
1,669
113
Location
Nova Laboratories, WA
After letting it cool down a bit...

LED headlights, parking lamps, and turn signal lamps.

Also, for future reference, probably a good idea to stop trying to unscrew something that feels like it's gonna break, because, it's probably gonna break..

I spritzed everything with a plastic safe penetrating fluid, so the brake/tail lens screws and passenger front lens screws should be free by morning. The rears looked almost new, and so did the driver side, but the passenger side almost looks like they replaced the screws with zinc instead of the stainless, brass, galvanized, or whatever the factory screws.


MyothersanM1

19K M1 Armor Crewman
Steel Soldiers Supporter
1,958
427
68
Location
Culver City, CA
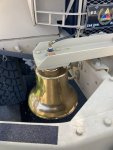
Finally, installed my 12" brass locomotive bell. It joins my Nathan Airchime P3 locomotive horn already installed. My truck has now become quite musical.

IMG_1738.jpg IMG_1739.jpg

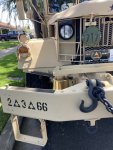
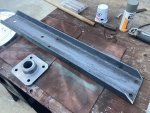
The winch-top bracket is 6" W x 1.92" H x .20" Thick u-channel cut to 40" cantilevering over the right-side frame. An EMD spacer block mounts the bell and Graham-White 506 double-acting ringer to the bracket. Yes, it does clear the folded up bumper step.

IMG_1702.jpg IMG_1713.jpg


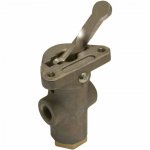
Operating air pressure travels from the cab through a Bendix TW-1 control valve and 3/8" nylon DOT air brake tubing and push-to-connect fittings. Supply pressure is 120psi from the wet tank I installed during my airbrake retrofit. I plan to add a Bendix RV-1 pressure reducing valve in order to regulate the ringing cadence.

Bendix TW-1.jpg
It’s crazy loud!😂
 
Last edited:

5 Ton John

Member
31
42
18
Location
Mississippi
Good news.

That's a 1-14 filter..... Meaning the same thread base as the FB1311 I use, which means you can use the BF7587 (4 micron absolute).

The 7587 is close to a foot long... It's a beefy one, with serious filtration capability.

Bad news is, the 86109 is 5 nominal, 20 absolute... meaning it's really a 20 micron filter.... and it's very small, about half the length of the 7587... So, it's probably clogged, and pretty bad.... The thing is.... with 20 micron absolute, those are some relatively big chunks that are being allowed to get through.
I just got my filters that I ordered today. Put the new one on and it fit good, runs good, back to normal. I wanted to say thanks to TechnoWeenie for suggesting that filter.(#bf7587) I thank you for researching and finding that it was compatible to my filter base. Also thanks to all others for the suggestions. I'm glad to have it back up and running.
 

5 Ton John

Member
31
42
18
Location
Mississippi
I'm considering putting a flatbed on my M814. I was wondering if any of you have done this, if so I would love to see a picture of it. I think it would be more functional since the 20'cargo beds don't have fold down sides , but I don't want to do it if it makes the truck look all funny since I've never seen one if these with a flatbed. Thanks to anyone who may respond with a picture.
 

TechnoWeenie

Well-known member
Steel Soldiers Supporter
1,653
1,669
113
Location
Nova Laboratories, WA
I just got my filters that I ordered today. Put the new one on and it fit good, runs good, back to normal. I wanted to say thanks to TechnoWeenie for suggesting that filter.(#bf7587) I thank you for researching and finding that it was compatible to my filter base. Also thanks to all others for the suggestions. I'm glad to have it back up and running.
Keep in mind the 7587 has increased filtration capability (4 micron vs the 20 micron you had on there), and if there's junk in the tank, it may clog quicker, despite being 2x the size.

Personally, I'd rather change a filter than deal with replacing a pump..
 

5 Ton John

Member
31
42
18
Location
Mississippi
Keep in mind the 7587 has increased filtration capability (4 micron vs the 20 micron you had on there), and if there's junk in the tank, it may clog quicker, despite being 2x the size.

Personally, I'd rather change a filter than deal with replacing a pump..
That's exactly right! It's cheaper to go through a pack of filters than to go through a pump. I hope that after I cleaned what I could out of it this filter change will last a little longer. Then I'll change it again sooner than normal just to be sure. I got a 6pack of filters for $65. Very cheap insurance policy to change a filter again in the near future. Thanks again TechnoWeenie.
 

Wreckclues

Well-known member
Steel Soldiers Supporter
222
609
93
Location
Jefferson, Massachusetts
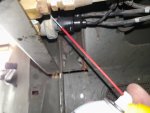
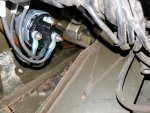
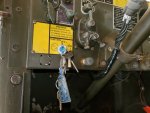
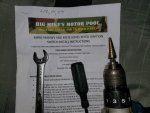
Installed a 5 Ton Series Keyed Ignition Switch from Big Mike's Motor Pool.
Actual installation time was about 15 minutes, it took me longer to set up my cameras.
This was not in response to the recent theft of a 5-ton, reported on this forum.
I believe the 5 speed Hi Low Millennial Theft Device that came "standard" with my vehicle would deter most would be thieves, with that said I'll sleep a lot easier knowing I have one additional layer of protection.
The hole in the dash is smaller than the threaded diameter of the switch so you'll need an 11/16 inch pyramid drill bit. The only other tools were a Flathead screw driver to remove the old lever switch and a 5/8 inch wrench to remove the old dash nut.
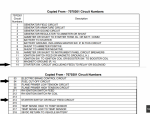
The leads are labeled B, R and S.
R corresponds to wires 12, 54 or29A;
S to 14, 14A or 498A
B to 11, 11A or 5B.
As it turned out my M813 has 14, 54 and 214...
Mike Virili stands behind his products. I gave him a call and he sent me a copy of "Form 7070301 Circuit Numbers" where 214 is the Starter Switch or Relay Feed Circuit and would thus correspond to the B terminal.
Before installation I hit the wire leads with silicon spray to loosen the rubber connectors which get brittle with age, already tore a couple apart from other repairs. No other problems and the truck started like usual.
Starter1.jpgStarter2.jpgStarter2a.pngStarter3.jpgStarter4.jpg
 

Russ Knight

Well-known member
Steel Soldiers Supporter
1,117
1,054
113
Location
Perry, FL
I posted most of what I did in my WeenieWagun build thread..

I also found my stash of 24V LED marker bulbs and headlights that was going to go in my deuce and now repurposed to my 5T, so that'll be getting done shortly.

Also needed these.. sharing for those who don't know how easy they are to find... No more paying $50/pair for 'tactical wiper blades' or some such nonsense at some of these surplus sellers.

View attachment 896925
Anyone been able to cross these wipers with a automotive type arm and blade?
 

Mullaney

Well-known member
Steel Soldiers Supporter
Supporting Vendor
7,716
19,766
113
Location
Charlotte NC
Anyone been able to cross these wipers with a automotive type arm and blade?
.

Couple of pieces of recent information:

You want the Trico 33-122 "Classic" wiper blades
and use them with Anco 4101 adjustable wiper arms


Wiper Blades 5-Ton @ O'Reilly.jpg
 

Wreckclues

Well-known member
Steel Soldiers Supporter
222
609
93
Location
Jefferson, Massachusetts
Troubleshooting a Pesky Power Steering leak on my M813

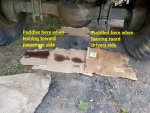
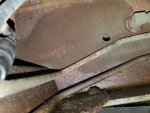
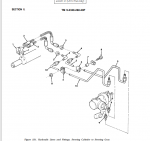
Gave the engine bay a good degreasing and power-wash and finally found where my power steering was leaking. Over the winter I had the truck leaning slightly toward the drivers side and the fluid puddle gave the impression the pump itself was leaking. After washing I had the truck leaning the other way and now the puddles were on that side of the truck. Turns out the leak was one of the "power steering gear-to-assist cylinder" lines. The lines run along a transverse frame member that channeled the fluid leak to wherever the truck was leaning. The lower line is rustier than the upper one, because it sits in a space where water could accumulate.
Has anybody ever bled one of these?
Are the instructions as easy as the Manuals suggest?

TM 9-2320-260-20 pg 9-43

Bleeding Hydraulic Power Steering System

CAUTION Do not hold steering wheel at full-wheel stop position for more than 15 seconds. Damage to equipment may result.

Slowly turn steering wheel clockwise and counterclockwise to each full-wheel stop position until screeching sound from hydraulic power steering system stops.

1a 20230523_144604.jpg2 20230523_145519.jpg3 PowerSteringLines.png
 

Mullaney

Well-known member
Steel Soldiers Supporter
Supporting Vendor
7,716
19,766
113
Location
Charlotte NC
Troubleshooting a Pesky Power Steering leak on my M813

Gave the engine bay a good degreasing and power-wash and finally found where my power steering was leaking. Over the winter I had the truck leaning slightly toward the drivers side and the fluid puddle gave the impression the pump itself was leaking. After washing I had the truck leaning the other way and now the puddles were on that side of the truck. Turns out the leak was one of the "power steering gear-to-assist cylinder" lines. The lines run along a transverse frame member that channeled the fluid leak to wherever the truck was leaning. The lower line is rustier than the upper one, because it sits in a space where water could accumulate.
Has anybody ever bled one of these?
Are the instructions as easy as the Manuals suggest?

TM 9-2320-260-20 pg 9-43

Bleeding Hydraulic Power Steering System

CAUTION Do not hold steering wheel at full-wheel stop position for more than 15 seconds. Damage to equipment may result.

Slowly turn steering wheel clockwise and counterclockwise to each full-wheel stop position until screeching sound from hydraulic power steering system stops.

View attachment 897938View attachment 897939View attachment 897940
.
You might even consider jacking up the front wheels to keep from stressing the system unnecessarily.

And yes, believe it or not bleeding the power steering system is really that simple.
 
Last edited:

cbrTodd

Well-known member
Steel Soldiers Supporter
268
483
63
Location
Indianapolis, Indiana
Troubleshooting a Pesky Power Steering leak on my M813

Gave the engine bay a good degreasing and power-wash and finally found where my power steering was leaking. Over the winter I had the truck leaning slightly toward the drivers side and the fluid puddle gave the impression the pump itself was leaking. After washing I had the truck leaning the other way and now the puddles were on that side of the truck. Turns out the leak was one of the "power steering gear-to-assist cylinder" lines. The lines run along a transverse frame member that channeled the fluid leak to wherever the truck was leaning. The lower line is rustier than the upper one, because it sits in a space where water could accumulate.
Has anybody ever bled one of these?
Are the instructions as easy as the Manuals suggest?

TM 9-2320-260-20 pg 9-43

Bleeding Hydraulic Power Steering System

CAUTION Do not hold steering wheel at full-wheel stop position for more than 15 seconds. Damage to equipment may result.

Slowly turn steering wheel clockwise and counterclockwise to each full-wheel stop position until screeching sound from hydraulic power steering system stops.

View attachment 897938View attachment 897939View attachment 897940
I rebuilt my assist cylinder on my M923A2 a while back and it was a royal pain to get it to force all the air out. The assist cylinder is the same for both, but not sure how much different it will be for you since your pump and gearbox are different. Mine would not get all the air out with the wheels turning up on jack stands, or turning on the ground. I took it on a short test drive and it still had air in it but a full reservoir. I drove it 40 miles to a campground and when I slowed down to stop at the check in I could hear it growling and the tank level was way low. Been fine since then. So be prepared to keep topping it off for a while in case yours is aggravating like mine.
 

Valley Rock

Big wheeler cat peeler
Steel Soldiers Supporter
445
837
93
Location
Orygun
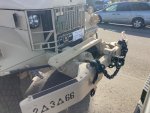
Ok so I did a thing, I hooked my Deuce to my 5 ton with my new to me tow bar and dragged it around on the property for a couple laps to see how it felt and see if I could make anything go wrong, which it did .

Vid here:

Here's a few pics too

.20230524_142424_HDR.jpg20230524_140603.jpg20230524_140632_HDR.jpg
 
Top
AdBlock Detected

We get it, advertisements are annoying!

Sure, ad-blocking software does a great job at blocking ads, but it also blocks useful features of our website like our supporting vendors. Their ads help keep Steel Soldiers going. Please consider disabling your ad blockers for the site. Thanks!

I've Disabled AdBlock
No Thanks