• Steel Soldiers now has a few new forums, read more about it at: New Munitions Forums!

  • Microsoft MSN, Live, Hotmail, Outlook email users may not be receiving emails. We are working to resolve this issue. Please add support@steelsoldiers.com to your trusted contacts.


What have you done to your CUCV today/lately? - Part 1

Status
Not open for further replies.

allenhillview

New member
272
3
0
Location
Jonesborough, TN.
Hey allenhillview: As has properly been said I love the panel. The guy who built it does fine work.

I do have one question though...... whats the point of it? Why do you need a toggle on the side of your seat for all those circuits that should just be on all the time for the most part? Please forgive my ignorance or if this seems cocky, I just dont get it.

Thanks!
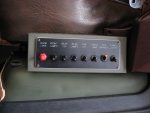
Sorry, You're not supposed to get it, I am.

Each circuit doesn't need to stay on, front HID, Rear HID, The power door lock is momentary switch, rear cargo, etc....

Besides I just wanted a clean look and I feel like I got close.
 
Last edited:

bshupe

New member
440
4
0
Location
Mount Vernon, WA
I replaced all the belts on my 1031 today. Ive had it for about 2 weeks and the drivers side alt belt would cry bloody murder for the first minute or two of running. The belts were in pretty bad shape and the alt that was squealing was at the end of the adjustment.

I have read much on SS about the alt belts, the various opinions on what size to use etc. etc. and I think I discovered why people use the too long variety. IF you use the proper belt for the drivers side alt you have to take the P/S pump loose to do it. I think people use the longer belt so they dont have to mess with the P/S pump.

Also, the PO of my truck had welded a divers helmet to the brush gaurd as something of a hood ornament/mascott and so it had to go and today was the day. He had welded the thing to the top middle and lower horizonatal bars so to save taking the whole BG off I had to cut the mask into thirds and bang it off with a sledge. Once the large chuncks were off then I used the grinder to clean it up. I repainted the BG to finish it off. Im planning to paint the whole truck sometime soon so I didnt sweat the color match too much.

Im not going to post a photo of the before since it would be very derogatory to post a photo of a CUCV with such an awful protusion from the front. I will put a photo up of the after though. Nothing Earth shattering but you know. Progress is progress.
 

Attachments

wayne pick

New member
658
2
0
Location
Valley Cottage NY
bshupe, Was that helmet an old hard hat type rig? Made out of copper or bronze? The PO might have been an old school Navy diver and proud of his elite and very dangerous profession. I was a hull tech-turd chaser and didn't see much daylight and was out by 81. Never got a chance to see divers like that in action. Interesting though. Those things are worth big $$$ to a colector.
 

bshupe

New member
440
4
0
Location
Mount Vernon, WA
bshupe, Was that helmet an old hard hat type rig? Made out of copper or bronze? The PO might have been an old school Navy diver and proud of his elite and very dangerous profession. I was a hull tech-turd chaser and didn't see much daylight and was out by 81. Never got a chance to see divers like that in action. Interesting though. Those things are worth big $$$ to a colector.

Hey Wayne, sorry if I cam off as disrespectful. The PO was never in the service but rather was operating a mini dive business from home using the 1031 as his dive rig. His highschool aged son made a divers mask in metal shop that was a couple of layers of mild steel welded to to the brush guard. It was more something like you would see hanging on a nail in a garage not an actual or replica dive helmet.
 

hmsgoodhope

Member
58
1
6
Location
Great Falls, VA
PM on Fleet

Replaced airfilters, fuel filters, and oil filters on my M1008 and M1009. Added Seafoam "boost" to fuel in tanks. Ordered new hoses and belts for my M1009 - next weeks project. Ordered new glow plugs for the M1009. Will place order for new tires in next week or so. Bled and recharged brake lines on M1009. Good start for season. Will work on last cosmetic touches on one of my M101-A1's today.
 

wayne pick

New member
658
2
0
Location
Valley Cottage NY
Hea bshupe, No problem man, I had assumed it was a real divers helmet. Those things are huge and I admit a real one would look pretty stupid hanging off the front of a CUCV! Those hardhat divers were in a league of their own, they either had big ba*** or were just plain crazy to do that kind of work. Your gonna love the 1031. Are you taking the box off it? The PO replaced the box on mine with a real nice flatbed as they are impractical unless you have a use for it like the dive school guy did. It looks kinda funny with the flatbed as the 1031 real frame is 8in shorter than the 1008-1028. I will warn you that the ride will be brutal with the box removed. I took my girlfriend:cookoo: to her brothers house with my 1031 over the hollidays to give the kids their gifts, about an 80mi round trip. She HATES "THAT THING" as she refers to it. She was cold and bouncing arround like a rag doll even with the seatbelt on, I was laughing my a$$ off. I call it the "chiropractor" either it straitens you out, or you need one when you get out of it. Good luck, WCP.
 

hmsgoodhope

Member
58
1
6
Location
Great Falls, VA
CUCV Brakes

Hi Allenhillview,

I am a relative newbie in the sport. I read the TM's, checked posts here and looked off SS site on net for dope.

First and foremost make sure all hardware in good shape - waste of fluids if pads, calipers, lines etc. are not in good working order.

If this is in doubt, and you don't want to potentially do a full brake job - take it to shop and let them vet system - like good shoes for walking - brakes and tires are the most important thing (my opinion) you can check/double check for safe operations. I "suckered" a friend over with a six pack and used the 2 man method - one on brake pedal - one on the bleeding end. Working from closest point to Master Cylinder bleed each line working my way towards furthest point from MC. (This advice form CUCV FAQs on SS site).

The following post I found most useful in laying out, in general terms, the what and why of Brake Bleeding, DOT 3 vs. 5, with a few good pics thrown in for the benefit of newbies like me. I did "invest" in a vacuum pump and tried to go it alone once - with mixed results on my M1008. Eventually got all things sorted after several attempts.

Here is the link on Brake Bleeding in general.

Brake Bleeding -Purging air and moisture from your brakes

If you have specific symptoms - check posts - it seems most common problems center around dying MC or incorrectly adjusted calipers. Be prepared for some trial and error and testing to be sure you have it right (and all air out essential) before regular road use. If pedal is spongy or brakes "rocket you through the windshield" you need to keep at it :jumpin:until it feels right and behaves properly.

I was fortunate in that my "Pedal pusher" is a truck mechanic and we got it right on the 2nd try. [thumbzup]

Good luck,

Ed
 

ryan77

Well-known member
2,584
56
48
Location
Cary IL
Finished the paint, mounted the hummer wheels and tires, trimmed the fenders a little to get them to fit! In the process cut my hand needed 15 stitches! Heres some pics! Grinder wheel went thru leather gloves! So be carefull when using tools!
 

Attachments

ryan77

Well-known member
2,584
56
48
Location
Cary IL
I have them up front for now im using 2" billet spacers off ebay and the lug nuts for the spacers are 9/16 thred with 13/16 head from summit racing!
 

wayne pick

New member
658
2
0
Location
Valley Cottage NY
Here's my center console- floor shifter mount. I might add another cup holder or put oil, water and trans temp guages where the circles are drawn on the can lid. I need some feedback on that, Thanks, WCP
 

Attachments

HOWEY

Member
159
1
18
Location
ireland
Overhauled the steering with new ball joints all round, cleaned non return valve on ip also removed and cleaned egr valve and associated pipework.........
Showed her off on the st paddys day parade also:grin: Mighty proud.......
 

Attachments

bshupe

New member
440
4
0
Location
Mount Vernon, WA
Overhauled the steering with new ball joints all round, cleaned non return valve on ip also removed and cleaned egr valve and associated pipework.........
Showed her off on the st paddys day parade also:grin: Mighty proud.......
Thats a great looking truck, you're right to be proud. Whats the mark on the door mean?
 

chief1983

Member
290
1
16
Location
Saint Charles, MO
Overhauled the steering with new ball joints all round, cleaned non return valve on ip also removed and cleaned egr valve and associated pipework.........
Showed her off on the st paddys day parade also:grin: Mighty proud.......
Your winch looks very neatly mounted, is that a production mount or a custom fab? Either way, can I get some more pics? Still have my 10k in the box in the back of the 09.
 

chevyCUCV

New member
598
3
0
Location
Massachusetts
Here's my center console- floor shifter mount. I might add another cup holder or put oil, water and trans temp guages where the circles are drawn on the can lid. I need some feedback on that, Thanks, WCP
Thats cool, but i would not put guages that low. Cup holders yes.

Overhauled the steering with new ball joints all round, cleaned non return valve on ip also removed and cleaned egr valve and associated pipework.........
Showed her off on the st paddys day parade also:grin: Mighty proud.......
Guessing you mean CDR? We dont have any EGR's ;-)
 
Status
Not open for further replies.
Top
AdBlock Detected

We get it, advertisements are annoying!

Sure, ad-blocking software does a great job at blocking ads, but it also blocks useful features of our website like our supporting vendors. Their ads help keep Steel Soldiers going. Please consider disabling your ad blockers for the site. Thanks!

I've Disabled AdBlock
No Thanks