olly hondro
Well-known member
- 905
- 593
- 93
- Location
- tucson AZ
2 TWhat's the capacity of that hoist?
Steel Soldiers now has a few new forums, read more about it at: New Munitions Forums!

2 TWhat's the capacity of that hoist?
I think they just needed more sanding before getting plated. But , yes, Some polish would make it shinier..
Wonder if you could polish it up a bit with something like jewelers rouge?
Prep makes all the difference with plating. Feel free to post more of your process. I tried the DIY route in the glasses for about 15 mins and all I got was rust. I caved, cheated and bought the copy-cad kit. I feel like it was well worth the investment. But, it's also catch 22. If you're doing a lot of plating or plating big parts, it's probably better to outsource. The plating set-up takes up a lot of space so setting up and tearing down is a process by itself.I think they just needed more sanding before getting plated. But , yes, Some polish would make it shinier.
My process is pretty basic. I started with a solution of vinegar and salt for the electrolyte.Prep makes all the difference with plating. Feel free to post more of your process. I tried the DIY route in the glasses for about 15 mins and all I got was rust. I caved, cheated and bought the copy-cad kit. I feel like it was well worth the investment. But, it's also catch 22. If you're doing a lot of plating or plating big parts, it's probably better to outsource. The plating set-up takes up a lot of space so setting up and tearing down is a process by itself.
After blasting, I run parts over the deburring wheel to polish them or if the part is round and will fit in the lathe; emory cloth & scotch-brite. The difference is night and day compared to blasting alone, especially if you're using an aggressive abrasive.
Doing some research on the copy-cad stuff...Prep makes all the difference with plating. Feel free to post more of your process. I tried the DIY route in the glasses for about 15 mins and all I got was rust. I caved, cheated and bought the copy-cad kit. I feel like it was well worth the investment. But, it's also catch 22. If you're doing a lot of plating or plating big parts, it's probably better to outsource. The plating set-up takes up a lot of space so setting up and tearing down is a process by itself.
After blasting, I run parts over the deburring wheel to polish them or if the part is round and will fit in the lathe; emory cloth & scotch-brite. The difference is night and day compared to blasting alone, especially if you're using an aggressive abrasive.
Then put some heat on it and you can get brass…..Doing some research on the copy-cad stuff...
I guess the answer is to first plate the item in copper to get a smooth finish, then hit it with the nickel.


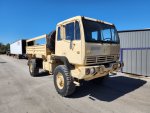

Looks good. I need a whole cover kit for mine as well, maybe some day lol. Was your’s from the lots of them sold off gov planet, the past couple of weeks?Bought a new in the crate cargo cover and poles kit.
Put in a solar powered rope lightView attachment 882585View attachment 882586View attachment 882587
Well sometime hopefully next year my truck will become a camper at that time I will sell the bed and the cover and poles kit, cleaned and folded nicely back in its original crateLooks good. I need a whole cover kit for mine as well, maybe some day lol. Was your’s from the lots of them sold off gov planet, the past couple of weeks?


.Worked on the lmtv graveyard all day
troubleshooting new starter
Tire swaps
Ctis troubleshooting
Battery charging
Engine cleaning
Fender replscement
2 steps forward 2 back
View attachment 882643View attachment 882644View attachment 882645View attachment 882646View attachment 882648View attachment 882647
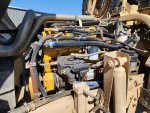
That @Mullaney is a SPI 15 ton hydraulic jack with height collar and additional riser that will extend 32”.
Definitely looks like a days hard labor to me @swiss ...
Can you tell us anything about what looks like a hydraulic jack on the ground in front of the right tire (or axle) ?
That's what this Jack is for, I wish I had one but I don'tThat @Mullaney is a SPI 15 ton hydraulic jack with height collar and additional riser that will extend 32”
if you can move it in position it will lift it. And you can use as safety stand. Problem is lmtv really does not have good spot to put it in front bumper area


And yes that sucker is expensive! I think you could buy a used Honda for the same priceThat's what this Jack is for, I wish I had one but I don'tView attachment 882746View attachment 882747
That's what this Jack is for, I wish I had one but I don'tView attachment 882746View attachment 882747

 www.ari-hetra.com
Military Floor Jack WS-1945 - 45,000 lbs. - ARI-hetra
Our Model WS-1945 hydraulic jack is designed to engage the shackle mounts of your heavy-duty military and construction vehicles, allowing you to raise the front and/or rear of your equipment weighing up to 45,000 lbs.
Cheaper to buy a forklift (and more practical).Military Floor Jack WS-1945 - 45,000 lbs. - ARI-hetra
Our Model WS-1945 hydraulic jack is designed to engage the shackle mounts of your heavy-duty military and construction vehicles, allowing you to raise the front and/or rear of your equipment weighing up to 45,000 lbs.
")
Don't have room for a forklift, but I do have room for that sweet Jack!Cheaper to buy a forklift (and more practical).