This is the wrong co. disregaurd this info The rite info is go to elesa.com twinsburg ohio then search (toothed clamping) on their page and you get alot more options than just the one in threads above Im talking about the info i put on earlier with the co. info in the uk !Elesa should be availlable also in the US, it's a worldwide company...
-
Steel Soldiers now has a few new forums, read more about it at: New Munitions Forums!

What have you done to your FMTV or LMTV today
- Thread starter Coffey1
- Start date

More options
Who Replied?BERZERKER888
Well-known member
- 416
- 896
- 93
- Location
- Daytona, FL
finally finished mounting 5 "new" MVTs ( big thanks to Ryan at Colony tire)...once you get into a rhythm they go pretty fast.. rebuilt the CTIS lines as well...o rings , diaphragms and I now see Will is selling rebuild kits with new hardware....ugh
Did you have any problems getting the valves apart with out breaking the four screws that hold it together?finally finished mounting 5 "new" MVTs ( big thanks to Ryan at Colony tire)...once you get into a rhythm they go pretty fast.. rebuilt the CTIS lines as well...o rings , diaphragms and I now see Will is selling rebuild kits with new hardware....ugh
I’ve been replacing all 7 tires and had a hard time getting them apart without breaking or twisting off the heads even after soaking them with PB for 5 days.
BERZERKER888
Well-known member
- 416
- 896
- 93
- Location
- Daytona, FL
yes and no....the first CTIS valve I broke 2 screws... carelessness on my part.... I had a protein shake in the morning that gave me super human strength..lol... in reality I muscles my way through the first 2 and they broke clean off.....ez out was to no avail.. I used a drill press and gingerly removed the broken bolt... re-tapped them and all was aok.. as for the remaining 18 screws.. PB Blaster the night before...following morning I gently used a air hammer and punch to delicately vibrate the screws... more PB Blaster as I used my HF impact drill set on 1... right left right left.. adding a bit more torque each time ..and wah lah.. all remaining screws came out.... I replaced all screws with a dab of anti seize and a lock washer.... bottom line ..take your time and be patient. As a side note , I did not use a torch..Did you have any problems getting the valves apart with out breaking the four screws that hold it together?
I’ve been replacing all 7 tires and had a hard time getting them apart without breaking or twisting off the heads even after soaking them with PB for 5 days.
BERZERKER888
Well-known member
- 416
- 896
- 93
- Location
- Daytona, FL
looking back.. Suprman has compete CTIS valve rebuild kits available on the cheap using all new parts...I should have bought 5 kits.. ugh
As I said I soaked them for 5 before I even tried to taking them apart, and I tried everything you did except for the air hammer, I used a regular hammer and punch. One came apart clean, one had one break off, another had two break off and one all four broke off. The other are still soaking.yes and no....the first CTIS valve I broke 2 screws... carelessness on my part.... I had a protein shake in the morning that gave me super human strength..lol... in reality I muscles my way through the first 2 and they broke clean off.....ez out was to no avail.. I used a drill press and gingerly removed the broken bolt... re-tapped them and all was aok.. as for the remaining 18 screws.. PB Blaster the night before...following morning I gently used a air hammer and punch to delicately vibrate the screws... more PB Blaster as I used my HF impact drill set on 1... right left right left.. adding a bit more torque each time ..and wah lah.. all remaining screws came out.... I replaced all screws with a dab of anti seize and a lock washer.... bottom line ..take your time and be patient. As a side note , I did not use a torch..
I'll drilled out and re-tap the ones that didn't come out., what a PITA! The easy-out was worthless!
Yeah I seen that. His has the top part of the valve but all I would have needed is the bottom part, everything else was good except for the diaphragms. Before taking them apart I had already purchased the rubber diaphragms which I knew would need replacing.looking back.. Suprman has compete CTIS valve rebuild kits available on the cheap using all new parts...I should have bought 5 kits.. ugh
Well, live and learn, and I did.
BERZERKER888
Well-known member
- 416
- 896
- 93
- Location
- Daytona, FL
4 down ,one to go
wandering neurons
Active member
- 264
- 147
- 43
- Location
- Fallon, NV
I can now close out two major projects on my M1081! About three weeks ago, I finally installed 3.07 diffs, with an Eaton locker in the rear.
Installing the Eaton into the rear diff was simple other than running out of Lock-Tite!
Rear diff notes: In replacing the rear drive shafts, I had to jack one tire and cage it's brakes to rotate the hub and align the splines on the shaft. That's because of the locker preventing free spinning of the hub and diff.
Front diff notes: I didn't disassemble the hub assembly, I removed it as a complete unit by pulling the king pins and lifting the entire hub assembly from the axle as a unit. Didn't have to disassemble/measure/reassemble front hubs. Used an engine hoist for lifting and moving. Was fiddly but I found a trick: The front drive shafts are also threaded like the rear shafts. I pulled the hub plug, put a threaded a piece of all-thread into the end of the shaft, put a 1" diameter, 18" long pipe nipple, washer, and nut on the end of the shaft. That gave me an excellent handle to manipulate the shaft when I was reinstalling the hubs and shafts.
Diffs are a very tight fit into the axle housings, but used an ATV lift with a few 2x4s to align the parts.
Kobalt battery impact did everything except the king pin bolts. Kudos on a powerful tool!
And today, I removed/rebuilt, and replaced the treadle/foot valve for the brakes. I had been getting venting from the vent in front of the radiator, and troubleshooting showed I was getting air bypassing the valve internally. I was able to remove the treadle valve but reaching into the dash assembly for the bolts was a real time-waster and PITA. I used air tool oil to lube all parts prior to reassembly. The valve itself is fairly simple, just nested parts, a few springs and e-clips. No more air venting when I'm not pressing the pedal.
Both jobs done solo. Just take time, use mechanical leverage and power tools. Much happier camper!
ramdough
Well-known member
- 1,554
- 1,731
- 113
- Location
- Austin, Texas
Do you have pictures of the steps by chance?I can now close out two major projects on my M1081! About three weeks ago, I finally installed 3.07 diffs, with an Eaton locker in the rear.
Installing the Eaton into the rear diff was simple other than running out of Lock-Tite!
Rear diff notes: In replacing the rear drive shafts, I had to jack one tire and cage it's brakes to rotate the hub and align the splines on the shaft. That's because of the locker preventing free spinning of the hub and diff.
Front diff notes: I didn't disassemble the hub assembly, I removed it as a complete unit by pulling the king pins and lifting the entire hub assembly from the axle as a unit. Didn't have to disassemble/measure/reassemble front hubs. Used an engine hoist for lifting and moving. Was fiddly but I found a trick: The front drive shafts are also threaded like the rear shafts. I pulled the hub plug, put a threaded a piece of all-thread into the end of the shaft, put a 1" diameter, 18" long pipe nipple, washer, and nut on the end of the shaft. That gave me an excellent handle to manipulate the shaft when I was reinstalling the hubs and shafts.
Diffs are a very tight fit into the axle housings, but used an ATV lift with a few 2x4s to align the parts.
Kobalt battery impact did everything except the king pin bolts. Kudos on a powerful tool!
And today, I removed/rebuilt, and replaced the treadle/foot valve for the brakes. I had been getting venting from the vent in front of the radiator, and troubleshooting showed I was getting air bypassing the valve internally. I was able to remove the treadle valve but reaching into the dash assembly for the bolts was a real time-waster and PITA. I used air tool oil to lube all parts prior to reassembly. The valve itself is fairly simple, just nested parts, a few springs and e-clips. No more air venting when I'm not pressing the pedal.
Both jobs done solo. Just take time, use mechanical leverage and power tools. Much happier camper!
Great job solo.
Sent from my iPhone using Tapatalk
wandering neurons
Active member
- 264
- 147
- 43
- Location
- Fallon, NV
I have pix but need to get them from iPhone (Apple's strange photo format) to my Linux or Windows box. Soon...
Do you have pictures of the steps by chance?
Great job solo.
Sent from my iPhone using Tapatalk
coachgeo
Well-known member
- 5,219
- 3,551
- 113
- Location
- North of Cincy OH
Least it is cooler in Fallon right now. (you are/was stationed there?)I have pix but need to get them from iPhone (Apple's strange photo format) to my Linux or Windows box. Soon...
Happy NV day end of the month
- 4,435
- 3,733
- 113
- Location
- Fort Worth, Texas
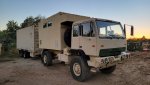
A customer now friend came in this week to build his dream truck. We started out with an M1078A1 w/w and changed it to a M1079A1 w/w. What a nice rare bird she is now. I upped the HP, set cruise control, and other things under the hood to wake her up too.
Attachments
-
 224.4 KB Views: 51
 -
 205.5 KB Views: 51
 -
 259.9 KB Views: 52
 -
 139.7 KB Views: 49
ramdough
Well-known member
- 1,554
- 1,731
- 113
- Location
- Austin, Texas
Well, when you take such good care of your customers, you are bound to make a few friends.A customer now friend came in this week to build his dream truck. We started out with an M1078A1 w/w and changed it to a M1079A1 w/w. What a nice rare bird she is now. I upped the HP, set cruise control, and other things under the hood to wake her up too.

Sent from my iPhone using Tapatalk
- 4,435
- 3,733
- 113
- Location
- Fort Worth, Texas
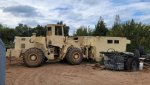
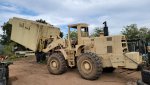
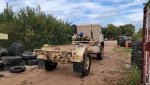
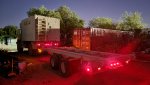
Well this friend (and I do mean friend) sweet talked me out of my new trailer. I got to keep the connex at least. I wish him well as it will be his home for the next 5 years. It will be SUCH a badass rig when he's done.Well, when you take such good care of your customers, you are bound to make a few friends.
Sent from my iPhone using Tapatalk
Attachments
-
 150.2 KB Views: 52
 -
 157.2 KB Views: 52
- 293
- 991
- 93
- Location
- Knoxville, TN
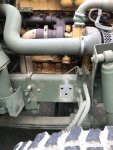
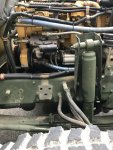
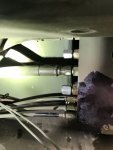
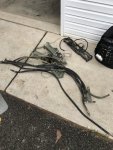
Had my drivers side hydraulic cylinder start leaking for the suspension compression system so I did what most would. I removed the whole system and capped the outlets at the manifold. Took a little while but nothing hard. Much cleaner now on the frame. I still have to paint the frame back green but that’s no big deal.
Attachments
-
 86.5 KB Views: 28
 -
 98 KB Views: 28
 -
 60.6 KB Views: 28
 -
 109.4 KB Views: 28
Did you get it in ga. the trailer that is a few months back i looked at 12 of them i think it was a auction co was moving ?Well this friend (and I do mean friend) sweet talked me out of my new trailer. I got to keep the connex at least. I wish him well as it will be his home for the next 5 years. It will be SUCH a badass rig when he's done.
Last edited:
And did the trailer get a army number like m something !Did you get it in ga. the trailer that is a few months back i looked at 12 of them i think it was a auction co was moving ?
Did that trailer ever get a m-something military designation number that auction is the only ones i ve ever seen .Well this friend (and I do mean friend) sweet talked me out of my new trailer. I got to keep the connex at least. I wish him well as it will be his home for the next 5 years. It will be SUCH a badass rig when he's done.
It's a MCT Industries XCK2000E1Did that trailer ever get a m-something military designation number that auction is the only ones i ve ever seen .
- 114,318members
- 167,210threads
- 2,353,958posts
- 3,390online users