- 1,246
- 506
- 113
- Location
- Guymon, OK
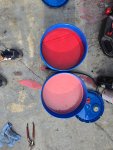
is this carpet in the cabin?Painting the bed before installing aluminum partition. Also recently installed console.
Sent from my iPhone using Tapatalk
Steel Soldiers now has a few new forums, read more about it at: New Munitions Forums!

is this carpet in the cabin?Painting the bed before installing aluminum partition. Also recently installed console.
Sent from my iPhone using Tapatalk
How many of the 6 pickup loops on that top did you use? I have the same top and it looks like just the 4 outer ones would be enough, if that is what you used did the top flex much?Have you ever had one of those jobs you needed to get done on the truck that wound up leading into another then another? Well thats what happened to me. Back in April i was driving the 1152 when I started to get a vibration in the drive line. I had recently changed the rear pads and brakes so I knew that was not it so I crawled under to find the u joints bad on the rear shaft. So i dropped it and changed the joints, easy enough. Then I thought while that’s out I’ll pull the fuel tank since it leaks from the top plate. So I did that and replaced all seals and hoses and removed the check valves while it was out. Then since that was out I ran all new vent lines that were bad as well, which was a job in itself.
I had reinstalled all of the fuel tank and associated parts and was going to bleed the fuel system but before that I thought, well my valve covers were leaking so since the fuel system is drained, and giving I would have to bleed the fuel system again if I didn’t fix it now, I proceeded to reseal the valve covers. So this past Sunday I tackled that along with changing out the lift pump since I had noticed it was leaking around its body crimp. Got it all buttoned up Monday and now it’s finally back on the road. the first picture is of the valve covers reseal job.
I don’t have many pictures but I’ll post what I have. I had forgot to post pictures from last fall of my attbar top conversion so I’ll post that as well. While I swapped tops I went ahead and lizard skinned and bed lined the truck so I’ll include those pictures as well. Now there is so much room for activities inside the cab now than it was with 1152 two man top. Hopefully before long I’ll finish restoring the set of x doors I have for the front and acquire the back doors and then finish laying the rest of the camo soon. I prolly need to start a separate thread to document all this work from the start but maybe later?
I thought the same as you, I just used the four outer loops to lift by and the top didn’t flex any that I saw. It is certainly heavy though, I had a dynamometer on it when I sat it on the truck, but for the life of me I can’t recall exactly the weight. I think it was around 580lbs.How many of the 6 pickup loops on that top did you use? I have the same top and it looks like just the 4 outer ones would be enough, if that is what you used did the top flex much?

Where'd you get that rear window? Looks greatShortened the height of the exhaust by 6” so it can fit in my garage. View attachment 948913
Thanks. I got it from Black Dog Customs. I’m told there aren’t many of them. Consequently, it wasn’t cheap.Where'd you get that rear window? Looks great
Might want to think about a "Speedy Sleeve" while you are in there. Number 99199......... just my 2 cents.My "While you're in there" is still going.
I've got 2 hubs rebuilt, a new pitman arm and all the new poly boots ready. After cleaning up the rear ball joints, I found -
View attachment 949260
Whoever can pick out the 2 visible (and 1 not so much) problems gets an "Atta boy". The other side was missing the upper retainer and had 4 total bolts loose.
Maybe at some point I can get into what I actually wanted to and fix the shifting issues.......
Any glass shop can make them, I’ve been installing rear wall windows for years.Thanks. I got it from Black Dog Customs. I’m told there aren’t many of them. Consequently, it wasn’t cheap.
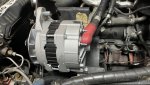
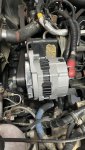
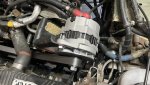
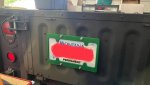
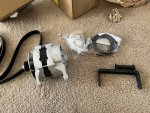
Where you got the alternator from? Lets us know how it works.160A alternator install to replace the 400A generator, and made a license plate frame for my M1102 that uses 4 of the tailegate rivet holes (remove the rivet and use 1/4 – 20 x 2 bolts).
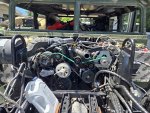

160A alternator install to replace the 400A generator, and made a license plate frame for my M1102 that uses 4 of the tailegate rivet holes (remove the rivet and use 1/4 – 20 x 2 bolts).
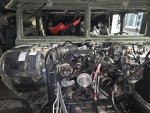
a better photo of you mod bracket? did you build the mod bracket full length of the alt? or just to the rear mounts
I didn't make the bracket. The kit is from Those Military Guys. The bracket spans both alternator lower bolts and spans the stock generator mount. It's made of c-channel and plate steel, and appears to be strong enough. My setup is a little wonky, in that my 400A generator used a 5/8" bolt instead of 1/2" at the base and 3/8" instead of 1/2" at the tensioner. Luckily I had bought a 200A adapter bolt from Black Dog Customs, so all I had to do is fab up a sleeve to adapt for the hole. I chose to do this rather than drilling out the alternator mount and using the 5/8" bolt because it's non-standard nature. I'll work on getting some more pics tonight and will update this post.Where you got the alternator from? Lets us know how it works.
Is the alternator some cheap china crap or is it a name brand? Also is it duel voltage>>I didn't make the bracket. The kit is from Those Military Guys. The bracket spans both alternator lower bolts and spans the stock generator mount. It's made of c-channel and plate steel, and appears to be strong enough. My setup is a little wonky, in that my 400A generator used a 5/8" bolt instead of 1/2" at the base and 3/8" instead of 1/2" at the tensioner. Luckily I had bought a 200A adapter bolt from Black Dog Customs, so all I had to do is fab up a sleeve to adapt for the hole. I chose to do this rather than drilling out the alternator mount and using the 5/8" bolt because it's non-standard nature. I'll work on getting some more pics tonight and will update this post.
Edit: I forgot a took a pic of the parts prior to installation.

