• Steel Soldiers now has a few new forums, read more about it at: New Munitions Forums!

  • Microsoft MSN, Live, Hotmail, Outlook email users may not be receiving emails. We are working to resolve this issue. Please add support@steelsoldiers.com to your trusted contacts.

Winch help

Hainebd

New member
520
5
0
Location
Mays Landing, NJ
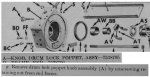
That is the plunger only. The thin hex nut still in the winch picture. The spring is under the hex nut along with the plunger. The plunger diameter is larger than the hole in the nut. I am not talking about the nut and handle you have off. Take a had look at the parts listing and how they are arranged. That is how to assemble.
 

doghead

4 Star General /Moderator
Staff member
Super Moderator
Steel Soldiers Supporter
26,247
1,172
113
Location
NY
Can you post a pic of the part you have removed?
 

sac

New member
66
0
0
Location
iowa
I just checked the old TM9-1819AC, which covers exactly that model winch (part 5 of 6).
Everything is clearly explained there...
(below, attached)

Hainebd: where do you see that "thin hex nut" you are talking about?


G.
Wow that is great, thanks for finding that. Now I wounder if I can use the new style lock, or weld mine up and look for an old style spare. Thanks again.
 

doghead

4 Star General /Moderator
Staff member
Super Moderator
Steel Soldiers Supporter
26,247
1,172
113
Location
NY
The new and old lock pin assemblies are interchangeable.

Just want the pic to confirm the obvious.
 

m16ty

Moderator
Moderator
Steel Soldiers Supporter
9,576
211
63
Location
Dickson,TN
If you can get it out and want to repair the pin, grind off what is left of the bolt, drill and tap a hole in the center of the pin, and thread in a piece of all-thread. It wouldn't hurt to use lock-tight on the threads.

I've repaired several pins this way.
 

sac

New member
66
0
0
Location
iowa
OK here are some pictures of what came off.IMG_20150211_180620991_HDR.jpgIMG_20150211_180741793_HDR.jpg

I tried to get it out again it will not come out, it moves in and rotates 360, but only moves out enough to disengage the drum. I'm at a loss.
 

doghead

4 Star General /Moderator
Staff member
Super Moderator
Steel Soldiers Supporter
26,247
1,172
113
Location
NY
Yup, it should come right out.

Thanks for the pic to confirm.
 

doghead

4 Star General /Moderator
Staff member
Super Moderator
Steel Soldiers Supporter
26,247
1,172
113
Location
NY
Can you chuck a cordless drill onto the pin?

Maybe pull out while spinning it?

The other end may be bent or the spring may be so disintegrated(rusted) that it is keeping it from moving out.
 

Hainebd

New member
520
5
0
Location
Mays Landing, NJ
Take the next nut off. I tried to put a pic here but can't. Check TM 9-2320-209-34-2-3 page 18-11 item 7 plunger, item 9 spring, item 8 retaining nut, item 4 plunger or lever, item 6 is hex nut.
 
Last edited:

doghead

4 Star General /Moderator
Staff member
Super Moderator
Steel Soldiers Supporter
26,247
1,172
113
Location
NY
We have posted the parts tm pics.

Tell us what number part this "next nut" is.
 

Hainebd

New member
520
5
0
Location
Mays Landing, NJ
Part "A" is one assembly consisting of, plunger, retaining nut, spring, lever or know, and hex nut. The hex nut holds the assembly together. The retaining nut is screwed directly into the winch enframe. The hex nut is 9/16" or smaller. The retaining nut is 3/4"or larger. The TM pic does not show the complete break down of this assembly.
 

sac

New member
66
0
0
Location
iowa
Part "A" is one assembly consisting of, plunger, retaining nut, spring, lever or know, and hex nut. The hex nut holds the assembly together. The retaining nut is screwed directly into the winch enframe. The hex nut is 9/16" or smaller. The retaining nut is 3/4"or larger. The TM pic does not show the complete break down of this assembly.
I don't see any other nut. The only one I see is the one I used a 3/4 wrench.
 

sac

New member
66
0
0
Location
iowa
Can you chuck a cordless drill onto the pin?

Maybe pull out while spinning it?

The other end may be bent or the spring may be so disintegrated(rusted) that it is keeping it from moving out.
I tried it but it doesn't move free enough,its stripping the shaft. I guess I will learn how to take a winch apart.
 

Hainebd

New member
520
5
0
Location
Mays Landing, NJ
Soak with pb blaster. Rock winch drum as you turn the plunger shaft. If you have a slide hammer and good vice grips try slapping in out. At least if you get this out you can strip the wich line off the drum. Mine was rusted in too. When you reassemble, use neversize! The TM I posted has a great parts break down on the winch.
 

sac

New member
66
0
0
Location
iowa
OK I can't get the TM to up load that you gave, but if you go to page 18-24, mine didn't have nut #5 only knob 4 and nut 3. But from that picture it looks like the pin is removed from the drum side. I have been soaking it with pb.
Oops it did upload.
 

Attachments

Last edited:

Jeepsinker

Well-known member
5,371
385
83
Location
Dry Creek, Louisiana
Apply some heat, then oil to cool it, then heat, then oil to cool it, then try pulling it out.
it needs to be hot enough to burn the oil off when you first start to cool it with the oil. The PB should work fine for this.
 
Top