• Steel Soldiers now has a few new forums, read more about it at: New Munitions Forums!

  • Microsoft MSN, Live, Hotmail, Outlook email users may not be receiving emails. We are working to resolve this issue. Please add support@steelsoldiers.com to your trusted contacts.

Working on the M1078 LMTV

mkcoen

Well-known member
Steel Soldiers Supporter
5,637
381
83
Location
Spring Branch, TX
With the help of Keith_J got started on the AC install after all. I won't clog up the board with another seperate thread but hopefully get all the info in here.

Here's a couple of shots of the progress:
1) a trailer full of removed parts to get the fan stuff off
2) changing out the water pump belt now that it's easy to get to
3) found a notch in the new crank pulley but prepped to weld it up
4) after weld and filing
5) new pulley installed

image.jpgimage.jpgimage.jpgimage.jpg
 

Attachments

Last edited:

NDT

Well-known member
Steel Soldiers Supporter
10,185
5,918
113
Location
Camp Wood/LC, TX
I see you removed the upper radiator pipe? Is this to drain the cooling system in advance of installing the new heater? Reason I ask is because I was able to remove the upper shroud with the pipe in place. Took a little prying.
 

mkcoen

Well-known member
Steel Soldiers Supporter
5,637
381
83
Location
Spring Branch, TX
NDT - yes we need to get the coolant level drained to remove the evaporator.

Running in to some snags as all parts were sourced seperately so the wiring isn't matching up exactly. We did get the new pulley and both compressor brackets installed but working outside in 95* temps on a concrete driveway takes it's toll on a couple of late middle-agers. We'll hit it again in the morning and make a little more headway.

image.jpg
 

Keith_J

Well-known member
3,657
1,315
113
Location
Schertz TX
While MKC is fetching some grommets for the five new holes in the floor, I'll update the AC install progress ..

The original heater is gone. Easy once floor heat duct is pulled. Air brake valves were buggy mess and should be even worse with AC due to refrigerant hoses. So New units heat duct is also pulled for install.

We made templates to drill holes. Two for condensate , two for refrigerant bulkhead fittings and one for wiring harness. Lacking MWO docs , we had to apply all potential foresight.

Still feeling woozy from the heat and upchucking yesterday. But my eyes seem calibrated to size fasteners.

Oh, with engine coolant drained , I charged the air tanks through the drain valves. No hand pumping for cab tilt 😋
 

mkcoen

Well-known member
Steel Soldiers Supporter
5,637
381
83
Location
Spring Branch, TX
Here's what the dash looks like with the old heater removed and a couple of shots comparing the old and new unit. New one slightly larger.

image.jpgimage.jpgimage.jpg
 

FloridaAKM

Well-known member
2,699
392
83
Location
Gainesville, Florida
You posted some much needed info for that conversion piece. My heater(which nothing works) is BTC, needs major work & is bent up badly. Your pictures shows that the replacement section, will fit & fix my existing problems & allow for A/C in the future if I so decide(Florida is really HOT right now), thanks for posting that!
 

mkcoen

Well-known member
Steel Soldiers Supporter
5,637
381
83
Location
Spring Branch, TX
You posted some much needed info for that conversion piece. My heater(which nothing works) is BTC, needs major work & is bent up badly. Your pictures shows that the replacement section, will fit & fix my existing problems & allow for A/C in the future if I so decide(Florida is really HOT right now), thanks for posting that!
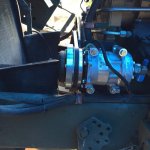
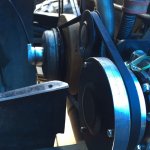
Other than needing to drill a few extra holes it just drops in and your heater should work fine until you get around to hooking the AC up. It's in the mid-90s here right now so I definately would like to getting working. We still have a couple of bugs to work out but its closer.
 

mkcoen

Well-known member
Steel Soldiers Supporter
5,637
381
83
Location
Spring Branch, TX
So here's a couple of pics with the belt on. The one we used is 56" long. We had to stack several washers behind the idler pulley to get it to line up with the crank pulley and the compressor but everything looks good.
 

Attachments

Keith_J

Well-known member
3,657
1,315
113
Location
Schertz TX
56" belt was a bit too large so we stacked two washers under each pad pillar. Still the idler will go overcenter but once tightened it seems there is adequate tension. Mind you, a Sanden SD15 will pull 8+ horsepower and on a single A section belt, that is too much torque even on a 7" diameter pulley . Sanden has a performance curve on their website.
 

TexAndy

Active member
1,427
15
38
Location
Bee County, Texas
Sweet. Can't wait to feel the cold air machine in action.

Slightly off-topic: Maybe start thinking about where we can pull VSS from for an electronic cruise control. Last resort is the magnets, but I'm wondering if the LMTV is new enough that it would have an ECU that you could pull a signal for VSS off of. I'm betting there is.
 

agazza2

Active member
483
31
28
Location
Ahwatukee, AZ
Rear mount

Allen, here's the shots of the antennae mount. The power cable that comes out of the back of the cab actually goes in to the mount on the bottom side of where the magnets are. I have not seen one of the antennae so not sure exactly what it looks like.

View attachment 629451View attachment 629450

Other things I'm working on today, just got some of the new style mirrors so I'm going to get them on. Also finishing up the paint on the wheels (just ran out so need to hit Home Depot) so I should have them ready to mount. That will have to wait for another day though as the heat index is headed for about 105 today. I know, nothing like Phoenix. 120 today?
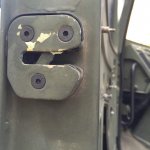
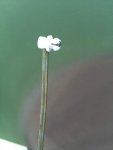
Mark, Thank you. I have not seen one of those mounts before. I guess one more thing to look for in the future :) Have to catch up on your thread now.
 

mkcoen

Well-known member
Steel Soldiers Supporter
5,637
381
83
Location
Spring Branch, TX
As much as I didn't want to spend the money I broke down and changed out the right air bag (saying "I" did means I watched while a friend did it - had a tooth yanked today and was drifting a little on left over dentist drugs and the additional shot of Tylenol 3). No more leaks, at least from there. If we get the AC buttoned up at the end of the week it will have been a very successful June.

1) taking the old bag out
2) serious cracking going on
3) new bag installed and ready to go

IMG_4357.jpgIMG_4358.jpgIMG_4359.jpg
 

Keith_J

Well-known member
3,657
1,315
113
Location
Schertz TX
Still no luck on the low pressure cutoff switch. Red Dot has online catalogs with pictures but without having the harness in my hands, my CRS disease kicks in. I fear this is an open port on the receiver dryer so it isn't easy to change later. Some factory units have a schraeder valve port for the switch so it can be replaced without having to recover and evacuate refrigerant.
 

mkcoen

Well-known member
Steel Soldiers Supporter
5,637
381
83
Location
Spring Branch, TX
One of the things I forgot to mention when I was replacing the door handles is the bolts holding the latch on were all stripped. For some reason the manufacturer thought slotted heads were the way to go. I replaced them with allen head bolts.
 

Attachments

Top