• Steel Soldiers now has a few new forums, read more about it at: New Munitions Forums!

  • Microsoft MSN, Live, Hotmail, Outlook email users may not be receiving emails. We are working to resolve this issue. Please add support@steelsoldiers.com to your trusted contacts.

I bought a "Not operationally checked" MEP-803A what can I expect?

Guyfang

Moderator
Staff member
Moderator
16,761
24,068
113
Location
Burgkunstadt, Germany
Oh, read the last part. When a unit gives up a piece of equipment to DRMO, mostly the OVM will be removed from the end item, to be installed on the new end item. Or, as the case often was, things like sledge hammers and tool simply get looted. That sort of thing can be used someplace else, so why turn it in? If you buy something with the OVM still on it, your lucky.
 

Daybreak

2 Star Admiral
Steel Soldiers Supporter
1,522
771
113
Location
Va
Still reading through this thread and I have to ask. The Gensets in Germany appear to be garage kept. The paint is like new. The 3132526 must have recently reset. Guyfang do you know why these look so good? Several in the background look to be the same shape.

Also does anyone know just what happens to the tools and accesories that were on the surplus equipment? It seems that anything that is sold or surplused through GP or Govliquidation is empied of the accesories. Is there a site to repurchase items.
Howdy,
I would say all those in Germany look like they all have fresh coats of CARC.
Maybe the painting department was slow and figured they would practice. :)
 

rtrask

Well-known member
342
251
63
Location
San Luis Valley, Colorado
I picked up my genset on Friday. I will post my experiences on this unit.

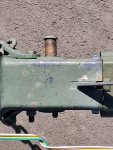
So far things have not gone particularly smoothly, but nothing to do with the generator. The yard manager was helpful in putting the pintle ring on the hook. am sure he just missed the fact that the pin that holds the ring on was half out, or may be he just forgot to mention it.
20200221_112008.jpg


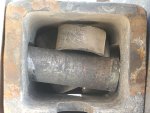
I discovered it about 5 miles down the road when I was checking because it's a habit when pulling a unfamiliar trailer. I didn't have a proper sledge, but it would not budge with all the love I could give it. So I decided to chance it and drove another 30 miles to a Harbor Freight parking lot. I could not get the pin to line up with the hole, so I had to take the hitch apart. When I did, this is what I found.
20200221_125618.jpg

No wonder whacking it did no good. It had gotten a lot more than whacks than I could give it, because the end of it took a fair amount of filing before it would fit through.

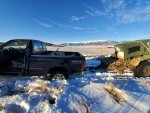
My next miss adventure came when I got within about 500 feet of the turn off to my property.


20200221_170703.jpg

The drift didn't look that bad, but with the trailer behind me, I was well and truly stuck. It took most of Saturday to get it unstuck, but there was no way to get the last 500 ft, so I turned around and brought it to Denver. I woke up to snow this morning, so I have not managed much. I did get the filters changed, and the batteries put in. More to come.
 

Light in the Dark

Well-known member
Steel Soldiers Supporter
3,827
5,933
113
Location
MA
welcome to the world of as-is/where-is surplus. Glad you found the issue though early. Sucks about getting stuck though... think of it as a story you can retell now.
 

reset2

Active member
180
68
28
Location
Myersville MD
Sometimes as things break around here I think of it as a large pile of scrap iron. But as I work through it and get things settled out in the end I am rather proud of what was accomplished. Guyfang is right if the general population thought "as is where is" surplus equipment was simple they all would do it. Most only once and complain, then quit. I'm not saying you are complaining but once you get your new Greenie doing what you want you will have your own pride and self accomplishment. Congrats on your new journey.

Now lets get a picture with the 803 with the background of those Colorado mountains without the stuck truck ruining the view. :)
 

69birdman

Active member
201
139
43
Location
Summerfield, Fla.
Looking back at the inspection pictures now, I think pic 21 & 38 show the pintle pin exposed, sorry we didn't catch that.
I purchased an LTT with 2- 802s back in October from Chambersburg, Zed254's keen eyesight spotted the pin exposed in the inspection pictures of mine . I had it shipped to me, loading it at the yard, they busted off the landing jack mount with their forklift. It's only riveted on the bottom of linette. I found the rivets above align with below so I cut them off and ran bolts all the way through the tongue to the jack mount. 20191006_154010.jpg
 

rtrask

Well-known member
342
251
63
Location
San Luis Valley, Colorado
Sometimes as things break around here I think of it as a large pile of scrap iron. But as I work through it and get things settled out in the end I am rather proud of what was accomplished. Guyfang is right if the general population thought "as is where is" surplus equipment was simple they all would do it. Most only once and complain, then quit. I'm not saying you are complaining but once you get your new Greenie doing what you want you will have your own pride and self accomplishment. Congrats on your new journey.

Now lets get a picture with the 803 with the background of those Colorado mountains without the stuck truck ruining the view. :)
This is not my first Greenie. I bought a 1987 FLU 419 Unimog a couple years ago. It is functional but is still not 100% (there is always something). I really wish I had down at the property. I went into it with both eyes open.

The pictures with the 803 up there will have to wait a bit until the drifts melt or I can get my FLU 419 up there. The drifts on the road were nothing compared to the drifts on my property, :(
 

rtrask

Well-known member
342
251
63
Location
San Luis Valley, Colorado
Looking back at the inspection pictures now, I think pic 21 & 38 show the pintle pin exposed, sorry we didn't catch that.
I purchased an LTT with 2- 802s back in October from Chambersburg, Zed254's keen eyesight spotted the pin exposed in the inspection pictures of mine . I had it shipped to me, loading it at the yard, they busted off the landing jack mount with their forklift. It's only riveted on the bottom of linette. I found the rivets above align with below so I cut them off and ran bolts all the way through the tongue to the jack mount.
The jack was missing on mine. With all the time I spent at Harbor Freight I found a replacement jack. The only problem is that even though it is shorter than what your original looks to be it is still to high to drop the pintle on the hook. I am going to have to cut the coupler off and weld it on about 4 inches lower.
 

Zed254

Well-known member
866
466
63
Location
S. Hampton Roads, VA
I was looking for a replacement jack for these trailers. Daybreak pointed me to Bull Dog Jacks: https://www.steelsoldiers.com/threads/m1101-m1102-ltt-tqg-trailer-jack.154286/

Their round jacks are close, but.... https://www.bulldogproducts.net/products/trailer-jacks/round-jacks/phveRFoAu26L!shBf1zQrQ2Ppw4AsVkb

This one looks like the same family, but it is not long enough: https://www.bulldogproducts.net/pro.../USX3uVM!Va79b3UMDH4nwGy0UHMQdTzSzAxqxyytVd0=

This one appears long enough, but the crank handle is in the wrong location: https://www.bulldogproducts.net/pro.../USX3uVM!Va79b3UMDH4nwP9gsASro6gH!APX8VVXJEQ=

NSN 2590-01-484-0440 shows as by Silver Eagle: https://www.parttarget.com/2590-01-...choption=nsn&originalsearchtext=2590014840440

Search Ebay for "MILITARY TRAILER LEG SUPPORT ASSY Wheel M1102 M101A1 M101A2 A3 M101" and find one for the price of an entire trailer....but they will take offers.
 
Last edited:

Chainbreaker

Well-known member
1,796
1,992
113
Location
Oregon
When I saw the picture of your stuck truck with generator behind it I thought to myself...gee I don't recall that the front of the trailer was so badly rusted. Then I realized it was mud slung up from wheel spin of your stuck truck.

That's the one part of Colorado I don't miss all that much, though that view sure is gorgeous! I once high-centered a low suspension sports car outside Denver with studded snow tires on a rather innocent looking snow drift from afar. I erroneously thought a little speed would push me through it on a down sloping on-ramp to a hi-way. Didn't work out as planned! Luckily a rancher in a 4 wd pickup with deeply lugged snow tires and tow strap came by soon and was able to YANK me out of it. Lesson learned...leave the sports car at home and always take the truck when wind and snow more than a couple inches on roadways.

Glad you made it unscathed as far as you did...its almost home and when it is home the fun begins! Fingers crossed that its a runner, if not your in the right forum!
 

rtrask

Well-known member
342
251
63
Location
San Luis Valley, Colorado
Some good news today, GP description said batteries were missing. The pictures showed them to be in the genset, and they were there! I figured they would not be worth more than core charge, but I put one on the charger and it showed 12.1 volts. I have not tried the other yet, but since they were connected serially I think it likely the other will be in similar shape.
 

rtrask

Well-known member
342
251
63
Location
San Luis Valley, Colorado
I got to spend some quality time with my generator today.

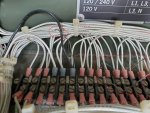
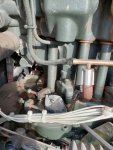
I did not make as much progress as I would would have liked. I did get all the fluids in and as best I can tell no leaks around the filters. I found some strange spring type wires behind the control panel does any one know what these are?
20200229_095449.jpg

I think the gauges are functional, but several of the light are burned out. The DC Circuit breaker was tripped, but once it was reset the control panel seemed to behave as expected. When set to prime the fuel pump worked both for the tank and the external tank pump. The progress stopped there. I had turned the engine enough to show that it was not seized. I attempted to start it, but it sounded like it attempted to turn over, but would make a clunk and then make a clicking sound. I tried to use the dead crank, and got the same result. Then I put a 24 mm socket and ratchet on the crank shaft and turned it through a full revolution of the generator, so I am confident that there is no physical restriction. That pointed to the starter. I verified that there was 25 volts between the negative ground bolted to the starter, and the positive post on the solenoid. I tried activating the solenoid, and got the same result as the the dead crank, and start switch.

I pulled the starter, and disassembled it. The armature checks out. The instructions on the field coil are not too clear, The brushes have connectivity in opposite pairs, which I believe is correct. One of the pairs has connectivity to the frame, so I believe that confirms the fault in the starter (EDIT: This was a red herring due to poor instructions on testing the starter and solenoid see later post). I looked on line for the yolk assembly, but you might as well buy the whole starter for what they want for them.

I ran it in primer mode for a long time looking for leaks in the fuel system. There are no bad leaks, but after a long time I noticed some dampness that I decided was diesel.
20200229_155647.jpg


I have not found the source, and I hope some of you with more experience with these generators can give me some diagnostic pointers. The one fuel line I think might be compromised is on top on the opposite corner from where this picture was taken. I don't think it can be the source. Any ideas?
 
Last edited:

Light in the Dark

Well-known member
Steel Soldiers Supporter
3,827
5,933
113
Location
MA
The spring form is the hold down bracket for the electromechanical relays just in front of the TB. One per relay. They tuck into small V notched at each side of the grey plastic base, and slide up and hold the relays down.

If this a set for yourself, if you are in the wrenching mind take the top off and just tackle the return line. Replace it with Viton or some other higher quality return line, and never worry about it again. It can leak anywhere up top, and show up in the back, front, or sides of the machine.

All you need is the right size, small zip ties, and a pack of 1/8" plastic vacuum tees (just as a backup, if they break while doing the job). With the top off the machine, you can also assess the water pump, thermostat, fan belt, fan, radiator, glow plugs, air filter, etc. Its like 30 screws max, and well worth the time as new owner.
 
Last edited:

Light in the Dark

Well-known member
Steel Soldiers Supporter
3,827
5,933
113
Location
MA
Have you perused the -24 manual yet for the no start condition? Have you tried flipping the dead crank switch to the up position, to see if she turns over that way (even though it wont start). Are you sure your batteries are good and charged?

Edit: I see you said same concern with dead crank. I really think you need to test the voltage on those batteries.
 

Guyfang

Moderator
Staff member
Moderator
16,761
24,068
113
Location
Burgkunstadt, Germany
Dude,

Slow down. First troubleshoot. Then you can start taking things apart. Charg the batterys REAL GOOD. Then we can remove them from the start problem. Read the trouble shooting digram. BOTH of them. There is one in the -10 and the -24 TM's.
 

Light in the Dark

Well-known member
Steel Soldiers Supporter
3,827
5,933
113
Location
MA
And to help you further, Page 55 of 9-8115-642-24 describes the testing procedure for 'Engine Fails to Crank'. Let us know what you come back with.
 

rtrask

Well-known member
342
251
63
Location
San Luis Valley, Colorado
The spring form is the hold down bracket for the electromechanical relays just in front of the TB. One per relay. They tuck into small V notched at each side of the grey plastic base, and slide up and hold the relays down.
Thanks for the info on the spring forms. They were all back behind all the wires and looked like they would cause a short where they were. I assumed that they were part of some wire management system where they were, but your explanation makes perfect sense. I just don't know how the got to where I found them.


If this a set for yourself, if you are in the wrenching mind take the top off and just tackle the return line. Replace it with Viton or some other higher quality return line, and never worry about it again. It can leak anywhere up top, and show up in the back, front, or sides of the machine.

All you need is the right size, small zip ties, and a pack of 1/8" plastic vacuum tees (just as a backup, if they break while doing the job). With the top off the machine, you can also assess the water pump, thermostat, fan belt, fan, radiator, glow plugs, air filter, etc. Its like 30 screws max, and well worth the time as new owner.
I think this is good advice, and I will next weekend if the weather holds.

Dude,

Slow down. First troubleshoot. Then you can start taking things apart. Charg the batterys REAL GOOD. Then we can remove them from the start problem. Read the trouble shooting digram. BOTH of them. There is one in the -10 and the -24 TM's.
Well intended Guy but if I went much slower I would be at a dead stop. I omitted a lot of the trouble shooting steps that I went through, just because it was a long enough post as it was.

Here is the section on engine fails to crank.

1. ENGINE FAILS TO CRANK.

Step 1. Test for defective DEAD CRANK switch, paragraph 2-96.3.
a. If DEAD CRANK switch is not defective, do Step 2. Dead crank appears to function correctly.
b. If defective, replace DEAD CRANK switch, paragraph 2-96.
Step 2. Check for loose or corroded battery cable terminals or battery posts.
a. If terminals are tight and posts are clean, do Step 3. Batteries were checked and rechecked connections clean and tight.
b. If not clean and tight, clean and tighten battery cable terminals and posts, paragraph 2-12.4.
Step 3. Check that batteries are installed correctly, paragraph 2-12.5.
a. If batteries are installed correctly, do Step 4. Batteries were installed in series showing > 25 volts with multi-meter
b. If not property installed, install batteries correctly, paragraph 2-12.5.
Step 4. Test for low or no battery charge, paragraph 2-12.1.
a. If fully charged, do Step 5. Batteries were freshly charged 12.7 volts each by De Walt charger
b. If not fully charged, replace batteries, paragraph 2-12.
Step 5. Test for defective DC CONTROL POWER circuit breaker, paragraph 2-26.2.
a. If DC CONTROL POWER circuit breaker is not defective, do Step 6. DC Circuit breaker was initially tripped, no power to panel reset fine
b. If defective, replace DC CONTROL POWER circuit breaker, paragraph 2-26.
Step 6. Test for battery voltage at terminal 1 of starter solenoid. Refer to Electrical Schematic FO-1.
a. If battery voltage is present, do Step 7. Battery voltage between lower starter bolt and positive terminal on solenoid > 25
b. If battery voltage is not present, check for loose connections from solenoid to batteries.
Step 7. Test for battery voltage at + terminal of starter solenoid with MASTER SWITCH in START position. Refer to Electrical Schematic FO-1.
a. If battery voltage is present, replace starter solenoid. Refer to TM 9-2815-253-24.
b. If battery voltage is not present, do Step 8.
Step 8. Test for battery voltage at input of MASTER SWITCH, refer to Electrical Schematic FO-1.
a. If battery voltage is present at input terminal (6) and ground, do Step 9.
b. If battery voltage is not present, do Step 10.
Step 9. Test MASTER SWITCH for output voltage in START position, refer to Electrical Schematic FO-1.
a. If battery voltage is present at MASTER SWITCH output temninal (7) and ground, do Step 13.
b. If battery voltage is not present at output terminal, test MASTER SWITCH, paragraph 2-47.2.
Step 10. Test for defective battery charging ammeter shunt, paragraph 2-29.2.
a. If not defective, do Step 11.
b. If defective, replace battery charging ammeter shunt, paragraph 2-29.
Step 11. Test for defective Reverse Battery Diode (CR1), paragraph 2-34.2.
a. If not defective, do Step 12.
b. If defective, replace reverse battery diode, paragraph 2-34.
Step 12. Test for defective EMERGENCY STOP switch, paragraph 2-9.2.
a. If not defective, do Step 13.
b. If defective, replace EMERGENCY STOP switch, paragraph 2-49.
Step 13.Test for defective engine fault relay (K12), paragraph 2-33.2.
a. If engine fault relay is not defective, do Step 14.
b. If defective, replace engine fault relay, paragraph 2-33.
Step 14. Test for defective BATTLE SHORT switch (S7), paragraph 2-50.2.
a. If BATTLE SHORT switch is not defective, do Step 15.
b. If defective, replace BATTLE SHORT switch, paragraph 2-50.
Step 15. Test for defective crank disconnect switch (S14), paragraph 2-32.2.
a. If crank disconnect switch is not defective, do Step 16.
b. If defective, replace crank disconnect switch, paragraph 2-32.
Step 16. Test for defective crank disconnect relay (K16), paragraph 2-33.2.
a. If crank disconnect relay is not defective, do Step 17.
b. If defective, replace crank disconnect relay, paragraph 2-33.
Step 17. Check starting circuit for breaks or loose connections, refer to Schematic Diagram FO-1.
a. If starting circuit has no breaks and connections are tight, do Step 18.
b. If defective, repair or replace defective wires or connections.
Step 18. Test for defective cranking relay (K2), paragraph 2-63.3.
a. If cranking relay is not defective, do Step 19.
b. If defective, replace cranking relay, paragraph 2-62.


All of this in yellow is really not applicable to this problem. The dead crank switch, and the Master Switch, and bypassing the switches with a remote starter switch connecting between terminal B on the solenoid and terminal S on the solenoid all behave exactly the same. The engine will start to turn over and then it stops turning and makes a louder clunk, followed by a series of clicks until switching off the Master Switch, the Dead Crank, or Remote Start switch. The Battle Short, the Emergency Stop, none of these things can account for this behavior. They would prevent it from starting, but not from turning over.
If engine were to turn over but not catch I will examine these further. I was concerned the issue is due to a internal mechanical problem which stop the engine or the generator from turning. I then put a socket on the crankshaft and turned the engine over. It never caught, or felt like it hit an obstruction.

Step 19. Test for defective starter solenoid, refer to TM 9-2815-253-24.
a. If starter solenoid is not defective, do Step 20. The starter solenoid is not defective Switched to TM 9-2815-253-24
EDIT( I am starting to suspect the solenoid may be bad)

b. If defective, replace starter solenoid in accordance with TM 9-2815-253-24.
Step 20. Test for defective starting motor, refer to TM 9-2815-253-24. If defective, replace starting motor in accordance with TM 9-2815-253-24.
 
Last edited:

Light in the Dark

Well-known member
Steel Soldiers Supporter
3,827
5,933
113
Location
MA
I just don't know how the got to where I found them.
Someone before you was trying to diagnose an electrical problem and gave up... thats my bet. Just put a 10k up for sale in the classifieds that showed up with all the relays loose, no hold downs in place, no start, no power condition.
 
Top
AdBlock Detected

We get it, advertisements are annoying!

Sure, ad-blocking software does a great job at blocking ads, but it also blocks useful features of our website like our supporting vendors. Their ads help keep Steel Soldiers going. Please consider disabling your ad blockers for the site. Thanks!

I've Disabled AdBlock
No Thanks