• Steel Soldiers now has a few new forums, read more about it at: New Munitions Forums!

  • Microsoft MSN, Live, Hotmail, Outlook email users may not be receiving emails. We are working to resolve this issue. Please add support@steelsoldiers.com to your trusted contacts.

CUCV 1986 M1008 - In a Real Pickle - Bad Heads - Need Advice

Commander5993

Active member
Steel Soldiers Supporter
clock your 18mm socket with a pencil. turn it 1/4 turn and it is good. Torque will be off. Depends on how you do it. I would do the 1/4 turn. Good Luck.
Well, I was torquing the 3rd round a few min ago on the passengers side head which I just got installed, *haven't* done the 3rd round on the drivers side yet.
I marked all the bolts so I could watch how far they turned. I found that it took 85 ft lb to turn the #1 bolt 1/4" of a turn. The next several bolts were the same... Then it went slightly over 1/4" turn on the #4 bolt, so I stopped and was doing some re-thinking.

So, in the end, I guess the 1/4" turn is the only thing you can do, even though it still seems... "sloppy".
But that's what I'm going to try to do.

Thanks Cucvrus
 
Last edited:

Commander5993

Active member
Steel Soldiers Supporter
Got both heads torqued, tried the best I could do to get 1/4 turn on each bolt... still don't like that.
Even more so when I read on another site that "...TTY head bolts are supposed to be turned on the final round, in one smooth continuous motion otherwise they will not stretch evenly..."
If I had to do it over again, I may have just bought the ARP studs, which are not TTY, and are reusable, and then torqued them all the same. If they weren't $200 I would have bought them without even considering tty bolts.

Anyway, hind sight is 20/20... just hope these heads hold up, and that I won't have any more issues once this truck is back together.
 

ken

Active member
Steel Soldiers Supporter
2,479
25
38
Location
Houston Texas
Cucvrs is correct. It seems sloppy but in fact it is not. These bolts are streaching when the 1/4 turn is completed. This will make for a even clamp across the whole head. You should be fine. As long as you have no gasket damage during the install.
 

Commander5993

Active member
Steel Soldiers Supporter
Cucvrs is correct. It seems sloppy but in fact it is not. These bolts are streaching when the 1/4 turn is completed. This will make for a even clamp across the whole head. You should be fine. As long as you have no gasket damage during the install.
Yeah I damaged the first gasket when I started to install the drivers side head. It was just some small "scratches" but I wasn't going to take the chance, i removed it and put it back into its packaging. I went and bought another new fel-pro head gasket to replace it. Second attempt on the drivers side installed fine without any further problems.
The passenger side head installed much easier, as there is more room, without any issues.

Today is Sabbath, so I'm not working on the truck today.
But since the motor and transmission mounts won't be in until wednesday, tomorrow I'll probably install the oil pressure gauge and water temp gauge. And I can start putting some of the top end back. But I think I'm going to wait to install the exhaust manifolds until after I get the new motor mounts in, just so there's more room, it'll make it easier to get the bolts for the mounts back in.
 

Commander5993

Active member
Steel Soldiers Supporter
ok...... i'm starting to think the TMs would make a bad trivia game...

In TM 9-2815-237-34 section 2-41 (pg 219 of the pdf file).
ENGINE ASSEMBLY FROM SUBASSEMBLIES
Rocker Arm Shaft and Pushrods


It states:
CAUTION
Marked ends of pushrods must point up when installed or engine
damage may result.
What "marked ends" ??? aua
I'm looking at these rods, and both ends look exactly the same. I don't see any marks or indicators on the shaft or anywhere...

The only other guess that I have is that I was supposed to have marked the "top" ends when I took it apart?? If so... then I guess I screwed that up...

If not then.... ??

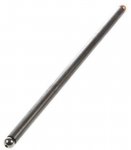
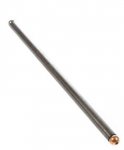
The only difference I can see at all in the two ends, is that all the rods seem to have one end, at the very end of the shaft it is sort of "blue" from heat for less than 1/16", like where the ball tip was "welded" on. The ball itself doesn't seem to be blue though... surely this is not the "mark" they are referring to??
 

cucvrus

Well-known member
11,474
10,441
113
Location
Jonestown Pennsylvania
Yes they do have an up and down. I pull all mine out and put them in a box in the same order I removed them. Up side UP and down side down. Let me get a look at one tomorrow. I don't recall a difference either. Did you at least keep them in order? Or did you throw them on a pile? :) Just asking. I will try and help out.
 

Commander5993

Active member
Steel Soldiers Supporter
of course I didn't throw them in a pile... I made two piles :mrgreen:... (or rather two zip lock bags)... one for drivers side and the other for passengers side

I did separate and label each of the rocker arm assemblies though... guess that doesn't help much since I didn't keep my rods in order... :cookoo:
 

Commander5993

Active member
Steel Soldiers Supporter
well, looking up a rod on rockauto... on the one they show one end is copped colored...
a lot of good that does as if these rods were colored like that, it soon wore off after first running, as both ends are just steel colored....

1.jpg

2.jpg


why couldn't they just do something simple, like make a mark or arrow on the shaft... or they could have gone way out there and wrote "top" toward one end...


I just don't get the difference, as both ends are made the same... what would make it fail?? It doesn't do anything different... its still riding between the rocker arm and lifter... aua

At this point, should I just buy a new set? I don't want a rod to break and have to take the whole top end apart again...
ridiculous... :roll:
 

Commander5993

Active member
Steel Soldiers Supporter
Ok... I had kind of figured this out, but I just came across this diagram which seems to say the same thing.

Some rods (apparently older models) "top end" are not "copper" colored, but instead are grey colored... guess some genius figured grey was kind of dumb seeing that it the color of steel, and changed to copper later.

The rods I have are "grey" on one end. Really all I could tell was that only the "top" half of the end was shiny, and the rest of the "ball" was dull. In comparison to the other end where the entire "ball" was shiny.
So I assumed that the end which was only "half shiny" must have been the top riding on the shallow rocker arm, and the full shiny end must have been in the deeper seat in the lifter.

This photo seems to confirm this:

pushrods-sm.jpg

So.... I think I can figure out the top and at least turn them right side up... just don't know which rod went to which rocker, but nothing I can do about that now.
 

cucvrus

Well-known member
11,474
10,441
113
Location
Jonestown Pennsylvania
Don't worry about which one went to which one. they are all the same length. If you figured out by looking at them top from bottom you done better then I could. I threw away several I had in a box and never looked back. Next time just cut an x in a box and keep them up up and in order. Or NOT. You will be fine. Good Luck. Thank you for the update.
 

Commander5993

Active member
Steel Soldiers Supporter
Don't worry about which one went to which one. they are all the same length. If you figured out by looking at them top from bottom you done better then I could. I threw away several I had in a box and never looked back. Next time just cut an x in a box and keep them up up and in order. Or NOT. You will be fine. Good Luck. Thank you for the update.
Yeah, since I found the tops, I decided to go ahead and put the rods in and the rocker arms on. Got it all torqued down.
Moving onto the valve covers and whatever else I can get done today... had to order a new oil cooler line as the one that was on it was rubbing the firewall and it had rubbed through or rather it was thinner than paper. Which the reason it was rubbing is because someone put the wrong line (bends were wrong) on there at some point, and it pushed it right up between the firewall and exhaust manifold.

Hope to get this all buttoned up and back running early next.
 

Commander5993

Active member
Steel Soldiers Supporter
well... found out today that the vacuum pump had been capped off and disconnected from the valve on the IP.
Which it also seems that the transmission hose going from the hard line to the IP was also disconnected.

Have no idea why someone disconnected it though, unless the vacuum module on the transmission or the valve on the IP are bad... the pump seems to work find as it has good suction even when just turning it by hand.

I just re-confirmed that this is a TH400 transmission, as it has a 13 bolt pan which is also the correct shape for a TH400. The vacuum module is also on the side of the transmission.

The thing is, the truck seemed to have shifted fine, didn't rev to high, didn't have hard shifts either. Guess that's why I never looked into the details on how to adjust it.
In any case, as soon as I get the intake a few other pieces re-installed, I'm going to run new vacuum hose and get it reconnected.

Ended up having to order a new thermostat, as the AC delco one I had ordered is not correct. So I ordered the Robert Shaw 370-180 as the "mr. gasket" version had many many complaints, even though some SS members said they have used them without issue. Also had to order a few other small odds and ends... which I will have to wait for and will push off the trucks completion a few more days... but no reason to get in a hurry now, its already been sitting for 3 months...
 

Commander5993

Active member
Steel Soldiers Supporter
I am really beyond words at this moment...

Tonight I thought I was finally nearly done with getting this engine back together so we could get our truck back... until I set the intake manifold on... and found that on the passenger head the intake bolt angle is apparently 60 degrees, and the drivers head the angle is apparently 90 degrees.

When I saw the angles listed in the ebay ads, I thought it was talking about the head bolt angle, so I checked this on both heads when they first came in... obviously that didn't do me any good...
Even before I bought these heads, i emailed the company, told them about this truck etc, and they told me these were the heads I needed.
If the heads were at the very least the same angle, then at least (maybe) I could have bought intake manifold to fit... but since they are both different that won't even work.

I can't believe that after all this work over the last month, let alone expense, just trying to get this thing reassembled, and getting so close to finished...... that I now have to tear it all back down and basically start over...
 

cucvrus

Well-known member
11,474
10,441
113
Location
Jonestown Pennsylvania
Yea WOW I don't know what to tell you. I never had that happen. Will the selling company get you the correct head. I always dislike buying parts sight unseen. But that should fall back on them. Is it a face to face deal or internet? You will be out the bolts and gaskets not to mention the time. Sad to hear. Good Luck getting back up and running again.
 
Top
AdBlock Detected

We get it, advertisements are annoying!

Sure, ad-blocking software does a great job at blocking ads, but it also blocks useful features of our website like our supporting vendors. Their ads help keep Steel Soldiers going. Please consider disabling your ad blockers for the site. Thanks!

I've Disabled AdBlock
No Thanks