-
Steel Soldiers now has a few new forums, read more about it at: New Munitions Forums!
CUCVRUS Repair Projects
- Thread starter cucvrus
- Start date

More options
Who Replied?cucvrus
Well-known member
- 11,478
- 10,507
- 113
- Location
- Jonestown Pennsylvania
I can not believe how hot a humid it is. Is it me or is the grass growing several inches a week. I mowed 3 times in the past week. It rained several days and I still don't have mud in the fields. Hot and humid. I am working on an M1009 with an adhesive tint on the rear glass. The owner sent another glass to me for replacement. It is a pretty decent clear / mild tint glass.
  I don't like to pick things apart but I noticed immediately that the sash was barely attached and not put on straight.
  . A quick firm tug on the sash and BAM it was detached from the glass.
  That would have been great if it happened when you were putting it up and down.

 I was not surprised to find shards of broken glass from the window that had previously occupied the sash.
 I amused to seeing work like this.
 I used a flat screw driver and I did manage to stab my hand with it. Joy. One thing to remember when working with adhesives. the surfaces must be clean, dry and rust free as much as possible. it looks to me like they used masking tape and red Permatex to attempt to adhere the glass into the sash. FAIL.
The owner sent another glass to me for replacement. It is a pretty decent clear / mild tint glass. I don't like to pick things apart but I noticed immediately that the sash was barely attached and not put on straight. . A quick firm tug on the sash and BAM it was detached from the glass. That would have been great if it happened when you were putting it up and down. I was not surprised to find shards of broken glass from the window that had previously occupied the sash. I amused to seeing work like this. I used a flat screw driver and I did manage to stab my hand with it. Joy. One thing to remember when working with adhesives. the surfaces must be clean, dry and rust free as much as possible. it looks to me like they used masking tape and red Permatex to attempt to adhere the glass into the sash. FAIL.cucvrus
Well-known member
- 11,478
- 10,507
- 113
- Location
- Jonestown Pennsylvania
 I kept digging the rubber tape and adhesive from the track until it was all out.
 You can see the adhesive had not adhered to the metal it had cured in the rust and dirt. No adhesion at all.
  Looking down over the length of the sash the channel was bent and uneven.
  The sash side guides were rusty and abrasive.

 I smoothed the sash guides with the 2" rolock polishing disc. it chewed it up quickly but left the surface smooth and un abrasive.
 I used a wire wheel on a drill and cleaned out the channel thoroughly. I wanted to clean the sash flange also so I put in a medium coarse 2" disc.
cucvrus
Well-known member
- 11,478
- 10,507
- 113
- Location
- Jonestown Pennsylvania
I used the body hammer and a piece of 1/4" plywood to get the channel opening more uniform and even. With the channel all clean  and I don't have any unexpired adhesive I went and opened the rear glass I have. It is a 1990 K5 Blazer Dot Matrix tinted glass.


 It is not a perfect rear window but it has the factory tint and is in great condition considering it is 30 years old. Next I will post pictures of over hauling the rear gate crank and guides without breaking the bank. If this nice clean roller guide is how you think they are supposed to look. That is part of the rear window problem.
I will do more work and post pictures at a later date. Take Care and Be Safe. Stay Cool.
and I don't have any unexpired adhesive I went and opened the rear glass I have. It is a 1990 K5 Blazer Dot Matrix tinted glass. It is not a perfect rear window but it has the factory tint and is in great condition considering it is 30 years old. Next I will post pictures of over hauling the rear gate crank and guides without breaking the bank. If this nice clean roller guide is how you think they are supposed to look. That is part of the rear window problem. I will do more work and post pictures at a later date. Take Care and Be Safe. Stay Cool.
cucvrus
Well-known member
- 11,478
- 10,507
- 113
- Location
- Jonestown Pennsylvania

cucvrus
Well-known member
- 11,478
- 10,507
- 113
- Location
- Jonestown Pennsylvania

4 years ago I had all my toys lined up for pictures. All gone from my toy box now but the memories will last forever.
- 8,245
- 20,816
- 113
- Location
- Charlotte NC
.
4 years ago I had all my toys lined up for pictures. All gone from my toy box now but the memories will last forever.
Looks like School Picture Day!

Were thay named?
Winkin, Blinkin, and Nod by chance?
Nice looking stable.
cucvrus
Well-known member
- 11,478
- 10,507
- 113
- Location
- Jonestown Pennsylvania
From left to right it was the Ugly, the Bad, the Good. All were top notch completely stock running gear and electrical systems. I drove them a combined 175k miles. As far as I know they are all still running. The ugly was a bit ugly body wise but 100% other wise. I abused the ugly very hard off road and deep water and mud. It just kept going. The center one I had 15 years as a fire wood vehicle. And the Mule I just drove everywhere as my fun truck. I had a lot of fun in all 3 M1009's. True names were Terminus M1009, Crown of Thorns M1009, and The Mule M1009. Thanks for asking. I don't really miss them. I just like the memories. I hate RUST and that is what turned me away from them.
cucvrus
Well-known member
- 11,478
- 10,507
- 113
- Location
- Jonestown Pennsylvania
I set the glass out on my door stand and prepared the channel with the sealer adhesive. 
 I placed the sash on the edge of the glass and aligned the ends. using bar clamps I locked then into position.
  I was able to tap and get the sash perfectly on the glass. I used finger clamps and squeezed them onto the ends so that I could get a good adhesion with sash to glass. With that set up and secured I called it a night. I want to work on the rear gate tomorrow night. I have an appointment at the transmission shop to get the transmission and rear differential over hauled. I have been waiting 2 months for an open spot. Of course it is raining here again. I can hear the grass growing. Take Care and Be Safe.
I placed the sash on the edge of the glass and aligned the ends. using bar clamps I locked then into position. I was able to tap and get the sash perfectly on the glass. I used finger clamps and squeezed them onto the ends so that I could get a good adhesion with sash to glass. With that set up and secured I called it a night. I want to work on the rear gate tomorrow night. I have an appointment at the transmission shop to get the transmission and rear differential over hauled. I have been waiting 2 months for an open spot. Of course it is raining here again. I can hear the grass growing. Take Care and Be Safe.Attachments
-
 92.7 KB Views: 17
cucvrus
Well-known member
- 11,478
- 10,507
- 113
- Location
- Jonestown Pennsylvania
I want to make a repair on this CUCV power steering bracket. It is in really bad shape but like most I have seen it has been run a long time in this condition.
 This is the lower adjustment slot. The adjustment nut press's the bracket onto the hex head of the stud. I use a flat washer behind this bracket at that location.
This side bracket has been stressed from taking up the pressure of the upper mount being broken. That upper mount has been broken a long time. The broken surfaces have been rubbed smooth and almost polished.
 I will report back later when I have the time to do these repairs. I think it is possible. These brackets don't exist new that they are available. They used to be a $15. item. I threw many away just because of the hex head press in the adjustment slot. I never knew. Take Care.
This is the lower adjustment slot. The adjustment nut press's the bracket onto the hex head of the stud. I use a flat washer behind this bracket at that location.This side bracket has been stressed from taking up the pressure of the upper mount being broken.
That upper mount has been broken a long time. The broken surfaces have been rubbed smooth and almost polished. I will report back later when I have the time to do these repairs. I think it is possible. These brackets don't exist new that they are available. They used to be a $15. item. I threw many away just because of the hex head press in the adjustment slot. I never knew. Take Care.cucvrus
Well-known member
- 11,478
- 10,507
- 113
- Location
- Jonestown Pennsylvania
cucvrus
Well-known member
- 11,478
- 10,507
- 113
- Location
- Jonestown Pennsylvania
The Power Steering bracket is repaired. I added a gusset to the upper pivot point and I hung it in final paint. It is currently drying in the sun. I will get pictures later today for the critique's to critique. I think it looks OEM good. I ask a fab shop they said it would not be cost effective to reproduce them. The first one would cost about $500. in design time. I have several that I can weld. I may just offer a repair exchange service. But then I get into warranty. Maybe not. Take Care.
cucvrus
Well-known member
- 11,478
- 10,507
- 113
- Location
- Jonestown Pennsylvania
It was a good day. I was up bright and early and had a few minutes to do some work while on break. Before. 
After. Before.
  After.
  Before.

After.
 I will send a few M10 Nylock nuts along to use in the upper pivot point. Also a grade 8 3/8" flat would help a lot on the slide adjustment stud. Keeps the nut from compressing into the hex head and chewing the bracket. The little gusset will not interfere as far as I can see. it adds a lot of strength to that hard radius that is always cracked out. Lets call that the CUCVRUS power steering gusset upgrade. Or NOT. I fixed many of these brackets. It is cleaned, fitted and mig welded. Cleaned and fitted is the most important part. Take care. I will throw a few M10 1.5 bolts and nuts along with some other stuff you may need. If not keep them for when you do. I have the 4WD filter also. I am 99.9% sure it will hold. The other .01% is if the other brackets on the lower side of the pump are tight and in the proper place. Many I see are missing the lower brackets. Wouldn't it be much easier with electric steering?
After.
Before. After. Before. After.
I will send a few M10 Nylock nuts along to use in the upper pivot point. Also a grade 8 3/8" flat would help a lot on the slide adjustment stud. Keeps the nut from compressing into the hex head and chewing the bracket. The little gusset will not interfere as far as I can see. it adds a lot of strength to that hard radius that is always cracked out. Lets call that the CUCVRUS power steering gusset upgrade. Or NOT. I fixed many of these brackets. It is cleaned, fitted and mig welded. Cleaned and fitted is the most important part. Take care. I will throw a few M10 1.5 bolts and nuts along with some other stuff you may need. If not keep them for when you do. I have the 4WD filter also. I am 99.9% sure it will hold. The other .01% is if the other brackets on the lower side of the pump are tight and in the proper place. Many I see are missing the lower brackets. Wouldn't it be much easier with electric steering?cucvrus
Well-known member
- 11,478
- 10,507
- 113
- Location
- Jonestown Pennsylvania
No that is not off the M1009. That is from a members here. He mailed it to me to repair. Remain calm all is well.
I was texting you and the battery went dead on my phone. I still have the flip phone. Hasn't failed me yet. I am not the least offended about the rear window. I have the clear one in the work area and am preparing a sash and glue to press it in place. All is well. I just move along. Not as fast as I used to but still moving. My Wife just told me it was 1 year ago today that I completed the Decade wrecked M1009 and made a sale in Germany. It seems like time just flies by. I will have your M1009 all checked out. Take care and Be Safe.
I was texting you and the battery went dead on my phone. I still have the flip phone. Hasn't failed me yet. I am not the least offended about the rear window. I have the clear one in the work area and am preparing a sash and glue to press it in place. All is well. I just move along. Not as fast as I used to but still moving. My Wife just told me it was 1 year ago today that I completed the Decade wrecked M1009 and made a sale in Germany. It seems like time just flies by. I will have your M1009 all checked out. Take care and Be Safe.
cucvrus
Well-known member
- 11,478
- 10,507
- 113
- Location
- Jonestown Pennsylvania
Surprise, Surprise, Surprise.
The M1009 was dropped off at the transmission shop along with the new center carrier for the rear differential.
I glued the sash on the clear glass today after work and painted the steel mushrooms for the cab mounts on my Little Red Riding Hood project M1009. Family vacation coming up so I am glad that the M1009 is at the transmission shop and I can relax and go to the mountains in peace for a few days. Take Care. I still have the rest of the week to work. Looks like lawn mowing time again. Rain and sun equals short times between lawn mowing. I seen a 5 gallon bucket of Round Up was on sale.
Well there goes the farm.
I glued the sash on the clear glass today after work and painted the steel mushrooms for the cab mounts on my Little Red Riding Hood project M1009. Family vacation coming up so I am glad that the M1009 is at the transmission shop and I can relax and go to the mountains in peace for a few days. Take Care. I still have the rest of the week to work. Looks like lawn mowing time again. Rain and sun equals short times between lawn mowing. I seen a 5 gallon bucket of Round Up was on sale.
cucvrus
Well-known member
- 11,478
- 10,507
- 113
- Location
- Jonestown Pennsylvania
I was down in the barn working on installing some Energy Suspension cab mounts. I also wanted to share my side window guide rebuilding process. I have done this modification to a few dozen M1009's. It beats the pants off of the replacement side guides that are available. I used my last set of Genuine GM ones 15 years ago. First thing is to clean out all the old seal. 
 Clean it all out and rotary wire brush the entire brackets. I use the vise because I value my flesh. Wear eye protection also because sight is valuable.
  The second one. There is a right and left.
 With the repair and upgrade I do it does not matter if the track is rusted thru.
  It does require that the attachment brackets are secure enough to reattach to the inside of the gate again. I wire brushed the entire track inside and out. i am out of the Black urethane adhesive. I used the whole tube to attach sash on the bottom of a Dot Matrix rear window and a clear rear window. I will acquire more adhesive and complete my rear track repair. It is inexpensive and holds up to more use and abuse then the cheap knock off replacement ones you can buy. The GM ones were great and held up. I will continue my repair tomorrow or the next day. When I get around to it. Take Care and Be Safe.
Clean it all out and rotary wire brush the entire brackets. I use the vise because I value my flesh. Wear eye protection also because sight is valuable. The second one. There is a right and left. With the repair and upgrade I do it does not matter if the track is rusted thru. It does require that the attachment brackets are secure enough to reattach to the inside of the gate again. I wire brushed the entire track inside and out. i am out of the Black urethane adhesive. I used the whole tube to attach sash on the bottom of a Dot Matrix rear window and a clear rear window. I will acquire more adhesive and complete my rear track repair. It is inexpensive and holds up to more use and abuse then the cheap knock off replacement ones you can buy. The GM ones were great and held up. I will continue my repair tomorrow or the next day. When I get around to it. Take Care and Be Safe. cucvrus
Well-known member
- 11,478
- 10,507
- 113
- Location
- Jonestown Pennsylvania
M1009 Axle Spline / Pinion Spline Counts? | SteelSoldiers
I messed up and posted my project on another thread while I was looking for information on 30 count axle splines. CUCV's have 28 in the M1009. Now I have a customer that has 30 spline rear axles. It was an update in 1989 and I had bought a brand new rear center carrier and found a use for it now. Check it out over there. Take Care.
I messed up and posted my project on another thread while I was looking for information on 30 count axle splines. CUCV's have 28 in the M1009. Now I have a customer that has 30 spline rear axles. It was an update in 1989 and I had bought a brand new rear center carrier and found a use for it now. Check it out over there. Take Care.
cucvrus
Well-known member
- 11,478
- 10,507
- 113
- Location
- Jonestown Pennsylvania
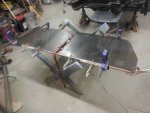
Tonight was a busy night. Busier then usual. I wanted to complete my M1009 gate glass tracks.  I put urethane adhesive in the channels. I press some TrimLok material into the tracks. It is 1/4".
 It fits in perfect. I clamped it a while and sent it to final paint.
 After an hour or so I set them back on my gate for pictures.
 The true test is "will they fit the gate glass?". BAM. Like new for a fraction of the cost.

Thank you for looking. I have used this repair on many M1009 gates and it works great for many years. It is very important to properly prep and use the correct adhesive. Won't stay in the track if everything is not clean and rusty. Thanks for Looking. Take Care.
I put urethane adhesive in the channels. I press some TrimLok material into the tracks. It is 1/4". It fits in perfect. I clamped it a while and sent it to final paint. After an hour or so I set them back on my gate for pictures. The true test is "will they fit the gate glass?". BAM. Like new for a fraction of the cost. Thank you for looking. I have used this repair on many M1009 gates and it works great for many years. It is very important to properly prep and use the correct adhesive. Won't stay in the track if everything is not clean and rusty. Thanks for Looking. Take Care.
- 114,414members
- 167,299threads
- 2,355,084posts
- 3,845online users