• Steel Soldiers now has a few new forums, read more about it at: New Munitions Forums!

  • Microsoft MSN, Live, Hotmail, Outlook email users may not be receiving emails. We are working to resolve this issue. Please add support@steelsoldiers.com to your trusted contacts.

First '52 XM211

hendersond

Well-known member
Steel Soldiers Supporter
1,171
29
48
Location
Galesville, WI
I'm no Carnac but I have a feeling we'll be seeing things much clearer in the future.
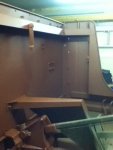
I'm getting mine back next week with no glass. I don't understand the issue. My plan is to get on the phone, order a piece of laminated glass to the size I need and glue it in myself. I have an aftermarket hard top that required a modification of the WS frame. I cut, ground and welded so I would have a single piece of glass. I also have an original frame that needs the 2 panels of glass and seals.
I will be looking for m35 seals as well.
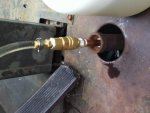
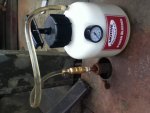
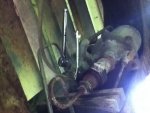
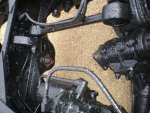
 

hendersond

Well-known member
Steel Soldiers Supporter
1,171
29
48
Location
Galesville, WI
The new Brake Bleeder worked awesome! I took and old master extension and cross threaded 1/4" npt nipple in it and connected an air fitting to it. That way I don't spray fluid like a fire extinguisher when it is disconnected. I did get up to 25 psi.
On the airpack, I cracked the line on the bottom first as this is the inlet. After clear fluid flowed, I opened the top line. That is the outlet. You can see the old fluid is cloudy. Not bad for 60+ year old stuff. Then I started with the rear wheel cylinders, top and then bottoms. I could not get fluid to come out any of the center axle bleeders. I then opened the fronts and fluid flowed.
I have 3 problems, No fluid flowing in the center axle, a super hard pedal and a non-assisting airpack. Hummm... I can stop with 2 feet.
I will start with the center axle and trace lines back. I suspect somebody did something. I have read about killing lines to reduce the G749 brake grab.
 

Attachments

Last edited:

USMC 00-08

Well-known member
1,165
137
63
Location
Skiatook, OK
I have read about killing lines to reduce the G749 brake grab.
Do you recall where you read that or what lines they would block?

I found that the front brakes on mine had been disconnected and plugged. It would be easy to reconnect them, but I wasn't sure if there was something wrong. Maybe it is for the reason you read about.
 

hendersond

Well-known member
Steel Soldiers Supporter
1,171
29
48
Location
Galesville, WI
I recall front or front (rear) axle??? I don't remember. I suspect this is the wrong thing to do. I will look into where I found it just for conversation. Anyway, I think I'm gonna lift the bed off. That thing scars the heck outa my head.
 

hendersond

Well-known member
Steel Soldiers Supporter
1,171
29
48
Location
Galesville, WI
I decided to drag the bed off and remove the fenders. I don't like laying on my back anymore. My head is too scarred up. Since the airpack is looking at me, I may just decide to rebuild it and replace some brake lines.
I may re-do some of what I did. I may rebuild a different hitch, rewire tail lights and trailer connectors, I'd really like a parallel 12 volt system.
Then there is that 6' section of frame I saved from a different truck... Hummm.......
 

Attachments

Last edited:

hendersond

Well-known member
Steel Soldiers Supporter
1,171
29
48
Location
Galesville, WI
Yea, I spent some time bleeding the vent lines ;). I actually took a hose off. It looks like one brake hose for each side. At least that is what I thought until I started tracing lines and noticed it smelled like grease inside. When I put air to it in frustration and it hissed under the hood, I realized what it was.
The box was a simple chain to the suburban and drive away (after removing the bolts).
It is amazing how good it drives with only 2 tires in the back.
 

m1010plowboy

Well-known member
Steel Soldiers Supporter
3,813
2,392
83
Location
Edmonton, Canada
The easy way to bleed brakes.
I found the problem. The last picture. The hose that goes to the axle lays in a channel. The rust and dirt swelled and pinched off the hose.
That is a lucky find! Taking the box off makes everything easier and is known to reduce head wounds.

With that 6' of extra frame and your spare parts I'd like to see a triple axle, 4 door deuce, with a deck on the back big enough to haul a deuce.....or a 20'x8' swimming pool which would double as a hockey rink in the winter. I know you have a bigger plans so what's next?

Here's the "box chained to a tree" removal method. The lumber got hung up on the rivets a little but everything slid out like the day after foreign food. It's entertaining if you can watch it in fast forward.

https://www.youtube.com/watch?v=j536s-9nAhw&feature=youtu.be
 

hndrsonj

Senior Chief/Moderator
Super Moderator
Steel Soldiers Supporter
7,584
361
83
Location
Cheyenne, WY
So you don't have two more jack stands? Kinda thought you swiped some of mine in the past....
 

USMC 00-08

Well-known member
1,165
137
63
Location
Skiatook, OK
The rust and dirt swelled and pinched off the hose.
From the picture it looks like that is the middle axle to frame line. If it has a weak spot from being pinched and blows out like mine did, the part number is UP 38297 at Napa and H38297 at O'Reilly's and Bumper to Bumper. I had to replace it last week.
 
Last edited:

hendersond

Well-known member
Steel Soldiers Supporter
1,171
29
48
Location
Galesville, WI
What was the cost of the new line?
I pulled the far rear driveshaft. I hope to get rid of the binding on hard surfaces and when turning. this should make it a better driver. (I hope this keeps me from cutting the rear axle off)
 

Attachments

hendersond

Well-known member
Steel Soldiers Supporter
1,171
29
48
Location
Galesville, WI
I have the deuce inside my heated garage for the winter. It is time to prime and paint the interior. Jim suggested the Rustoleum primer. Spray cans are my choice for this project as I will be doing small sections at a time. The back 40% is sanded and primed. Pulled the seats and dash out. The floor has some thick paint, but it does sand smooth.
 

Attachments

Last edited:

hendersond

Well-known member
Steel Soldiers Supporter
1,171
29
48
Location
Galesville, WI
Did some reading on the data plate restoration threads. Testing on some extra plates. Paint remover in the spray cans worked great. Most only needed 1 coat, but a few with thick white paint took 3 coats and steel wool between. The white corrosion on the backs even came off with the spray. The plates looked great ...when wet. They turned very cloudy when dry. I'm attempting a clear coat on 2 plates. We'll see how they turn out when cured. The two with clear really are crisp!
I did not know some of the m135 shift and winch plates are larger in size. The panel they mount to I may have given away. :-(
I'm missing the "Fording" plate.
 

Attachments

Last edited:

hendersond

Well-known member
Steel Soldiers Supporter
1,171
29
48
Location
Galesville, WI
Here is my data plate story.
I tried the suggested method found in another post of paint and sand off the higher letters. This could have produced a better result, however it did not work for me for several reasons.
1. The height of the raised letters is so small I kept scratching the background.
2. Most of my plates are not perfectly flat.
3. The biggest reason is my lack of patience.

I tested a few other methods and here is what I settled with:
Spray the plates with a chemical paint stripper in an spray can. Wait 2-5 minutes and clean with steel wool. Thick paint will require another coat. Repeat on the back and wash in the sink to remove any stripper residue. The paint stripper did a good job of removing the white corrosion. The plates have a very "crisp" look when wet. This is exactly what the finished product will look like. Air dry, cook, or whatever. They should have absolutely no odor when dry.
Shoot the backs with clear coat. Allow them to dry overnight. Clear the front and allow to dry. Apply a second coat to the front and allow to dry. I used Rustoleum clear. The stuff comes out very fast and runs easily. Be cautious and keep your pieces horizontal.

Krylon clear did not work! Krylon acted like it wanted to get away from something. Perhaps it was residue from the stripper or something else. I have had this happen before over other types of primers.

After the wash and dry the plates became very cloudy and blurry. Go ahead and just lick one to re-assure yourself of what they will look like after clear is sprayed. I did and I felt better. ;)

First 2 test plates are done and oven cured. Color did not fade out.

Next time I will use flat black paint on a rag to infill the hand set VIN numbers and year. They are difficult to read without that.

Here are the other sets I'm working on.
 

Attachments

Last edited:

USMC 00-08

Well-known member
1,165
137
63
Location
Skiatook, OK
How are you applying the black paint and getting it off of the raised portions without sanding? I am getting ready to do the plates on my truck too.
 

hendersond

Well-known member
Steel Soldiers Supporter
1,171
29
48
Location
Galesville, WI
No black paint. Just remove old overspray and corrosion, then clear. The black background would not come off with the stripper.
Pics 2 & 3 are the before. Pics 5 & 6 are the after. Pic 1 shows the stripper and clear.

The only thing not shown is steel wool and the sink I rinsed them in.

The most difficult part for me was touching them every few minutes to see if they were dry yet.

Test it on a small plate first. The clear comes off with stripper if you don't like it.
 
Last edited:
Top
AdBlock Detected

We get it, advertisements are annoying!

Sure, ad-blocking software does a great job at blocking ads, but it also blocks useful features of our website like our supporting vendors. Their ads help keep Steel Soldiers going. Please consider disabling your ad blockers for the site. Thanks!

I've Disabled AdBlock
No Thanks