• Steel Soldiers now has a few new forums, read more about it at: New Munitions Forums!

  • Microsoft MSN, Live, Hotmail, Outlook email users may not be receiving emails. We are working to resolve this issue. Please add support@steelsoldiers.com to your trusted contacts.

FLU419 SEE HMMH HME Owners group

SeeNebraska

Member
86
24
8
Location
Nebraska
thumping under driver side floor board

i just recently developed a thumping sound sometimes under my feet. the weather is horrible so i haven't had the time or desire to get underneath to look for what could be the problem.

any ideas what to look for?

FYI, the thumping seems faster than the speed the wheels are turning at. is there a motor mount in that area?
 

The FLU farm

Well-known member
Steel Soldiers Supporter
3,353
1,353
113
Location
The actual midwest, NM.
i had that happen a few times this winter. taking the cap off the fuel filter i could blow off the gunk/ice with carb cleaner and it would be back to full power for the rest of the job.
I use anti gel. Because I'm lazy. It's much easier.

Thumping? Had something similar to that when a snow chain came off the outside and ended up draped over all the little lines, hoses, and wires on the inside.
Oddly enough, nothing broke.
 
Last edited:

SeeNebraska

Member
86
24
8
Location
Nebraska
I use anti gel. Because I'm lazy. It's much easier.

Thumping? Had something similar to that when a some chain came off the outside and ended up draped over all the little lines, hoses, and wires on the inside.
Oddly enough, nothing broke.
i hope its that simple! waiting out the blizzard before going out to check.
 

mberetta

Member
39
1
8
Location
Utah
i just recently developed a thumping sound sometimes under my feet. the weather is horrible so i haven't had the time or desire to get underneath to look for what could be the problem.

any ideas what to look for?

FYI, the thumping seems faster than the speed the wheels are turning at. is there a motor mount in that area?
Steady thumping, intermittent thumping, thumping that changes with speed or engine rpm?
Smooth road surface or rough terrain?

We need to narrow the variables.

Sent from my Moto G (5) Plus using Tapatalk
 

SeeNebraska

Member
86
24
8
Location
Nebraska
understood, i haven't isolated the variables yet. I'll pay attention next time and try to figure out the pattern.

Steady thumping, intermittent thumping, thumping that changes with speed or engine rpm?
Smooth road surface or rough terrain?

We need to narrow the variables.

Sent from my Moto G (5) Plus using Tapatalk
 

Speedwoble

Well-known member
606
302
63
Location
New Holland, PA
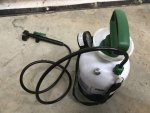
No advice, so I asked Mr. Google. My best guess is that I have air in the break lines, so I will continue bleeding them. The way I had been bleeding them was with a set up similar to what the TM's show with two caps that are attached to hoses. I modified that set up with a reservoir made from a garden pump sprayer. I suspect that this set up may be allowing air into the system. I will try to re-engineer this system. Speedwoble talks about a similar set up that connects through the bleeder valve on the master cilynder in post 2641 / pg 265. Unfortunately the link which describes it is no longer valid. I will look around for other design ideas, and post some pictures of what I come up with. If anyone has suggestions please pass them on.
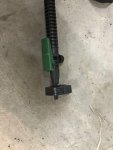
Here is a picture of my bleeder setup. Note that the tube sticks down below the cap a little bit. I set the pressure tank on the ground and once I am done bleeding, I let the pressure out of it. The residual fluid runs down into the tank via syphon so I don’t have to suck out extra fluid. I recommend a longer tube than I used.

I have gotten gallons of brake fluid from usual surplus dealers for as little as $60. But if you can’t afford the correct brake fluid, you can’t afford a SEE as far as I am concerned. The silicone fluid is non hydroscopic, so I don’t have concerns storing it in my pressure tank.
 

Attachments

rtrask

Well-known member
342
251
63
Location
San Luis Valley, Colorado
I'm afraid this is on the horizon for me. I'm not very excited about it honestly. What about rinsing with a cheaper brake fluid?

Thanks for the pump info and the index. Very useful!
I don't think that you need to rinse it. The thing I would do differently next time is to just use air to blow out all of the old, before putting in the new. I think I wasted a lot of the good stuff trying to make sure I had gotten the old fluid completely out. The old fluid was really bad and IMO you should get it out so it does not contaminate what you are putting in. Also buy a full gallon (< 100$ at NAPA) rather than what I did ( > 125$ at NAPA) with multiple trips for the more expensive per fluid oz in smaller quantities.

Use your own best judgement about blowing the old stuff out with air to start. I would be interested to hear if other people think this is a bad idea due to the introduction of so much air into the lines. I think it would be fine, but have zero experience. It might mean more waste getting the air out than the waste I had in making sure I had the old crap out.

Speedwoble's design is very similar to mine except that I used pressure from my air compressor dialed back to < 25 psi. The main advantage of his design is that there is one connection from the tank into the master cylinder. What I put together had 4 additional connections plus leakage at the lids to the reservoirs. so easily 6 more points of failure / places where it would leak or get air into the fluid. I think Flu Farm's suggestion of using gravity could also work well at a much lower cost but at the expense of taking a long time to do.
 

mberetta

Member
39
1
8
Location
Utah
I don't think that you need to rinse it. The thing I would do differently next time is to just use air to blow out all of the old, before putting in the new. I think I wasted a lot of the good stuff trying to make sure I had gotten the old fluid completely out. The old fluid was really bad and IMO you should get it out so it does not contaminate what you are putting in. Also buy a full gallon (< 100$ at NAPA) rather than what I did ( > 125$ at NAPA) with multiple trips for the more expensive per fluid oz in smaller quantities.

Use your own best judgement about blowing the old stuff out with air to start. I would be interested to hear if other people think this is a bad idea due to the introduction of so much air into the lines. I think it would be fine, but have zero experience. It might mean more waste getting the air out than the waste I had in making sure I had the old crap out.

Speedwoble's design is very similar to mine except that I used pressure from my air compressor dialed back to < 25 psi. The main advantage of his design is that there is one connection from the tank into the master cylinder. What I put together had 4 additional connections plus leakage at the lids to the reservoirs. so easily 6 more points of failure / places where it would leak or get air into the fluid. I think Flu Farm's suggestion of using gravity could also work well at a much lower cost but at the expense of taking a long time to do.
I'm not afraid to get air in there. In my experience the only place you really don't want air to get into is an anti-lock brake controller. On some makes of vehicles this can be a deadly situation if it it's not ALL bled out properly.

For those who don't know:

Some Anti-lock brake controllers have your brakes brake in pairs. So your front wheels should brake as a pair and your rear wheels should brake as a pair.

If air gets into your anti-lock brake controller it can cause the passenger side to brake as a pair and the driver side to brake as a pair.

My mom's minivan had the anti-lock brake light on for years and Ford kept telling her it was an electrical issue and not too worry about it. I was the lucky one to borrow her car for a road trip.

I had to slam on the brakes on the interstate to avoid an accident which whipped the car 90° to the direction I was traveling sliding to a stop from about 60mph. If the road had been dry I'm pretty sure it would have rolled.

Long story, but pay attention to those anti-lock brake lights. A year from now somebody's going to comment that there are no anti-lock brakes on the FLU419.

Sent from my Moto G (5) Plus using Tapatalk
 
Last edited:

Pinsandpitons

Active member
164
57
28
Location
Central Washington
I have felt that thunk also. For me it was almost certainly suspension related, and diminished and disappeared after a few miles on the road. I don’t know for sure, but I think it’s a bad shock absorber. Thunking when it’s cold and the oil is segregated, then loosening up as It warms. Best I could figure.
 

The FLU farm

Well-known member
Steel Soldiers Supporter
3,353
1,353
113
Location
The actual midwest, NM.
I'm not afraid to get air in there. In my experience the only place you really don't want air to get into is an anti-lock brake controller. On some makes of vehicles this can be a deadly situation if it it's not ALL bled out properly.
On my FLUs I may or may not notice if the brakes work. I very rarely use the brakes on them.

I have a beater sports car that generally gets to go to the post office, some three miles away. It has a bad habit of running the master cylinder dry, and I usually don't notice that until having to come to a complete stop at the post office.

I used to have a late model go-fast car, obviously with anti lock brakes. It would refuse to slow down on hard packed snow thanks to the anti lock brakes.

Moral of the story: Brakes are overrated.
 

rtrask

Well-known member
342
251
63
Location
San Luis Valley, Colorado
Here is a picture of my bleeder setup. Note that the tube sticks down below the cap a little bit. I set the pressure tank on the ground and once I am done bleeding, I let the pressure out of it. The residual fluid runs down into the tank via syphon so I don’t have to suck out extra fluid. I recommend a longer tube than I used.
I have gotten gallons of brake fluid from usual surplus dealers for as little as $60. But if you can’t afford the correct brake fluid, you can’t afford a SEE as far as I am concerned. The silicone fluid is non hydroscopic, so I don’t have concerns storing it in my pressure tank.
Thanks for the post on what your pressure bleeder looks like. I have looked at the hose end multiple times, and I can't quite figure out how it attaches to the bleed screw port on the master cylinder. Does it just slip onto the bleed screw? That would mean pretty low pressure. It looks like there is a cap too, but the unless my sense of the scale is way off, it looks too small to fit the brake fluid reservoir. I like that you left a valve on the end of the hose. I think that would help to prevent getting air into the system. I had no valve and when ever I disconnected the air hose it all drained back into the tank and I got air in the lines. Your system really looks simple (Simple = Better) and it looks like all you had to do was add a pressure gauge, and do a little work on the end that attaches to the brake system.

As an alternative, I have been thinking that rather than connect to the bleeder screw, I might just disconnect the supply lines from the reservoirs, plug one, and connect my tank with the brake fluid on the other one. That way you could still bleed the ports on the master cylinder first and prevent accidental introduction of air into the lines. Of course I will probably never need to completely replace my fluid again (at least I hope not) but may be the next guy can learn from my mistakes.
 

alpine44

Member
403
17
18
Location
Asheville, NC - Elkton, MD
Thanks for the post on what your pressure bleeder looks like. I have looked at the hose end multiple times, and I can't quite figure out how it attaches to the bleed screw port on the master cylinder. Does it just slip onto the bleed screw? That would mean pretty low pressure. It looks like there is a cap too, but the unless my sense of the scale is way off, it looks too small to fit the brake fluid reservoir. I like that you left a valve on the end of the hose. I think that would help to prevent getting air into the system. I had no valve and when ever I disconnected the air hose it all drained back into the tank and I got air in the lines. Your system really looks simple (Simple = Better) and it looks like all you had to do was add a pressure gauge, and do a little work on the end that attaches to the brake system.

As an alternative, I have been thinking that rather than connect to the bleeder screw, I might just disconnect the supply lines from the reservoirs, plug one, and connect my tank with the brake fluid on the other one. That way you could still bleed the ports on the master cylinder first and prevent accidental introduction of air into the lines. Of course I will probably never need to completely replace my fluid again (at least I hope not) but may be the next guy can learn from my mistakes.
You need to buy a brake reservoir cap or two, drill a hole into the cap(s) and plumb the garden sprayer hose into it.
Here is my system (available as a loaner tool if you pay for shipping):

BrakeBleeder (1).jpg
 
Last edited:

911joeblow

Active member
508
69
28
Location
Utah
I have upwards of 15 different brake reservoir caps all with standard 3/8 air line fittings attached to them for all sorts of cars and trucks. I use basically a pressurized weed killer setup with it's own hand pump and gauge. The reservoir in it can take any brake fluid you want so I just clean it out, put in the fluid I need and pump it up, open a shutoff valve and away we go. I just go to each wheel and open the bleeder.
 

rtrask

Well-known member
342
251
63
Location
San Luis Valley, Colorado
You need to buy a brake reservoir cap or two, drill a hole into the cap(s) and plumb the garden sprayer hose into it.
Here is my system (available as a loaner tool if you pay for shipping):

View attachment 758215
I have upwards of 15 different brake reservoir caps all with standard 3/8 air line fittings attached to them for all sorts of cars and trucks. I use basically a pressurized weed killer setup with it's own hand pump and gauge. The reservoir in it can take any brake fluid you want so I just clean it out, put in the fluid I need and pump it up, open a shutoff valve and away we go. I just go to each wheel and open the bleeder.
Thank you both. The brake pressure bleed system I made was similar to Alpine's. I bought 2 of the Benz caps and had a tee between them. After my experience with it I was not happy with my design which worked OK, but I was battling leaks both at the connections and at the caps. Speedwoble said on his post 2641 https://www.steelsoldiers.com/showt...Owners-group&p=2008572&viewfull=1#post2008572

How to bleed the brakes: I ended up making a pressure bleeder that I hooked to the bleeder screws on the master cylinder. http://www.ibmwr.org/ktech/pressure-.../bleeder.shtml Much faster than pumping the pedal, or a vacuum bleeder.

I was trying to figure out how he hooked directly to the bleeder screws, because the link is no longer good. Since I have all new fluid, it's not really critical to my life right now. I guess I was just curious for next time. Again, thanks for your help.
 
Last edited:

Speedwoble

Well-known member
606
302
63
Location
New Holland, PA
My sprayer came with a hard composite wand which fit into the compression fitting on the end of the on/off valve. So I cut the wand into pieces and have multiple adapters. One was in the photo I just posted. On another, I heated a pvc hose and stretched it over the composite wand piece. Then I slipped the other end of the pvc on the nipple on the MC. Hose clamp if needed.
 

mberetta

Member
39
1
8
Location
Utah
So I received my new primer pump in the mail. I put it in and same as before. I would have figured I would be moving more fuel up and out of the bleeder screws. I will review everything I can find on here with regards to bleeding the air out of the fuel system, but I've never had this much trouble getting the air bled out of a diesel before.
 

alpine44

Member
403
17
18
Location
Asheville, NC - Elkton, MD
So I received my new primer pump in the mail. I put it in and same as before. I would have figured I would be moving more fuel up and out of the bleeder screws. I will review everything I can find on here with regards to bleeding the air out of the fuel system, but I've never had this much trouble getting the air bled out of a diesel before.
This sounds like either a severe restriction in the fuel lines to or from the pump or a pinhole in the suction line that lets air in. The Flu419 fuel system is easy to bleed and from my observation self-bleeding if you get the engine running with the content of the double filter housing.
With your troubles, I would first check the pickup in the tank (needs to be dropped) and if the symptoms persist buy the nylon fuel line from Belmetric and redo the entire fuel piping between tank and injection pump.
If you get to that point, ask for tricks to work with the plastic lines and their press-on fittings.
 
Last edited:

The FLU farm

Well-known member
Steel Soldiers Supporter
3,353
1,353
113
Location
The actual midwest, NM.
This sounds like either a severe restriction in the fuel lines to or from the pump or a pinhole in the suction line that lets air in.
With your troubles, I would first check the pickup in the tank (needs to be dropped) and if the symptoms persist buy the nylon fuel line from Belmetric and redo the entire fuel piping between tank and injection pump.
While it's not a fix, it's quick and easy to blow compressed air into the tank through the line at the strainer. If the pickup is clogged, that'll unclog it...for a while anyway.

Or you can do what I did and replace all the lines and washers (which surely didn't hurt) only to find that it was the gasket on the strainer that leaked.
 

911joeblow

Active member
508
69
28
Location
Utah
So I received my new primer pump in the mail. I put it in and same as before. I would have figured I would be moving more fuel up and out of the bleeder screws. I will review everything I can find on here with regards to bleeding the air out of the fuel system, but I've never had this much trouble getting the air bled out of a diesel before.
Way way way back when we bought our FLU we got a really good deal on it. It had 17 miles on the odometer (real, not a reset) and still had knobs on the tires. Despite this it was being sold as a non-runner and it was.

Well it turned out that when the Service Builtin came out requiring fuel lines to be replaced mine had the fuel feed and fuel return lines reversed during the work. I figured it our by accident as I drained the tank and refilled to the top with fresh diesel to try and get her running. After no time at all she primed and bleed out easily and fired right up. The problem was she would die after an hour or so of running. That was when I figured out the reversed lines as the return dumps back toward the top of the tank so as a feed it will fuel starve rather quickly after a little run time. Once switched back, I have never looked at the fuel system since. Just a thought to check out. Good luck!

P.S. The feed pipe can also rust inside the tank and suck air. Again filling the tank to the top will stop the air being sucked in and might help to diagnose the issue too.
 

rtrask

Well-known member
342
251
63
Location
San Luis Valley, Colorado
I would guess this is for our resident Case expert Speedwoble, but can anyone confirm if the rod for the bucket cylinder (part no G103351 from the TM... P2) is the same as part no G33162. I did a web search on the TM's part number and only out of stock on hits, but there is a lot of hits on the G33162 and it is supposed to fit Case 580B, 580C, 580D, 580E, and others.
 
Last edited:
Top
AdBlock Detected

We get it, advertisements are annoying!

Sure, ad-blocking software does a great job at blocking ads, but it also blocks useful features of our website like our supporting vendors. Their ads help keep Steel Soldiers going. Please consider disabling your ad blockers for the site. Thanks!

I've Disabled AdBlock
No Thanks