I don't think that you need to rinse it. The thing I would do differently next time is to just use air to blow out all of the old, before putting in the new. I think I wasted a lot of the good stuff trying to make sure I had gotten the old fluid completely out. The old fluid was really bad and IMO you should get it out so it does not contaminate what you are putting in. Also buy a full gallon (< 100$ at NAPA) rather than what I did ( > 125$ at NAPA) with multiple trips for the more expensive per fluid oz in smaller quantities.
Use your own best judgement about blowing the old stuff out with air to start. I would be interested to hear if other people think this is a bad idea due to the introduction of so much air into the lines. I think it would be fine, but have zero experience. It might mean more waste getting the air out than the waste I had in making sure I had the old crap out.
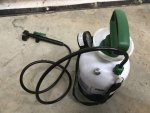
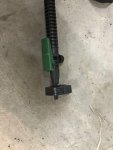
Speedwoble's design is very similar to mine except that I used pressure from my air compressor dialed back to < 25 psi. The main advantage of his design is that there is one connection from the tank into the master cylinder. What I put together had 4 additional connections plus leakage at the lids to the reservoirs. so easily 6 more points of failure / places where it would leak or get air into the fluid. I think Flu Farm's suggestion of using gravity could also work well at a much lower cost but at the expense of taking a long time to do.
I'm not afraid to get air in there. In my experience the only place you really don't want air to get into is an anti-lock brake controller. On some makes of vehicles this can be a deadly situation if it it's not ALL bled out properly.
For those who don't know:
Some Anti-lock brake controllers have your brakes brake in pairs. So your front wheels should brake as a pair and your rear wheels should brake as a pair.
If air gets into your anti-lock brake controller it can cause the passenger side to brake as a pair and the driver side to brake as a pair.
My mom's minivan had the anti-lock brake light on for years and Ford kept telling her it was an electrical issue and not too worry about it. I was the lucky one to borrow her car for a road trip.
I had to slam on the brakes on the interstate to avoid an accident which whipped the car 90° to the direction I was traveling sliding to a stop from about 60mph. If the road had been dry I'm pretty sure it would have rolled.
Long story, but pay attention to those anti-lock brake lights. A year from now somebody's going to comment that there are no anti-lock brakes on the FLU419.
Sent from my Moto G (5) Plus using Tapatalk


.jpg")