• Steel Soldiers now has a few new forums, read more about it at: New Munitions Forums!

  • Microsoft MSN, Live, Hotmail, Outlook email users may not be receiving emails. We are working to resolve this issue. Please add support@steelsoldiers.com to your trusted contacts.

My BIG M925A2 Project Truck Is Home

WillWagner

The Person You Were Warned About As A Child
Super Moderator
Steel Soldiers Supporter
8,408
2,456
113
Location
Monrovia, Ca.
Hey Chris, I shoulda told ya that the seal goes in the front cover while it is on the bench. It is centered on the crank when you install the cover. Keep an eye on the front, you have a better than 50% chance it is gonna leak :oops:
What Vid?
 

steelsoldiers

Administrator
Staff member
Administrator
5,251
3,962
113
Location
Charleston, WV
Yeah, that's how I did the seal on my 5.9L in my Dodge, but the TM specifically said to mount the cover loosely, use the seal driver on the crank to center the cover, torque the bolts, then, install the seal using the plastic crank cover and the seal driver. So, that's what I did. We'll see. The vid is up now.
 

jwaller

Active member
3,724
19
38
Location
Columbia, SC
take a pic of the starter next time your around please. I still don't think mine is on right.

edit. I found it. thanks.
 
Last edited:

steelsoldiers

Administrator
Staff member
Administrator
5,251
3,962
113
Location
Charleston, WV
EZFEED, I have the front clip for it and it will probably go on soon since most of the engine work is done.

I had a 10 hour work session yesterday in the rain with Chad. Thankfully, we had the foresight to bring a big blue tarp, which we stretched across the top of the truck to give us shelter. We still got soaked, but not as quickly ;)

Chad was a huge help with the alternator wiring. It had been chopped off when the alt. was cannibalized. He had to scrounge some longer pieces of wiring and then soldered and heat shrink-ed everything back together. The stuff did not want to take solder since it was salt corroded, but he managed to cut the wire back far enough to finally get it to stick. Dang seawater!

We reconnected wire 566 to the alt. That is the circuit that tells the control box that the truck has started and kicks the starter out. It was a huge PITA to start the truck yesterday because the PCB kept kicking the starter out on me. That explains the 939 field mod where wire 566 is disconnected. I will be performing that mod.

The next task was getting the intake plumbing up to snuff. I had to replace one of the boots, several hose clamps, and the giant u-bolt that holds the intake to the engine.

After that came the cooling system. We had to disassemble the thermostat housing, clean out all of the mud-dobber nests, replace the crusty thermostat, and put it all back together with new gaskets. Then, we hoisted the very heavy radiator into place after giving the rusty bolts that held the bottom bracket on a good cussin! We got the bolts started on the bottom and the upper and lower hoses shoved in place.

Chad had to head out to do some work at home so we got him packed up and headed out. Thanks working in the rain with me, brother!

After Chad left, I got the upper radiator bracket installed and bolted the fan to the fan clutch. I then added almost 10 gallons of distilled water to the system, fixing leaks as I went. I will probably have to do several drain and refill sessions with this thing since it is so nasty inside. I should install a coolant filter kit too. I also installed the power-steering cooler and bolted it to the radiator.

After the system was topped off with water, I went and got the trusty jumper deuce for some run time. She fired up after a couple of minutes of fighting the protective control box. It kept kicking the starter out on me. Arrgghh!

I let it sit there and run for 5 minutes or so to get everything circulating. It revs up easy and sound great. There is plenty of oil pressure too.

Here's a few phone-pics to keep you guys interested! Wow, it's starting to look like a truck now! Chad will post some more later and I will post a vid tonight.
 

Attachments

EZFEED

New member
880
0
0
Location
Lafayette, LA
All I can say is God bless you Chris for giving the old girl a second chance! That looks like a heck of a project that most would have shyed away from, you've definitley worked a miracle there! :D
 

Oldvw2

Member
Steel Soldiers Supporter
169
2
18
Location
Wake Forest, NC USA
Looking Good! Sorry that I couldn't stay until it was running yesterday. I started to splice in a Packard connector on that #566 wire on the alt but didn't when it looked like the ring terminal was easy to get to.....Oops!
I'll upload those other pictures tonight.
Chad
 

steelsoldiers

Administrator
Staff member
Administrator
5,251
3,962
113
Location
Charleston, WV
Chad, no problem on the connector. The field mod says to disconnect it, wrap the terminal with tape, fold it back against the harness and wrap it with more tape. Easy fix.

I wish you could have seen it running too. There was a nice cloud of smoke and cloud of bees! I had to wage war on the bees with a can of brake-clean!


Bjorn, I have considered making a solid state relay box to replace the PCB. I would like to engineer one using the factory connector. I will work on that once the truck is on the road and I have a few less irons in the fire. It might be tough though, considering how many systems run through the box.
 

cranetruck

Moderator
Super Moderator
Steel Soldiers Supporter
10,350
75
48
Location
Meadows of Dan, Virginia
........
Bjorn, I have considered making a solid state relay box to replace the PCB. I would like to engineer one using the factory connector. I will work on that once the truck is on the road and I have a few less irons in the fire. It might be tough though, considering how many systems run through the box.
Well, I would consider eliminating "unnecessary" functions, such as the reverse polarity protection on the battery hook-up and even the oil pressure sensitive start switch. Certainly no solid state here with associated problems during start-up, loose battery connections and shut-down.
 

steelsoldiers

Administrator
Staff member
Administrator
5,251
3,962
113
Location
Charleston, WV
Well, I would consider eliminating "unnecessary" functions, such as the reverse polarity protection on the battery hook-up and even the oil pressure sensitive start switch. Certainly no solid state here with associated problems during start-up, loose battery connections and shut-down.
Good point Bjorn. We will have to put our heads together on this deal in a few months when I have a running truck to work with. We could make a lot of people happy if came up with an effective plan to eliminate the PCB.

Here's a video shot with my BB yesterday: YouTube - 925A2 running Sorry for the poor quality, but SS doesn't allow 3GPP video uploads and youtube converted the file. I need to get that format added here.

Here's a couple of pics from way back in 2007. I was looking through some old pics leftover from the GL Sale where I got my 923A2. Lo and behold, I had taken a pic of the steering knuckle of my current 925A2, which wasn't for sale then, to use as a reference for putting the axle back together on the 923A2. I also noticed the 925A2 sitting behind one of the other trucks I bid on. Crazy! That 925A2 has been sitting around a long time. Plus, that 2007 auction was in the Little Creek Amphib Base and I bought the 925A2 out of the Portsmouth Navy Base. That explains why there was so much filth, rocks, corrosion, etc... on my new project!!
 

Attachments

Oldvw2

Member
Steel Soldiers Supporter
169
2
18
Location
Wake Forest, NC USA
As promised here are a few more pictures of the Labor Day work session.
Fiberglass troop seat sides make some great lightweight tarp supports

Work Area.jpg
As Chris was saying, the alternator harness had been hacked off at some point - looked like the vehicle harness had been given a dip in salt water for good measure too aua
Alternator Before.jpg
After finding the needed wires on a scrap engine I was able to solder them back into the vehicle harness.
Alternator After.jpg
Meanwhile, Chris was installing the fan clutch actuator in the upper radiator hose and prepping the radiator for installation
Fan Actuator.jpg
Since someone brought the air compressor but left the impact gun in the garage (#@!!) we swapped out the radiator mount bolts the hard way and got the radiator set
Radiator and fan clutch actuator 9.09.jpg
Here's proud Steelsoldiers and his truck after a hard morning of wrenching
Steelsoldiers and truck.jpg
 

steelsoldiers

Administrator
Staff member
Administrator
5,251
3,962
113
Location
Charleston, WV
Great pics, Chad. I like how you can see the blowing rain in the background! It was a good day of wrenching otherwise. The alternator wiring looks very professional considering the amount of salt corrosion. Good thing we had a torch. It never would have held with just an iron.
 

steelsoldiers

Administrator
Staff member
Administrator
5,251
3,962
113
Location
Charleston, WV
It's time for another M925A2 work-day recap! I went down to Winslow's on Saturday morning. I had the Excursion chock full of tools and parts for the day's work. I was planning on doing some wiring, air line, and body work.

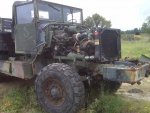
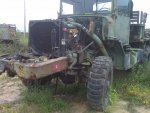
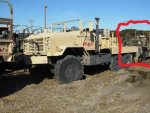
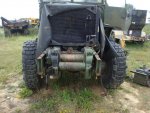
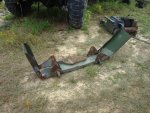
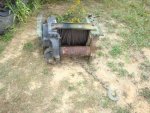
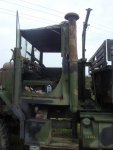
The first thing I notice when I pulled up was signs of progress! Pete, John's son-in-law, has been working on the truck for me to help speed the project along a little. The best I can do is every other weekend and sometimes not even that often. So, Pete had removed the twisted front bumper, removed the damaged winch, bolted in the good winch, and installed the air intake stack with accessory lines. Good work, Pete!

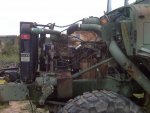
The first project I tackled was hooking up the air lines to the fan clutch actuator. I had installed the actuator last time, but couldn't get the lines hooked to it because I didn't get the right fittings :oops:

After that, I soldered a few wires back together behind the cluster and repaired/replaced some air lines in the dash that went to the air pressure gauges and spring brake override switch. Then, I was able to reinstall the cluster with some shiny new screws.

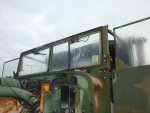
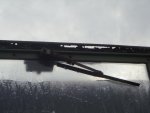
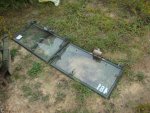
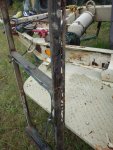
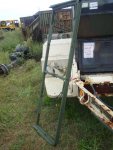
Once that was done, I removed the soft top in preparation for swapping out the windshield frame. The old one was from a parts truck at John's and the soft top mounting rail looked like swiss cheese. I found a good, used frame at Clark Truck. They had cleaned it, chased the threads, and painted it for me already so it was ready to go in. I had to chisel off the old inner windshield screws because they were so badly rusted. Once the inner frames were free, I was able to install the outer frame and then bolt in the inner frames. Much better!

I was going to start on the headlight switch harness, but ran short on time. That will be priority one next time.

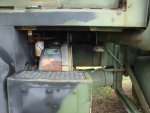
To finish the day, I installed a newly rebuilt protective control box from Bjorn, aka Cranetruck. It eliminated all of the circuit boards and other fragile stuff. It is now just 2 beefy relays and a zener diode. It works like a champ. Since the starter disable circuit was eliminated, I didn't have any of the starting problems like I had last time. The starter kept cranking until I let off of the switch. Good job, Bjorn.

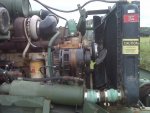
I started the truck several times to check a few things. It revs up well with minimal smoke. It should clean up after it has been run a bit. From my 2007 auction photos, I can tell this truck has been sitting dead for more than a few years, so it's amazing it runs at all. It had 60 psi of oil pressure at cold start up.

Over the next couple of weeks, Pete is going to replace a few things on the power steering system for me and swap out the crushed oil pan for a good one off of a parts truck. It's almost ready for a test drive. If it just had some brakes!!

More reports later!
 

Attachments

Top