• Steel Soldiers now has a few new forums, read more about it at: New Munitions Forums!

  • Microsoft MSN, Live, Hotmail, Outlook email users may not be receiving emails. We are working to resolve this issue. Please add support@steelsoldiers.com to your trusted contacts.

Successful Deuce Recovery

silverstate55

Unemployable
Steel Soldiers Supporter
2,068
855
113
Location
UT
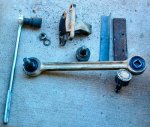
I removed the entire frame for the soft top and wire-wheeled everything down to bare metal; it was all pretty heavily rusted to begin with. I sprayed everything with Rust Reformer, and then painted with Rustoleum Sand spray paint. I also wire-wheeled the windshield fold-down frame and surrounding areas to get rid of rust, and treated these to the Rust Reformer & Sand paint treatment. While this paint was drying, I decided to replace the air filter...the metal housing was pretty rusty, so I got it down to bare metal and RR/Sand treated it too. While I was at it, I painted the air intake cap I purchased from an online vendor, and installed everything once the paint was dry.

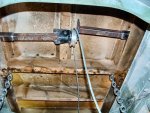
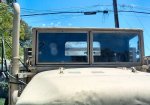
Once the paint was dry around the top of the windshield frame, I re-installed the soft top. It's in pretty bad shape, so I'm trying to literally patch it enough to last up to a year before I get my hardtop. The blue clamps are holding the soft top in place against the plastic clips along the top of the windshield frame while the adhesive cures, since the threads have all dry-rotted off and there was no way I was going to try to rethread the vinyl top to the broken plastic mounting clips. Once the soft top was re-installed, I applied liberal amounts of silicone adhesive to the top, to patch/cover up all the rips and tears. I used a tent repair kit from Wally World to repair the worst of the rips/tears, but I ended up using an entire tube of silicone to do the job right (or at least until the first road trip, anyway :razz:).

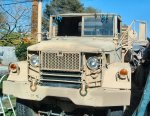
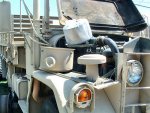
I straightened out the bent passenger-side turn signal housing, covered up the GL spray-painted markings on the front, fixed numerous small repair items, and installed a mesh stone guard in front of the radiator that I purchased from fellow member JCKnife (I removed all the paint & rust, and repainted it to match the truck).

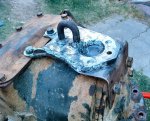
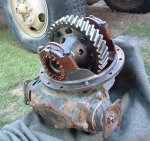
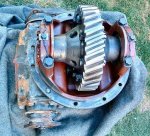
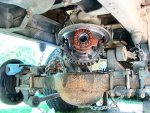
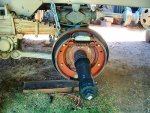
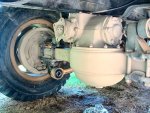
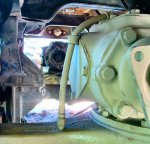
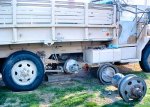
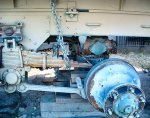
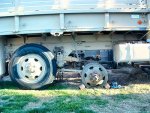
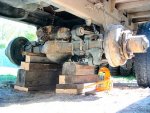
Tomorrow the axle swap begins!
 

Attachments

Last edited:

silverstate55

Unemployable
Steel Soldiers Supporter
2,068
855
113
Location
UT
Thanks again Joe! Now I just need to fab up a lower guard to fit beneath yours, while I search for a winch to install....
 

JCKnife

Well-known member
1,367
46
48
Location
Kentucky
Thanks again Joe! Now I just need to fab up a lower guard to fit beneath yours, while I search for a winch to install....
You can have my lower guard off my WO/W truck when I get the winch installed on it.

Also I am going to have a totally re-built winch and PTO for sale in a month or two.

(Edit: just realized you're not going to need the lower guard once you have a winch! So you won't need both...)
 

silverstate55

Unemployable
Steel Soldiers Supporter
2,068
855
113
Location
UT
Joe, I'm interested in the lower stone guard until I get a winch installed...I wonder what it would cost to ship your winch out my way...

Got an early start today, as I wanted to make some good progress before I had to knock off early for a friend's birthday dinner. I disconnected the brake line & tied it back out of the way, then loosened the 12 1-1/8" nuts/bolts holding the axle to the springs & dogbones. Off came the tires & wheels, then started jacking up the axle so I could chain up the springs, and place wood blocks under the axle. I also wrapped a chain around the upper part of the axle to prevent it from rotating once it was freed from the suspension, which worked well.

When I had purchased the replacement axle from 100DollarMan (Hundy), I had also purchased two Deuce wheels without tires...these were a tremendous help in moving both axles around by myself. I put the bare wheels on the old axle, slowly dropped it to ground level by jacking & removing wood blocks, then used the wheels to move the axle out of the way (against the block wall on the other side of the truck). Then, I swapped the wheels back to the new axle and maneuvered it into place. Once again, I broke out the bottle jack to lift each side of the axle to place wood blocks underneath it. When the proper height was reached, I was able to slide the axle on the wood blocks into position and re-install it on the suspension. By then it was time to knock off and jump in the shower, so I hope to be able to get a few hours' worth of work in tomorrow morning before work, in order to button it down & take care of the remaining details.

I think I'll pull the flipped hubs & other parts from the old axle & put them on this replacement axle. I will pull it all apart once remounted, and put in new bearings & seals, as well as address the brakes. Oh yeah, gotta change diff fluid too. Details, details!

What a lot of work! But one person CAN do an axle swap. It was so worth it!

Many thanks to Hundy for fixing me up with plenty of replacement parts & pieces for such great prices!!
 

Attachments

Last edited:

silverstate55

Unemployable
Steel Soldiers Supporter
2,068
855
113
Location
UT
Got the dogbones & suspension bits all rebolted & buttoned up this morning. So I broke out the drain pan and drained the gear oil out of the axle housing, when I saw these 3 metal pieces sticking to the magnetic drain plug.

I should have done this before installing the axle...now what? Is this normal? The axle tag is dated from the 1970s, so I have no idea when/if it was last serviced. I don't detect any anomalies when turning the input shaft by hand, but then again that's no indicator. Is this a problem? Shoud I tear the axle down to make sure that there isn't any significant damage, or is it OK to run? These were the only pieces that came out, along with a fair amount of very fine metal shavings on the magnet. I pulled the right-side axle and didn't notice anything out of kilter about it. I hope I don't have to remove the top-loader gears...

Any input/advice is greatly appreciated, thanks in advance!
 

Attachments

dmetalmiki

Well-known member
5,523
2,026
113
Location
London England
Hard to see in the picture, but the profile looks like it would"allign" to the curvature of the pinion gears.....if they are flat? that might be bearing retainers or washers.
Is the thickness consistant with gearing taper at the outer edges?
This would mean "chipped" gearing.
There was nothing exept the slightest "particle" in my axles.
Fantastic Job you are accomplishing , and on your own! well done.

Close up pictures perhaps?. Are the sources of "axle-s" not too distant to x-change?
 

silverstate55

Unemployable
Steel Soldiers Supporter
2,068
855
113
Location
UT
Thank you for the prompt reply! Looks like with your thoughts, as well as a PM from Ron, I'll be pulling the replacement axle off to break it down. I'll put both axles on a stand so I can take the best, serviceable parts from both to make into one (along with any necessary repair parts).

Thanks fellas, I guess tomorrow morning I'll start pulling the replacement axle off. Dangit!!

aua
 

JCKnife

Well-known member
1,367
46
48
Location
Kentucky
I'll only cite advice I've gotten on this board: pieces stuck to the magnetic plug are only a worry if they are large enough to have an NSN.
 

silverstate55

Unemployable
Steel Soldiers Supporter
2,068
855
113
Location
UT
I'll only cite advice I've gotten on this board: pieces stuck to the magnetic plug are only a worry if they are large enough to have an NSN.
I'm real tempted to follow that advice in this case, but I HAVE to consider the track record of my luck...it WILL become an issue when I'm in the worst possible place at the worst possible time. As much as I'm tempted at this point to just say "F**k it" and move on to the next task, I know better. If it was my axle from the beginning, I'd probably be OK with it. But I don't know any history from this one other than it was removed from a running Deuce that was bobbed.

So, I think what I'll do is fab up a steel plate that will slide on top of the bed frame, directly above the toploader/third member...it will have a double pulley on it, so I can use a come-along hand winch to lift the toploader straight up, allowing me to disassemble the rest of the axle & lift the axle housing onto my hand truck. Then I can bring the hand truck back to cart away the toploader assembly. Doing this in pieces is going to be much easier on my back & my knees, I don't think I have the energy & motivation to do this all over again without complete breaking things down into more manageable modules/assemblies.

I'm hoping that between the 2 axles I'll have enough useable parts to make one complete axle, which I'll reassemble in place underneat the truck. I'm tired of manhandling this heavy crap. As Dirty Harry loved to say in his early movies, "A man's gotta know his limitations."
 

silverstate55

Unemployable
Steel Soldiers Supporter
2,068
855
113
Location
UT
Something else interesting I discovered was that when I disconnected the brake hose from the T-fitting on the axle, LOTS of BFS came out of the hose, and there was also plenty present inside each wheel cylinder & brake line on the axle. Since the MC was bone dry when I got it, that kind of narrows down the problem area.

After re-examining the damage to the input pinion shaft on the damaged axle, forklift damage seems the likely culprit....but while looking for a damaged brake line, I couldn't find a problem with them. And since they only started leaking BFS when I disconnected the lines & fittings, I'm starting to lean more towards the MC having an issue.

I guess I'll find out more when I get to that task...I'm going to have my hands full for a while with these axle rebuilds.
 

silverstate55

Unemployable
Steel Soldiers Supporter
2,068
855
113
Location
UT
Over the past 10 days or so, managed to get some work done on the suspect replacement rear axle. I didn't want to remove the entire axle, so I fabricated some brackets for a pulley sheave to mount directly above the third member; I drilled a small hole in the bed support and tapped it for a 3/8"x16 NC bolt (the same ones used to secure the inspection covers on the axle's third member) to keep everything in place while using my come-along to lift the 3rd member straight up. I next fabbed up a bracket (made from 3 M105A2 master cylinder mounting brackets) to bolt on to the 3rd member, so I can lift it straight up out of the axle housing.

We all know that room is limited in doing this, so by making these brackets I could maximize the limited space to lift the 3rd member straight up and out, then drop it onto my hand truck for closer inspection at a better location.

First, I pulled the inpsection covers off the 3rd member...everything looked PERFECT up top with the input pinion & ring gear. I dipped a magnetic parts picker-upper into the gear oil, swirled it into every nook & cranny I could reach, and when I removed it, it was completely clear....NO DEBRIS up top. That's good news, thought I...so I buttoned the covers back on and set out to remove the 3rd member.

Once I had the 3rd member out where I could give it a good going-over, it looked nearly perfect underneath as well. There was a little rust on some castle nuts & other minor parts, which I scrubbed off (there was some water in the gear oil when I drained it, and both sides axle seals were shot). But everything looks perfect, even the spider gears...I can't find where these metal shards might have come from. There are NO foreign debris/pieces inside this 3rd member, I mean NOTHING but gear oil.

When I checked the inside of the axle housing, I drained the residual gear oil and again, NOTHING unusual was found...nothing sticking to the magnetic drain plug, not even shavings....this is so strange. So perhaps these 3 metal shards were left over from a previous failure, and just never got cleaned out after repair? The axle shafts pulled right out with no effort, no signs of scoring, NOTHING unusual found other than a little surface rust here & there from the water contamination it was sitting in for quite some time.

I certainly feel better now, as soon as my new gasket set arrives from Erik's (complete with axle keyway gaskets) I'll have it back together. I even changed out the gear oil from the top of the third member and refilled it with fresh lube. This axle makes me feel pretty good about it, the brakes are almost new as well & the drums are in excellent shape.

I briefly considered swapping the old drums onto this new axle to save the hassle of flipping hubs, but after digging into the old axle, I'm going to flip the hubs on the replacement axle's drums. If nothing else, at least the drums are matched to the brake shoes by now & there's plenty of life left in everything at this point. The whole axle just needs to be degreased & derusted, repainted, and she'll be good as new.

Am I missing something here? Good Lord I hope not... :)
 

Attachments

Last edited:

silverstate55

Unemployable
Steel Soldiers Supporter
2,068
855
113
Location
UT
Here are some shots of the old axle; I haven't even removed the 3rd member nor axle shafts yet (I'm afraid to! :mrgreen:). The front of the pinion is bent severely (must be from a forklift), which caused everything else to wobble into self-destruction. The pinion gears are completely gone, and pieces/bits are strewn around inside all throughout the 3rd member. When I removed the rear cover plate, the blackened metal bits fell out from there. It's a total loss in the top part of the 3rd member, I'll probably have to scrap the whole axle at this rate. I'm hoping I can salvage an axle shaft or two, as well as the drums, hubs, and brake parts, but we'll see....
 

Attachments

Last edited:

plym49

Well-known member
1,164
171
63
Location
TX USA
Looks like you are a good rigger. Nice job on getting that rear apart and out using your noodle. :)
 

silverstate55

Unemployable
Steel Soldiers Supporter
2,068
855
113
Location
UT
with the pinion gear GONE, it is just amazing that the ring gear looks as good as it does!
tom
Isn't that something?

Taking into account what others have posted earlier, it seems that a GL forklift caused the input shaft damage, and the buyer drove it home from Barstow which caused the damage. I'm glad that there wasn't any damage to any other components, although I will take the driveshaft to a shop to have it inspected & balanced, in case there was damage done to it by the wobbly input shaft. Oh well.

At least I'm being pleasantly surprised with this replacement axle, originally purchased for $100 from 100DollarMan. It's obviously been rebuilt, but wasn't tagged as such. The brakes are almost new, just have to clean the grease off of them from the blown axle seals. I've been cleaning the drums & hubs from all the caked-on grease and grime, then separating the hubs from the drums so I can flip them based on mikew's instructions in his how-to thread: http://www.steelsoldiers.com/deuce-modification-hot-rodding/51160-how-hub-flip.html

To degrease them I just used Purple Power & Greased Lightning degreasers, and scrubbed with small wire brushes & old toothbrushes. Once apart I used my needle scaler & grinder with wire cup wheels to remove rust & old paint, before sealing them with Rust Reformer & Rusty Metal Primer. I painted them Krylon Sand to match the truck when it's done. I used my hydraulic press to remove the studs & then reseat them; it's very very easy to do, as I can leave the hub in place on its arbor plates while removing the studs, and then re-installing each stud in its proper orientation one by one. Mike's instructions are incredibly easy to follow.
 

Attachments

silverstate55

Unemployable
Steel Soldiers Supporter
2,068
855
113
Location
UT
For the past couple of days I've been trying to prep everything for the reinstallation of the third member on the forward rear axle. I cleaned & degreased the area around the brakes and spindles, then did the same on the inside of the axle housing (used compressed air & lots of brake cleaner at the end to ensure that there's nothing left inside that shouldn't be there). But when it came time to scrape off the old differential gasket, HOLY MACKEREL, it took me the better part of 2 mornings to get that dang thing completely removed! I don't know what in the heck it was made of, but DANG that thing was hard to get off. I even used a freshly-sharpened chisel, and it was a monster of a job.

Once that was done, it was time to hook the third member back up to my homemade hoist mechanism and lift it into position, so I could place the new gasket (courtesy of Erik's) on. There are 4 nuts that are captive under the third member, and of course one of them stuck to the stud and didn't want to go back in...a little encouragement from a cold chisel, and the problem child was put in its place and everything tightened down.

I installed the inner axle seals using 3-inch ABS pipe via CARNAC's method (thanks CARNAC!).

Got some more parts coming in via UPS tomorrow from Erik's; when I pulled the wheel cylinders from this replacement axle, they looked OK but had the "wrong" type of spring inside, so I ordered rebuild kits from Erik's with the correct springs. Can't install hubs/drums/axle shafts until this is completed. More photos to follow when I get them in & done.
 

Attachments

Last edited:

silverstate55

Unemployable
Steel Soldiers Supporter
2,068
855
113
Location
UT
In between working on Airbornebandsman's M109 conversion, I've managed to get the inner hub seals installed, reinstalled the drums with flipped hubs, put in the new outer seals (modified courtesy Gringeltaube's method), buttoned everything up, and filled the "new" differential with NAPA Premium Performance Gear Oil 80W-85-90 differential lube that perfectly matches the original lube specs in the TM (NAPA Part #75-210 in 5-gallon bucket). I made sure to carefully seat the cork seal in the keyway on the axle spindle, and fill the remaining gap with oil-safe silicone sealant; I also replaced all other existing gaskets with new ones from Erik's kits. So far, so good!

The brakes took about 10 minutes to adjust both sides; very simple once you get the hang of which way to rotate the adjusting bolts in order to tighten or loosen the cams.

I removed the stock axle breather cap and replaced it with a brass threaded nipple; I will be installing a barbed fitting for oil-safe braided hose to use for a remote breather system...it will connect via a "T" fitting to the same from the rear rear axle, and then be routed up near the air filter in the engine compartment and capped with a gasoline fuel filter to keep dust out. This should handle the pressure buildup in the axles with no problem, and keep it out of dust, water, mud, and other elements. With axle seals being such a PITA, I don't want them getting blown out from a plugged breather valve.

While doing all this, I noticed that all the torque rod ends need to be replaced; about half of them have completely separated and I can see through the rubber to the other side (those will be fun to try to remove...oh boy). I had ordered 2 new torque rod ends from Erik's several weeks ago, so I removed the passenger's side forward torque rod. I used my 3/4" drive ratchet and a cheater pipe to break the nuts loose, then used my 4-lb drilling hammer to knock the rod ends loose from their tapered mounts. I had to remove the torque rod in order to hammer loose the axle mount. I used a piece of angle steel and 3/8" scrap plate as dies to hold the axle mount on the concrete while I pounded the tapered fitting loose with my 4-lb drilling hammer.

Then it was off to the 20-ton hydraulic press. To remove the old torque rod ends, I used a bearing cup (race) from a previous project (Gringeltaube's outer wheel seal modification) that fit almost perfectly to press out the old ends: SKF bearing cup, part #8297C/89410. The old rod ends popped right out, and I posed them in the photos below to show the difference between old & new (and these are some of the better ones; there are 5 or 6 on the other side that are worn all the way through & separated). I used a wire brush to clean out the inside mounting areas, then applied a thin coat of grease to help prevent future corrosion. I pressed in the new rod ends easily and then reinstalled the rehabbed torque rod back into the suspension.

It actually went easier than I thought it would, thanks to other members who have posted very helpful threads on how they replaced theirs. Thanks fellas!!

2 down, 10 to go!!

ETA: I installed new windshield glass in the passenger's side frame, and reconditioned the frame as well as put in new outside rubber. I painted it Sand to match the truck (somewhat) before installing the new glass. Just need to reinstall the windshield wipers now.
 

Attachments

Last edited:
Top
AdBlock Detected

We get it, advertisements are annoying!

Sure, ad-blocking software does a great job at blocking ads, but it also blocks useful features of our website like our supporting vendors. Their ads help keep Steel Soldiers going. Please consider disabling your ad blockers for the site. Thanks!

I've Disabled AdBlock
No Thanks