• Steel Soldiers now has a few new forums, read more about it at: New Munitions Forums!

  • Microsoft MSN, Live, Hotmail, Outlook email users may not be receiving emails. We are working to resolve this issue. Please add support@steelsoldiers.com to your trusted contacts.


Successful Deuce Recovery

silverstate55

Unemployable
Steel Soldiers Supporter
2,068
855
113
Location
UT
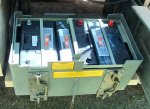
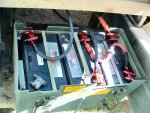
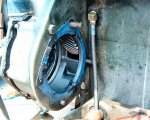
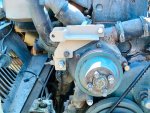
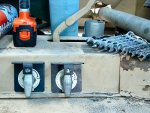
This morning I got both Flaming River Battery Lockout switches installed; each has provisions for locks to be placed on them to prevent starting/running. I plan on installing the negative ground wires for both my 24V & 12V circuits to each of these switches. Tomorrow I plan on running to NAPA to get some new cable for the ground wires, as the stock one is corroded & frayed beyond use.

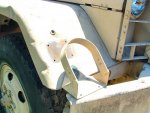
I also disassembled the front turn signal mounts on both sides, in anticipation of installing LED turn signals. I already have LEDs for the rear, just need to install them.

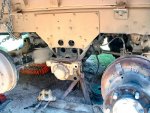
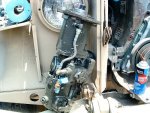
I also took care of many smaller, time-consuming issues this morning as well. I removed the headlight switch housing since it was broken & missing levers; there was a spare functional one that came with the truck, so I cleaned it up & installed it. While the headlight switch was out, I got a small wrench behind the dash so I could tighten the nut on the fuel shutoff switch...now that works as it should. I also relocated the passenger's side seatbelts to accomodate the upcoming bucket seats installation, and replaced missing rivets on the dash data plates.

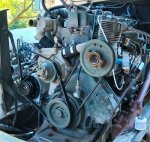
It's amazing how such a good deal on these fine trucks can turn into a really time-consuming & expensive project...I bought this truck last November, and it's STILL not driveable yet! But it should be soon, I only have a few weeks left to get it driving & registered (personal deadline). All in all, it's coming along pretty good.
 

Attachments

Isn't it amazing how you can always find little silly things to fix that just make the whole truck just a little nicer? I've been dealing with all those little adjustments for going-on 12 weeks now. Sooner or later I'll actually get around to bobbing mine and slinging some paint at it. [thumbzup]
 

silverstate55

Unemployable
Steel Soldiers Supporter
2,068
855
113
Location
UT
Isn't it amazing how you can always find little silly things to fix that just make the whole truck just a little nicer? I've been dealing with all those little adjustments for going-on 12 weeks now. Sooner or later I'll actually get around to bobbing mine and slinging some paint at it. [thumbzup]
LOL, so true! Based on your avatar, just wait til you get to have fun working with that soft top....UGH!
 

silverstate55

Unemployable
Steel Soldiers Supporter
2,068
855
113
Location
UT
For the past few days I've been reworking my "new" battery box (courtesy of JCKnife) to fit my 3 civvie batteries; each battery is 750CCA and all 3 are matched. 2 will be placed in series for 24V and the third battery will remain solo for my 12V circuit. I've got the brackets from TM America for 24V & 12V alternator installation, which will start this week.

First I cut & filed notches in some scrap 1x4's to level out the bottom of the battery box for my 3 batteries. My battery compartment was bare when I got the truck, and the previous battery box was the one held in by 2 bolted-in flip-type latches...I unbolted & removed these, then marked & drilled two 5/8" holes for the handles on the new box to lock into. I tightened up the rear of the battery mount to keep the new box from bouncing up & down as well.

The stock ground cable was frayed and rotted, so I replaced it with 2 new 2/0 ground cables; these run over the frame to the Flaming River Battery Cutoff Locking Switches I mounted in the cab. Where ever cable met metal, I placed braided fuel hose over the cable to prevent wear/chafing and secured it with a metal hose clamp (the plastic zip ties dry-rot and break over a short period of time here in the desert). I made sure to check that the metal hose clamps didn't chafe on any other cable or wiring anywhere. The stock positive lead was in good shape, so I cleaned it up, soldered it solid to the terminal connector, and double-heat-shrunk it with heavy-duty material. ALL cable connections are soldered thoroughly after being crimped on, and protected with heavy-duty heat shrink with inner lining.

I took one of the original rubber-coated metal battery tray brackets and modified it to fit around my 3 batteries...the hardest part was removing all the rubberized coating, as it was rusting underneath and I needed to do some welding on it. I cut it apart and hammered the side sections straight, then measured the centerline of each battery on the new bracket so I could weld across some metal strap to secure each battery. In between each battery I placed some plastic foam board (UV-proof) to act as insulators for each. I then secured the bracket over the batteries once I had it de-rusted, primed/sealed, and painted with some leftover Rustoleum camoflage paint that nearly matches the color of the battery box.

Then, I installed new battery terminal connectors to each cable, fabricated a new series cable from 2/0 power cable, and coated everything in spray-on corrosion preventer spray (this stuff has worked very well for me over the years). The only thing left to do is fabricate a 12V power cable and run a 12V charge wire to the upcoming 12V alternator.

I tested the new wiring for shorts through the Flaming River switches; none found and the new wiring works GREAT! For the first time in 6 months the starter actually got to kick over, before the batteries died. I have a Solargizer coming, when it arrives I'll install it and let the batteries charge while I finish other repairs.

Afterwards, the hot afternoon sun was shining directly on the engine compartment, so instead of starting to remove engine side panels to begin alternator work, I started tearing down the rear-rear axle. I want to verify the condition of brakes and wheel cylinders on this last rear axle, as well as take care of the heavy grease coating on the hubs (new seals). So, I started with the right side, removing the hub/drum and everything else.

I was again pleasantly surprised by the results: NO rust inside the wheel cylinder anywhere (the inside parts look almost brand-new, but I'll replace them anyway since rubber parts don't do well in the dry desert & I don't want any surprises), the wheel bearings & races look to be brand-new with no scoring nor irregular wear, and the brake shoes & parts look to be almost new! There is very little wear on the drum, the wear seems to match the low mileage on the truck very closely. I'm very encouraged and excited!

Once everything is de-greased, cleaned up and reassembled, I'll be able to more easily identify future problems such as leaking seals or gaskets. I just received 2 brand-new differential top-loader side-plate gaskets, so the leak from the top-loader in the last photo will be resolved on both rear differentials...again, that will help me more readily identify any future problems (or lack thereof).

So far, so good!! :jumpin:
 

Attachments

LOL, so true! Based on your avatar, just wait til you get to have fun working with that soft top....UGH!
I actually need to update my avatar soon. A few weeks ago I traded my soft top frame to another SS member for a hard top I installed a couple weeks ago. One of these years I'll aquire another frame and soft top, but for now I'm OK with the prospect of pulling out a few bolts and a couple screws to go topless if I feel the need for open-air cruising. While a soft top frame for a complete hard top seems like hardly a fair trade, it worked for both of us as I needed something to keep my lilly-white hiney out of the sun most of the time, and he needed a soft top for his truck as it's going to become a replica of a Vietnam-era gun truck. Before too much longer, my truck is going on a diet to lose a few thousand pounds and become a 4X4 bobber. While the purists cringe at the very mention of the word "bobber", In my case it's matter of practicality in the sense that in The People's Republik of Kommiefornia, the commercial enforcement division of the Highway Patrol are known to write citations to deuce owners for driving out of class when the truck has 3 axles. Mainly, my focus is to raise fuel milage and increase the mobility (easier to drive) as well as make it easier to find a parking spot. Honestly, who wants to go to the local burger joint or car show, and not be able to find a place to park they can fit in? Not to mention a bobber goes through drive-thru's WAY easier than a 6X6 as long as the awning isn't too low. :mrgreen:
 

silverstate55

Unemployable
Steel Soldiers Supporter
2,068
855
113
Location
UT
LOL, very true, all good points! Enjoy & good luck on bobbing your Deuce! It will certainly save you money on tires in the long run... :mrgreen:
 

silverstate55

Unemployable
Steel Soldiers Supporter
2,068
855
113
Location
UT
Got the passenger's side torque rods completed, time to move on to the driver's side...UGH. I found it easier to just remove the leaf spring pack to access the 2 recessed torque rod bushing nuts. These 2 were by far the most difficult to remove...I had to loosen the nuts out to where the NAPA socket would slip over it, so I could get a 12-lb sledge hammer to apply a little motivation on the socket. All of the others came out within 4-5 strikes from my 4-lb drilling hammer, but not these 2...nope, they needed about 8-10 strikes from a 12-lb sledge to break loose.

Once broken loose, I took all 4 remaining (driver's side) torque rods to the hydraulic press to remove the old, dry-rotted bushings. Then I wire-brushed each torque rod end opening to remove rust, scale, paint, etc... I also wire-brushed each tapered opening in the axle mounts, and before everything is pressed together I apply a thin layer of anti-sieze to each pressed-in surface to hopefully minimize future corrosion.

While looking at the trunnion mount for the leaf spring, it is obvious that the area where the U-bolts pass through is pretty much a bad design: it encourages debris and corrosive materials to collect there and eat away at the U-bolts, as other members have described. It makes me glad that I've got a desert truck and all that I found packed in this area was dust & sand that easily washed out.

I'll be glad when this is done and WON'T be looking forward to ever doing this again....

I also completed the rebuilding of wheel cylinders on each rear axle as well as installing completely new seals and gaskets...when changing out the lube on the rearmost differential, it came out clean with only a small bit of fine shavings on the magnetic plug. All in all, very encouraging! I also replaced the side-cover access plate gaskets on both differentials with new ones from Erik's, in hopes of eliminating the leaks from both. Brakes adjusted very easily on all rear axles, so as soon as the new torque rod ends come in, the driveshafts go back in & the new super single wheels/tires will get installed. Oh boy!!!
 

Attachments

Last edited:

silverstate55

Unemployable
Steel Soldiers Supporter
2,068
855
113
Location
UT
While removing the oil lines on the IP today (want to have them replaced with braided stainless lines), I managed to break off the angled brass piece that goes into the engine block. Now it looks like I'll have to remove the whole IP in order to get my extractor set in place.

This sucks.
 

m-35tom

Well-known member
Supporting Vendor
3,021
221
63
Location
eldersburg maryland
first, you want to use the type of extracter that is a tapered square. you can cut off the top part that is too long to fit in and just leave enough to get a small wrench on the end. press it into the fitting carefully with a large pry bar while turning it out. i know it is close but i would try that first. good luck!!

tom
 

silverstate55

Unemployable
Steel Soldiers Supporter
2,068
855
113
Location
UT
first, you want to use the type of extracter that is a tapered square. you can cut off the top part that is too long to fit in and just leave enough to get a small wrench on the end. press it into the fitting carefully with a large pry bar while turning it out. i know it is close but i would try that first. good luck!!

tom
Ahhh, thanks Tom! I'll give it a shot in a day or two when I'm working on it again.
 

silverstate55

Unemployable
Steel Soldiers Supporter
2,068
855
113
Location
UT
I ended up buying some of the tapered square extractors. I tried using one of the screw extractors, but it broke off too. I thought I was really screwed with this. I ended up removing the entire IP, and while it was out I removed the HH (following instructions on other threads) and replaced the 3 O-rings with Viton O-rings. By following the instructions in the other threads, it was pretty easy. I don't have anything new to add, so I didn't see the need to post duplicate photos. I also took the opportunity to fix a couple of leaky gaskets on the IP while it was out; I used some great sealant called "The Right Stuff" which comes in a can...it sets immediately and working time is done as soon as you have everything torqued back down. Good stuff!

So now time to try to extract the broken brass piece and the broken extractor inside of it (first pic). Boy, when I gum something up, I gum it up GOOD. I ground the area flat, struck a point with a center punch, and started drilling with a 1/16-inch drill bit. This went all the way through in no time, so then I stepped up to 3/32-inch...this dulled quickly on the semi-hardened extractor point, so I set up my grinder in a vise and used it as a static sharpener for the 3/32-inch drill bit. When it was sharpened again, I'd dip it into water to harden it, then back to drilling. I repeated this about 3 times until it went all the way through. Same with a 1/8-inch drill bit, which the square extractor required. Finally I tapped the square extractor firmly into the 1/8-inch hole, and using a wrench slowly extracted the broken pieces. Luckily the oil passage is nearly vertical for some ways inside the engine block, so it was easy to clean out the shavings & other bits.

Afterwards, I carefully installed a new angled adapter and new stainless braided oil line (I'm sick and tired of rubber dry-rotting after 5-6 years), as well as another new braided stainless oil line on the IP. Then I reinstalled the IP and assorted pieces, carefully lining everything back up with the Sharpie pen lines I had drawn across the front of the gears & timing shaft before removing them.

It is so much easier to remove the fender in order to access everything; I'm glad I did.

Now time to replace the nylon injector return lines, as well as the other miscellaneous fuel lines to & from the IP & filters.
 

Attachments

silverstate55

Unemployable
Steel Soldiers Supporter
2,068
855
113
Location
UT
While the radiator & driver's side fender are off, I started mocking up my new dual alternator setup. I have a new 24-volt alternator (27si) and a brand-new 10si 12-volt alternator waiting for this installation, using George's brackets (member name TM America).

I'll also be installing new coolant hoses, hose clamps, thermostat & gasket, and other miscellaneous items. More pics to follow tomorrow.
 

Attachments

silverstate55

Unemployable
Steel Soldiers Supporter
2,068
855
113
Location
UT
Got the water pump remounted after I de-rusted it and sealed it with Rust Reformer before painting it Khaki. Then I installed TM America's dual alternator kit, and installed the belts. It is a well-designed kit, I really like it, most everything lines right up. I did have to move the primary fuel filter back one bolt hole in order for the 24-volt alternator to clear for belt tension.

Also got every flexible fuel line replaced throughout the entire engine compartment, using Parker hi-temp nylon fuel line (as recommended by my hose repair shop). I installed all new compression ferrules and made sure to remove the hose reinforcing tubes from the old lines for re-use in the new ones.

All coolant hoses have been replaced and I also used the heavy-duty hose clamps instead of the stupid thumb-screw stock ones. I've replaced the oil filters & gaskets (the gaskets were petrified on the mounts; they look to be 20-year-old originals). Now I'm fighting with the stupid secondary fuel filter canisters; the original flanges for the secondary filters to rest on inside the canisters are missing, so I had to use some heavy fender washers & Viton O-rings to make sure that the filters will properly seat themselves inside the canister....when I removed them, the filters were just sitting at the bottom of each canister, flopping around...that's real effective. WTF, over....
 

Attachments

caliber1

New member
995
8
0
Location
Elcho, Wisconsin
You wouldn't happen to have part numbers for the return hose and ferrules would you? wanna call my distributor tomorrow and get it delivered. One of those things I have been meaning to do.
 

silverstate55

Unemployable
Steel Soldiers Supporter
2,068
855
113
Location
UT
You wouldn't happen to have part numbers for the return hose and ferrules would you? wanna call my distributor tomorrow and get it delivered. One of those things I have been meaning to do.
No, sorry, I just removed the hoses & took them to All-Hose here in Las Vegas...they matched them up & made new ones with new ferrules while I waited.

The ferrules look to be common 1/4-inch brass ones. Don't forget the internal hose reinforcements at each end: they look like thin brass tubes & can be removed from the old hoses with needle-nose pliers.

I purchased a 6-foot length of the 1/4-inch Parker nylon fuel line, so I could cut the lengths of the injector fuel return lines; I also bought one of the Parker nylon hose cutters that works like a champ and was well worth the couple of bucks I paid for it...it also works great on air lines.

I also had 2 heavy-duty braided fuel lines made to replace the IP supply hose & the rubber return hose.
 

caliber1

New member
995
8
0
Location
Elcho, Wisconsin
Thank you sir. So it is 1/4 inch. I still have some of the old air brake line fittings with the ferrules and sleeves. Wonder if the nylon air brake line I have would work alright? Hafta call Amazon tomorrow. Thanks again sir, great looking truck too.
 

silverstate55

Unemployable
Steel Soldiers Supporter
2,068
855
113
Location
UT
Thank you Jess, sorry I couldn't be more specific. A couple of members here have told me that truck air brake line will work as fuel line, but the guys at my local All-Hose didn't like to hear that (they stand behind what they sell, so I tend to stick with their advice...haven't steered me wrong yet). M-35Tom would know for sure.

I tend to not like re-using the brass ferrules, as once they are tightened they crimp down & seal against the hose...I assume you're talking about new ferrules?

Thanks for the kind comments about my truck; it's coming along, I can't wait to get the rest of my torque rod bushings installed this week so I can re-assemble my rear suspension and start installing my 395/85R20 Michelins XZLs & 5-ton combat wheels!!!
 
Top
AdBlock Detected

We get it, advertisements are annoying!

Sure, ad-blocking software does a great job at blocking ads, but it also blocks useful features of our website like our supporting vendors. Their ads help keep Steel Soldiers going. Please consider disabling your ad blockers for the site. Thanks!

I've Disabled AdBlock
No Thanks