• Steel Soldiers now has a few new forums, read more about it at: New Munitions Forums!

  • Microsoft MSN, Live, Hotmail, Outlook email users may not be receiving emails. We are working to resolve this issue. Please add support@steelsoldiers.com to your trusted contacts.


Superthermal's M813 Build, THE BOT

Superthermal

Well-known member
266
768
93
Location
Utah, Murray, United States
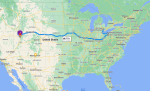
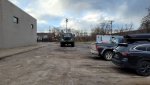
Had been looking for some time for an M813 with winch. Not much luck and was always behind another buyer it seemed. Finally found one in decent shape and an excellent price but on the other side of the US from me. The rig was located near Detroit. I know that is a long ways away but I bought it anyway. So I flew out and picked it up.
The previous owner Alex co-runs D&D Gunsmiths (The second job wish of many I would think here on SS ;) ).
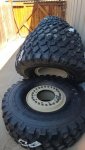
Trip first to a gas station for the trip brought to my attention that the heater core of the cab heater had a pinhole leak or something to the effect. Lucky the motor hadn't warmed up too much so I quickly bypassed the heater with the already existing tubing. Topped off the fluid and was back in business. Could not get any of the drivers side tires to take air and they were all at about 38ish PSI. Since the rig was new to me I plotted my first stop with no highway miles. Glad I did as the tires needed some time to re-round out from the time sitting. At first 25 was ruff, then 30 then 40 then 50 /51 was max without serious vibration.
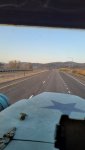
On the way to this first stop the breaks began to say pumped and locked ON. Wasn't quite sure what was causing it so I looked up here on SS and found a few possible solutions. At 2:30 AM in a Walgrens back parking lot I backed the peddle rod just a bit out of the master cylinder just to make sure the piston was retracting all the way and then bleed some brake fluid out of each wheel cylinder. This released the bind on the breaks for the moment. This "fix"did the trick but made me drive from here on the rest of the journey with caution to not use the breaks unless needed. Drove slow to all stops so I would omit using the breaks to keep this issue from becoming a full problem out on the road. Had an amazing drive along the Lake Erie and a stop by the Kirtland Temple which I had never had the chance to see.
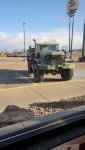
Then stopped by Sam Winer Motors Inc in AKRON OH,to grab a rebuilt Garwood 20k winch with the Level wind I bought for the rig off EBAY. Also bought from him a new PTO with some gaskets. While there Robert the son of the original owner of the place was nice enough to let me have the linkage off one of his parts trucks, but after spending significant time trying to remove it, I had to give up as with the limited tools I traveled with I could not remove the dog house as the bolts were previously stripped and very rusted. Giving up on getting such a nice hand out I reluctantly set off again. If anyone is in that area and wanted to do an immeasurable favor and finish that job for me I would be deeply grateful. I would pay you for your kindness. If I had a battery powered grinder that could have taken the rest of the cover bolts off I would have been in business. The rest is 80% ish detached. Not wanting to take some of the parts and leave someone a piecemeal of items I left everything there.
After leaving Ohio I set off to see a fellow 5 TON owner Andy Lang who had tipped me off on the rig being available to say thanks in person! Andy has an M930A2Dump Truck running on 14.00s. After a great but short stay I headed off again. Sopped by the Carthage Jail for and 1.5 to charge my phone and take a tour. Passed the Nauvoo Temple and headed over the Greatest river on EARTH and then off to more of the great planes.
Rain brought to my attention that there was actually no wiper on the blades of the windshild wipers. (AT night mind you.. rain... flat windshield...you get it?) At a Flying J I bought a 24" wiper and cut it in half and used my black tape to mount it to the original blade. This did the trick to keep me moving.
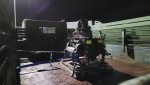
Caused myself a big issue when somehow (still dont know) turned on the intake heater and it stayed ON all nap long (and maybe was on the entire drive prior?) on Sunday morning. The 4 batteries were D.E.A.D! Like no life. No buzzer for the air no lights nada. So .. lucky for me in the prep to leave from Detroit I bought two new batteries to bring with me. I wired down from 4 to just the two there in the parking lot and fired up and set out again. Lucky, lucky, lucky.

All in all drove some 2300ish miles back home at 49-51 mph. Covered this from start at 9pm Friday night to arrival at 7:30am Monday. That left at 50 mph 46 minimum+ hours of driving of the total 82.5 hours. 1 hour of tour guide at the Jail at the hours of sleeping, about 1.5 hours of break troubleshooting, 1.5 hours of battery swapping (yea took a while to think what was going to be best to do) Some hanging out with Andy, two dinners at Flying Js some general checking here and there at fuel stops. the wiper rig and pulled over twice to catch a cat nap and 3 other times to just close and rest my eyes.
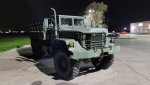
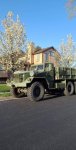
If I could do it over, I would have found some way to put antifreeze in the tires to help with the hop hop hopping. This one thing would have made the entire journey better. Motor did not use any oil, and the Dot 5 I had to periodically drain from the wheel cylinders was made available by Napa, Front seal on the front axle chunk is leaking a bit. Heater core needs some attention or replacement and the rig is awesome.

Now the rest of the fun begins.
 

Attachments

Last edited:

US6x4

Well-known member
Steel Soldiers Supporter
1,165
2,027
113
Location
Wenatchee, WA
Congratulations on getting your new truck and good job doing all the homework leading up to picking one out! That truck looks like it's in good shape and pretty complete.

Are those 16.00R20s? Could you have been seeing 51 mph on the speedo but doing more like 60? Just curious about actual cruise speed.

That's a long enough trip to plan out your next move - what will you do first ?
 

Superthermal

Well-known member
266
768
93
Location
Utah, Murray, United States
Yes the truck is in good shape. Still have to test the 4wd to ensure the sprag and clutch are working. I was so tempted to do this out on the muddy farms I was seeing out on the midwest..lol! But getting stuck on some farmers land or leaving ruts on a well plowed field is un-American and I have more respect than that.
The speed was tracked on Google and is accurate. It has 16.00 Goodyears. The tires are out of round-normal- but as soon as I have some Detroits put into the axles I will be testing out the unit and will wear out these 16s before switching to my new ones I bought recently. The Detroits could be put on hold as I am toying with an Idea suggested to me to put most of the drivetrain from a M916 in it. As those axles can come with lockers.
As for the immediate future. I have some gauges that need replacing or diagnosis steps completed, a heater core to solder or replace, a chunk front seal to replace as well. The hood needs to be pulled off set upside down and have my kids and I jump on it to fix what Some soldiers likely did when they stood on it for a picture. Same for the cab.
I have a lot more plans for the future and I am not shy to jump into things.
Getting the 500lb winch installed will also be on my soon list.
Thanks for the interest.
 

Attachments

Last edited:

Superthermal

Well-known member
266
768
93
Location
Utah, Murray, United States
Since purchasing the BOT I have been considering all my options on what is most important to upgrade. My list is currently as follows. You don't have to read all this.... Mostly just my thoughts... cliff notes :TIRES, TRACTION, WINCH, POWER, SAFETY,

1. Get new tires mounted. This will require 2 additional HEMTT rims $200ea +$270 for shipping. Then $300 for O-rings and new double sided valve stems. Total of about $1000. If the run flats from the MRAP aluminum rims wont fit with the HEMTT rims I am going to be ... sad.

2. Buy Three Detroit Lockers. The going rate for the lockers is about $1100 Each.

3. Get remainder of parts to install the winch. I have a 20K rebuilt Garwood winch with the level-wind and a new PTO but I need linkage $100 driveshaft $300ish and the frame extensions $200 so at least another $600 there not including a 250' 5/8" Swivel hook 45,000lb winch cable... $550ish so about $1200 total. I have been also looking into making my own frame extension that will put the winch 8" higher than stock... I would mount the stock bumper upside down and the front of the winch instead of poking down from the front bumper where the roller guides can be rammed into the ground they will be above the bumper and the bumper "cutout" will help guide the cable in from the bottom. This will place the winch to high to have a shaft drive. I would put a Sprocket/chain drive on the shaft instead and a 900 series hydraulic winch motor mounted below. The PTO would drive a hydraulic pump and I would put the valve box in the cab for the controls. Still thinking this over, I like the PTO but a STALLION 25K for 1800 is looking very nice too but it cannot hold up to the duty of the Garwood.

4. Next,Add some more power. I know the 250 ain't going to roast the tires for me. All I need is to clean the lugs out of mud or snow if I choose to do so and even then I think the 250 will be stretching to do that. This means a HT3B turbo, a 17 PT button, BC cooled intake, exhaust manifold and since I am on a budget a straight pipe for the exhaust. This also requires that I put in 3 gauges: PYRO, Fuel Rail Pressure and boost. I have been offered the main parts I need at reasonable prices. But for me to install any turbo I need these gauges which will be about $400.
I would love a BC400 to drop in my lap for the same price as all this but one can only dream but even then I don't have a shop I can tear into my rig that far right now.

5. Some maintenance items. Front chuck shaft seals, replacement of one set of break shoes and some seals for one of the rear axles. A full lube of all the axles, t-case and trans. Some new mirrors. Replace a couple of so so gauges and minor stuff like that.

6. Roll cage. I have started another thread here on SS discussing this.
I feel I can make a stout cab roll cage and a cargo bed roll bar out of 2" .250 wall and .120 wall DOM tubing. The cage will have a front hoop, rear hoop, 4 front to rear hoop upper tubes, 2 lower front to rear tubes, two removable tubes for the seats to mount on and a rear spider brace that will need to allow for the seats to sit all the way back to the back of the cab. A standard X bar would keep that from being possible and yes we all know that last 2" of seat space makes life better. All corners would get gussets to add rigidity.
The cargo bed roll bar will be as I drew it in my original mock up but with the addition of two down bars that will form a "W" in the middle of the front hoop and an extra drop bar on the rear down bars where the two 16.00 XZL tires will mount. My bed is slightly different than the one in my mock up as it has a higher front lip. Additionally, I would add a second set of long bolt bed mounts with springs to the front of the bed/frame connection to ensure they could not separate easily.
I feel with this set up I would be safe rolling this rig with high probability of survival. This tubing is $650 a stick of 24'... still haven't put together a cut list.

7. Expanded fuel system. I plan on adding another 78 gallon tank in the place of the current cargo box. $300-400.
8. Cargo bed hoops and cover
9. Cargo crane of some type.
10. Some paint in the form of olive drab and black
11. Electrical system... 200 amp alternator, manual shut off. batteries in the cab.
I have more but this is already a significant list of goals.
Anything you see here I am overlooking that I am not seeing?
Started on the tires. I have the parts coming for the first 6 to mount.
Wish me luck!
20220917_133027.jpg20220915_213413 - Copy - Copy.jpg1662268544205.png
 
Last edited:

swbradley1

Modertator
Staff member
Super Moderator
Steel Soldiers Supporter
14,173
1,481
113
Location
Dayton, OH
Of the three trucks I had I miss the 813 most of all. I've got a couple of tips for you. One the NHC250 put the dual fuel line mod on it to smooth out idle. Put a gear reduction starter on it. I had a gear reduction put on mine and two car batteries would spin it like a top.

M813s must be a popular model as the guy that bought mine couldn't find one either.

Lastly, you drove right by me and didn't say hi. :)

Enjoy the truck
 

ToddJK

Well-known member
1,312
4,464
113
Location
Sparta, MI
That is a nice truck and I look forward to seeing how it evolves over time as you make it more your own. One thing is for sure, I find having a winch to be priceless and peace of mind when off road or helping with a recovery, ect. Only other thing I'd like to add to mine now is a winch in the rear and eventually a crane or hoist to lift and lower spare tires and cargo in and out of the bed. The bows will hold the weight of a standard 9-20 NDT tires, I've used a chain hoist for that, but not a super single as these can weigh over 350+lbs, it'll bend that bow in half. I might make a steel contraption that fits along the bow just for that, but haven't gotten that far yet.
 

Superthermal

Well-known member
266
768
93
Location
Utah, Murray, United States
Of the three trucks I had I miss the 813 most of all. I've got a couple of tips for you. One the NHC250 put the dual fuel line mod on it to smooth out idle. Put a gear reduction starter on it. I had a gear reduction put on mine and two car batteries would spin it like a top.

M813s must be a popular model as the guy that bought mine couldn't find one either.

Lastly, you drove right by me and didn't say hi. :)

Enjoy the truck
At the point I bought this I didn't know anyone out of state but 71DeuceAK here on SS. He tipped me off about the M813 being for sale and for that favor I routed my drive cross country at who knows how many miles added to make sure I stopped by his place to give a personal thank you.
 

ToddJK

Well-known member
1,312
4,464
113
Location
Sparta, MI
At the point I bought this I didn't know anyone out of state but 71DeuceAK here on SS. He tipped me off about the M813 being for sale and for that favor I routed my drive cross country at who knows how many miles added to make sure I stopped by his place to give a personal thank you.
Yeah,I met Andy at Haspin and we'll shoot the 💩 once in a while over text. Good guy.
 

Superthermal

Well-known member
266
768
93
Location
Utah, Murray, United States
Making some progress on tires. Dismounted 6 of the 8 MRAP 16.00s with their run-flats a couple weeks back. Started today on getting the tires one at a time off my BOT and dismounting the tires using a high lift. Was a pain as it didn't apply direct downward pressure to help the bead slip inwards. Ended up rotating the tire 5 or so times and pressing down while adding some soapy water to keep the bead from binding again as I made my way around. The first tire did not have a bead lock in it which I was surprised to find.

One thing that I was not expecting is the MRAP tires as I was looking to clean any debri out of the bottom and clean up any soapy water from the dismount process, I found that the tire has a gooy tar like substance inside of it. Thick butyl liquid stuff. I am not sure if I can put antifreeze mix in with that to balance the tire. Trying to clean it out would not be a fun job. Not sure I would want to even try.

UPDATE: Run Flat Grease is what I found. If your interested in what it is go here:

20220915_211038.jpg20220915_213413.jpg20221008_175011.jpg20221008_175043.jpg
 
Last edited:

Superthermal

Well-known member
266
768
93
Location
Utah, Murray, United States
First tire assembled. The alignment of the valve stem in the run flat was a bit of a challenge to get perfect (Yes it is perfect :)) but by far the hardest thing was to get the deep dish side of the rim to start slipping into the run flat. Fought that for a while. I have not aired the tire up yet as I promised my diesel mechanic brother I would not air the tire up unless I had a self attached air hose that I could attach and air the tire up from a distance just for some freak accident the tire or rim was to give way... you know so I don't die and leave my wife and six kids to do the rest of the tires alone... LOL. With the next tires I will take some photos to show the process I am using to help anyone else who might be like myself with limited tools trying to do a big pain of a job.
Bit of info on the run flat goo I found inside the tires can be found here:
Capture5.JPG
 

Superthermal

Well-known member
266
768
93
Location
Utah, Murray, United States
I dont have any special equipment to do this job.
1.I used soapy water to get the bottom half of the tire to seat on the dish side of the rim as best as I could with the tire face down.

(UPDATE:I will never use soapy water again. https://www.napaonline.com/en/p/BK_...tE_nbb_eLzTgT8ZzwEaAgPAEALw_wcB&gclsrc=aw.ds&
Napa tire mounting paste is your best friend. Like slick. No need to worry about leaving water in the tire after mounting)

2. I strapped the rim in place with this clocking with a ratchet strap to ensure the run flat grove was exactly centered with the HEMTT rims valve stem.
3. I then flipped the tire over onto the lower side of the rim which was held up off the ground about 5 inches on top of some wood sections of the pallet I kept from when I purchased the rims.
4. I used a pry bar levering against some of the lug nuts I had on the studs to help ease the run flat down onto the rim. (The runflat was catching on the o-ring ridge and seemed impossible to get it to slide over it.) I did this until I could feel the tire was near the lower bead. Still using soap throughout.

(UPDATE This step was totally not needed if using the Napa tire mounting paste as in step 1.)

5. I installed the O-ring at this point carefully with a wide flat tool to ensure the o-ring would not have any gouging. Ensuring everything was clean and lubed.
6. I meticulously aligned the top rim half with the studs (had to do this part several times) to ensure the tire was not twisted or under rotational tension as the top half of the rim aligned with the bottom half. This was tuff as the rim was TIGHT on that bead as soon as it was in contact. It has about 3.5 Inches of rim it needs to slide down into before it would make contact on the o-ring.
7. I used my Sledge hammer and a 4x4 wrapped in a heavy garbage bag (to avoid any wood chips near my clean o-ring) to ease the rim down far enough to get the lug nuts started.
(UPDATE This step was totally not needed to hammer anything when using the Napa tire mounting paste... again WOW what a difference)

8. Tightened back and forth across the rim evenly all the way down until both rim faces met and were tight at a "2" on the Milwaukee impact I was using.
STILL TO DO:
9. Torque the nuts correctly. I don't have a torque wrench that will do 450-500 but I do have a 52/1 torque multiplier that I may use. The impact driver doesn't have a chart that will help me feel confident I can trust the exact settings. Unless someone here can voge for this unit and its settings.

[/URL]

10. I purchased a set of locking air chucks so I can air the tire up without being next to it. My brother, who is a diesel mechanic, made me promise him that I would not stand near any tire I assemble so in the event that it has a catastrophic failure upon inflation I am not injured. I also plan on making a 1 to 4 air hose system that will allow me to connect all 4 rear tires simultaneously and air the tires up and allow them to equalize to the exact same pressure. I hope this will buy me a bit more mileage out of the tires if they are all the "exact" same size since they are all geared against each other and any significant differences would cause one or another tire to "drag" or be "pushed" until the diameter matches. Still waiting for these to show up.


11. I will need to lift this now 615lb tire up and roll it over and get it to slide over the axle shaft and onto the lugs of the rig where I will tighten down my new toy. Then I will be happy for 5 minutes and realize I still have 5 more to go and another 2 after that when I can afford two more HEMTT rims so I will have a total of 8.
 
Last edited:

Superthermal

Well-known member
266
768
93
Location
Utah, Murray, United States
Spent the last week's evenings fighting the removal of the last three tires. You can look at this thread below to see how that turned out.


20221028_185647.jpg20221028_185708.jpg
 

Karl kostman

Well-known member
Steel Soldiers Supporter
2,283
836
113
Location
Fargo ND
Sounds like a good trip and congrats on the new truck! Recoveries are always interesting some more than others yours sounds about average, good looking truck and it appears that you have a very solid base to start building on, you will have fun in making the YOURS! And Andy is a very nice guy who happens to own a very nice tipper!
 

Superthermal

Well-known member
266
768
93
Location
Utah, Murray, United States
Ordering some fuel parts for the BOT. #20 and #17 button. The 20 I will use after I verify where my fuel rail pressure is (I am guessing 150psi) and the 17 when I get a turbo. I am also putting in the dual fuel mod, I will be using 6AN parts for this. I have also ordered a mechanical 0- 200PSI SW fuel pressure gauge. I am going to be shooting to be right at 200psi rail pressure. I'll post the parts I used and where I found them as I get done. Button numbers are referenced from a post back in 2014... Found that to be helpful to find them to order on www.dieselpartsdirect.com


Once I verify the fuel pressure as is stock, I will put in the extra line for the dual fuel and give a report on the fuel rail drop in pressure that is reported by others to give you an idea if that is helpful.
 

Superthermal

Well-known member
266
768
93
Location
Utah, Murray, United States
Dropped the stock filter housing off today and Yes it was looking chunky in the bottom but all in all was looking quite nice, that is nice after a few minutes with a wire brush and scotch bright. I do like the tuff housing of the sock caniser and was wondering if maybe I should just keep it and replace the stock filter after seeing how effective the stock setup was at keeping garbage out of the filter with the lower housing being a sediment catch.
Also pulled out my sending unit after fighting some stripped screws and found the float to be full of diesel. No wonder my gauge always read EMPTY. That is an easy fix.
Also pulled my supply and return hard lines off my tank today as a last check on fittings before purchasing and found the 3/8" copper hard lines are pristine and not corroded at all.
1674962750089.png
The inside of the tank was a bit ugly for a 44 year old bucket of dead dinosaurs and corn syrup tar, but not much I can do about that. Just want to make sure what my engine sucks in is good to go. I will need to think about chemically cleaning this tank but not sure in the long run it will bring me any benefits. Anyone here can tell me I need to fix this and I will start thinking I have a bigger to do list. LOL
1674962685927.png1674963517159.png
 
Top
AdBlock Detected

We get it, advertisements are annoying!

Sure, ad-blocking software does a great job at blocking ads, but it also blocks useful features of our website like our supporting vendors. Their ads help keep Steel Soldiers going. Please consider disabling your ad blockers for the site. Thanks!

I've Disabled AdBlock
No Thanks