• Steel Soldiers now has a few new forums, read more about it at: New Munitions Forums!

  • Microsoft MSN, Live, Hotmail, Outlook email users may not be receiving emails. We are working to resolve this issue. Please add support@steelsoldiers.com to your trusted contacts.


What have you done to your CUCV today/lately? - Part 1

Status
Not open for further replies.
367
0
18
Location
Castalian Springs, TN
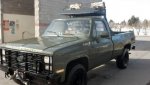
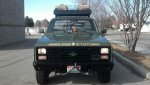
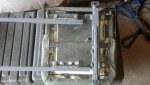
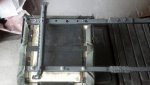
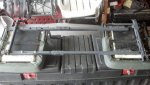
thanks, the M series headlight buckets that I got from Popacom (I think I got his last pair) are a perfect fit between the rails on the grill gaurd. What is nice about them is you can mount them even and then use the adjusters in the headlight housings to aim the spotlights. You do not have to try to aim them with the mounting brackets. I should have taken a pick of the metal that I started with. I actually pulled some metal angle brackets out of the scrap pile and cut them up to make the pieces. These brackets were used to strap computer cabinets to pallets for shipping. I had them in my scrap metal pile for about 5 years and finally found a use for them.

I still need to get them wired up and then adjusted but I already have the switch in the dash and the lights mounted I now need to get the wire and relay's installed. I am shopping for a 24V relay that I can use 12 volts to actuate. I think I need relays that will handle 20 amps for each pair of lights.


Cool.... let me know how/where you sourced your relays.... i still need to finish wiring up my aircraft landing lights i have on the front of mine.....
 

Mainsail

Well-known member
Steel Soldiers Supporter
1,428
1,462
113
Location
Puget Sound, WA
Great job! I also bought some bulbs and cans from Popacom, only mine came without the trim rings needed to hold the bulbs in- but he's working on finding me some. I have the wiring mostly finished and only need to mount the cans. I'm using a solenoid relay mounted in the engine bay on the right fender. The switch inside the cab is one of the switches on the SW300- it throws the solenoid which will run the 24 volts to the cans.

EDIT to add: I could have easily used the old starter relay that I took out when I did the doghead mod. Just an idea for you.

Rich, can you post some closer pictures of the brackets you made? I can't see how you have the landing light cans mounted.

SW300.jpg
 
Last edited:

Mainsail

Well-known member
Steel Soldiers Supporter
1,428
1,462
113
Location
Puget Sound, WA
OK, I turned the picture and zoomed it in some. I think I see how you did that. Very ingenious!

Did you determine which side is UP in any special way?
IMG_1013.jpg
 

richingalveston

Well-known member
1,715
120
63
Location
galveston/Texas
They are L brackets with an extra tab welded to it to make it an F bracket. The bolt in the back tightens to clamp the bracket to the brace.
The bulbs had an up arrow on them and the buckets lined up with the bulb so that the adjustment screws are on top and to the left side when looking at the face of the bulb.

the bottom bracket could be longer to use the larger bolt, I had to modify this one to use a smaller bolt at the very end of the tab. The back of the housing gets in the way of the larger bolt on the bottom mount. Don't use thick metal for the braces, the bottom brace and the can both have to fit between the bars.

I allowed enough room between the two tabs for the metal thickness of the grill gaurd and also some thin rubber insulation. This was to prevent the clamps from wearing on the paint and to limit vibration.
I can get some better pics this weekend.
 

2HIJOS2126

New member
103
2
0
Location
IDAHO FALLS, ID.
PICTURES! How did you go about mounting them?
I used the original seat brackets so that I could bolt them in to the original location... I bolted them on the outside of the seats (towards the door) and I bolted 1X1 square tubing under each seat and across to tie the whole assembly together... I'll get some pics up in the next couple of days...
 

Dylan

New member
14
0
0
Location
Ontario
have not done much with my M1028 but I added a 12volt accessory plug mostly for my GPS so it can be charged for long trips, also replaced two belts and had to put in a new battery. also replaced the wipers the rubber on the ones it came with was completely rotted away so just metal blades. also had to get the windshield washer sprayer to work took some fiddling. next task is to get it's generator running.
 
367
0
18
Location
Castalian Springs, TN
Great job! I also bought some bulbs and cans from Popacom, only mine came without the trim rings needed to hold the bulbs in- but he's working on finding me some. I have the wiring mostly finished and only need to mount the cans. I'm using a solenoid relay mounted in the engine bay on the right fender. The switch inside the cab is one of the switches on the SW300- it throws the solenoid which will run the 24 volts to the cans.

EDIT to add: I could have easily used the old starter relay that I took out when I did the doghead mod. Just an idea for you.

Rich, can you post some closer pictures of the brackets you made? I can't see how you have the landing light cans mounted.

View attachment 414268


I didnt think of that..... too bad i have already done the Doghead mod, and threw the orginial away....... Ugh.....
 

richingalveston

Well-known member
1,715
120
63
Location
galveston/Texas
cucv spotlight mount

Here is a pic off the light removed with the brackets on the back of the light. I would like to know where I can get the connectors that go on the back of the can and inside the can to the bulb. It looks like both the 7 inch lights and the IR lights us the same single pin with a rubber boot. I need to make a wiring harness for the lights.
I was thinking of using a glow plug relay for each pair of lights.
When I get some more rattle cans I will paint the lights green, they started out desert tan.
 

Attachments

Mainsail

Well-known member
Steel Soldiers Supporter
1,428
1,462
113
Location
Puget Sound, WA
Here is a pic off the light removed with the brackets on the back of the light. I would like to know where I can get the connectors that go on the back of the can and inside the can to the bulb. It looks like both the 7 inch lights and the IR lights us the same single pin with a rubber boot. I need to make a wiring harness for the lights.
I was thinking of using a glow plug relay for each pair of lights.
When I get some more rattle cans I will paint the lights green, they started out desert tan.
I don't know whats supposed to be used, but standard bullet connectors will plug in either (or both) side. That's what I will use. If I don't like the bullets, I'll pop the connectors out of the grommets and just run some 10 gauge wire through the hole.

The solenoid relay I'm using is functionally the same as the GP relay, only mine grounds through its body.

I don't weld- do you think you could make me a set?
 
Last edited:

True Knight

Active member
668
171
43
Location
San Pedro, CA
What have you done to your CUCV today/lately?

I used the original seat brackets so that I could bolt them in to the original location... I bolted them on the outside of the seats (towards the door) and I bolted 1X1 square tubing under each seat and across to tie the whole assembly together... I'll get some pics up in the next couple of days...
Thanks. I've been trying to figure out how I'm gonna mount the bucket seats I got so any ideas will help.
 

Durango_USMC

Member
663
0
18
Location
Indianapolis, IN
Coolant tank was replaced! I know nothing cool, but its a small victory for me not to have a large puddle of antifreeze hanging around. Replaced the cotter pins on my shackles. I'll be cleaning the foam insulation off the bed when I get home and attempting to clean the green scum off my back windshield. I'll be looking to get some more gaskets to clear up the oil leaks tomorrow and I'm waiting on parts for the doghead relay mod. I think I'll be back on the road soon :driver:
 

2HIJOS2126

New member
103
2
0
Location
IDAHO FALLS, ID.
Heres some pics of my Humvee seats and Humvee seatbelts... I dont got the best fabrication skills or resources to acclomplish such but I make do with what I have and tend to get the task at hand done most of the time... the pass seat is scooted back as far as it would go and the driver seat is up a lil, its comfortable for me and close enough to the pedals just in case the wife wants to drive it... I also used the original brackets from the old seatbelts... I just did a lil trimming and added some reinforcement and it worked out quite well...
 

Attachments

SandBar

Full Time Patriot
755
231
43
Location
GA/FL
Finally got around to some much needed rust removal. Nowhere near done but it feels good to see her coming back to life. Another truck spared from the boneyard :)

1d.jpg6.jpg3.jpg
 

2HIJOS2126

New member
103
2
0
Location
IDAHO FALLS, ID.
Got my safari rack mounted... Im taking some 7" HID offroad lights off my 85 Silverado and installing them in front of the ammo boxes... Dont know what to tackle next... some square tube doors or a swing out tire carrier to replace the tailgate... decisions decisions...:-D:-D
 

Attachments

Status
Not open for further replies.
Top
AdBlock Detected

We get it, advertisements are annoying!

Sure, ad-blocking software does a great job at blocking ads, but it also blocks useful features of our website like our supporting vendors. Their ads help keep Steel Soldiers going. Please consider disabling your ad blockers for the site. Thanks!

I've Disabled AdBlock
No Thanks