• Steel Soldiers now has a few new forums, read more about it at: New Munitions Forums!

  • Microsoft MSN, Live, Hotmail, Outlook email users may not be receiving emails. We are working to resolve this issue. Please add support@steelsoldiers.com to your trusted contacts.


wsucougarx's M923 acquisition

wsucougarx

Well-known member
6,951
64
48
Location
Washington State
Troubleshooting Day....

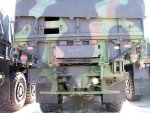
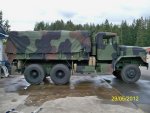
Ok today and most of yesterday was dedicated to troubleshooting. Top of the agenda was finding out why my Parking Brake Light/Alarm wouldn't shut off, why my truck won't shift into Lo/Hi Range with 120 PSI in the system, and lastly why my front axle wouldn't engage.

The parking brake issue turned out to be a disconnected wire...whew!

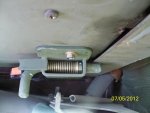
The next issue was the transfer case switch/lever. For some reason, I couldn't get my truck to shift from Hi/Lo Range while the truck was at 120 PSI (running or not running). I was only able to shift the transfer case once the air pressure was way down or completely drained from the tank. My attention was then focused on that little button at the end of the lever...what the heck is that thing for? I went inside and pulled the TM to find out about the system. Hmm, it says you suppose to push in the button to swith the transfer case. Uh yah, it didn't work. My thoughts were a faulty switch once again. Then it dawned on me, why not crawl under the truck to see if there's another dangling wire. Hmm, there was another wire spotted that wasn't mated to anything. Later I found it was the capacitor. Both the wires from the transfer case lever switch enter at opposite ends of the this capacitor. Looking up at the unit I saw where the two transfer case wire's came out of the cab. One wire went to the capacitor and the other one went directly to the transmission 5th gear lock out unit. I went inside and saw that it was indeed wired incorrectly...no surprise. Further investigation revealed many wires were just connected randomly...what the heck!!! I copied the wire numbers down, went inside and did my homework.
Once I got the wires figured out, I wired them to the appropriate places. I jumped in the cab and just turned on the battery switch. Holding my breath I grabbed the transfer case lever and pushed in the button.....CLICK! I head an audible click from the rear of the truck. OK, now the transfer case interlock is receiving juice. Now the big test, started the truck and VIOLA!! She now shifts smoothly at 120 PSI.
Now my attention was on the front wheel drive enagement. I got the air pressure upto 120 PSI, turned off the truck and flipped the airshift lever in the cab. Crawled to the back of the transfer case and cracked open the air line leading to the airshift piston. It was getting air...hmmm. I then crawled back in the cab and shut the switch off. Went back to the transfer case, cracked the air line and no air. Ok now I ruled out a faulty air valve just forward of the transfer case. Now I was confused. I'm now thinking it was a stuck air shift pistion. I went to crawl out and decided to trip the Lo range air valve and heard air. I then put my hand on the driveshaft and hand rotated it and CLICK!:oops: Oh, I didn't even think about rotating the shaft to seat the air shift piston....oops. That was 6 hours of troubleshooting wasted on something as simple as common sense...LOL. Lessons learned!!

Oh and another thing that got fixed today was the parking brake. Couldn't figure out why there was no resistance in the handle when in the upright position. I crawled back to find the lock nut was gone. In fact, the cable was just dangling there. Luckily, the remedy was just a locknut and washer.

Projects Completed:
-Parking Brake Light/Alarm fixed
-Transfer Case switching fixed at 120 PSI
-Parking brake operational now
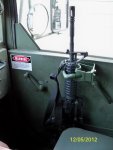
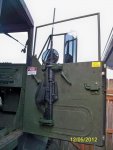
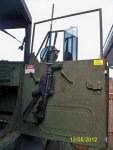
-Mounted a ring mount bracket on the passenger side of truck

Pics:
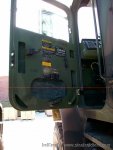
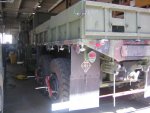
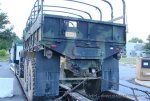
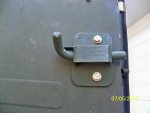
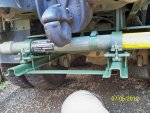
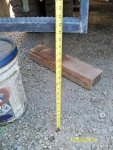
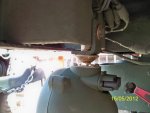
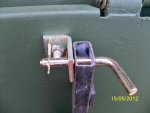
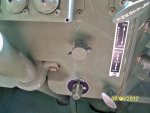
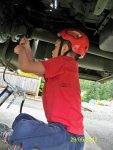
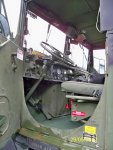
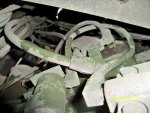
1- The reason my truck wouldn't shift from Hi/Lo Range. Dangling wire from the capacitor.
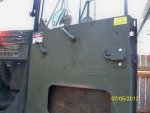
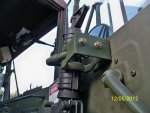
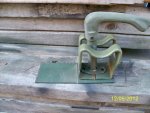
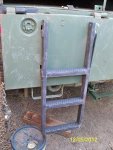
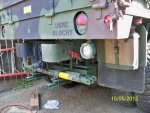
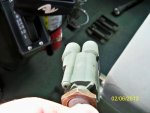
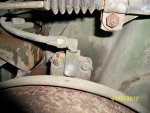
2- Interlock on the transfer case
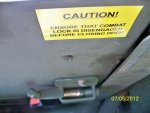
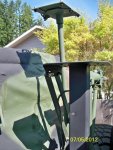
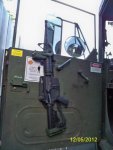
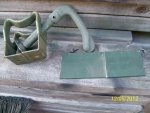
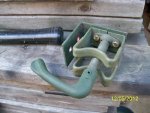
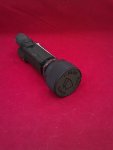
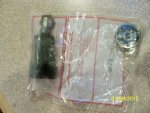
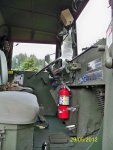
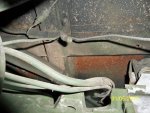
3- Air shift unit
 

Attachments

Last edited:

wsucougarx

Well-known member
6,951
64
48
Location
Washington State
I wish some of my crew had your approach to troubleshooting! Good job!
Thanks. For me, this is one of reasons I own these green machines;-) It's a little bit of a challenge when it's pouring rain, like it is today. My work station is under the elements laying on 3/4" black gravel...soaked black gravel:). I'm sitting here just dripping from laying in the many mud puddles under my truck. When I was crawling under my wet truck today, I had many flashbacks of bootcamp. Just this time around GYSGT Lewis wasn't screaming at me but I heard his voice in my head:shock:
 

Amer-team

Well-known member
1,706
28
48
Location
Centralia/WA
We are going to have to start calling you Dr. 5Ton. Nice job on the trouble shooting. The thing about it, is that next time you have this issue, you will know what the problems can be.
 

Beerslayer

Well-known member
Steel Soldiers Supporter
1,054
53
48
Location
Tualatin, Oregon
I wish some of my crew had your approach to troubleshooting! Good job!
Yeah, he is one smart guy. I really appreciate the detail put into the reports on repairs. For any of us who follow, it is a huge help.

While I read the TMs when I am having trouble sleeping, I do find them pretty dry and lacking a lot of information when actually trying to fix something.

To be able to Google search this site and get hits on what I need to know with color photos, that is a huge help.

So there's some encouragement for you to keep taking those photos while laying on the water soaked 3/4 minus and posting them up here for us. I really appreciate it.
 

wsucougarx

Well-known member
6,951
64
48
Location
Washington State
MTVR ladder order and other stuff

Yesterday I got two more orders for the 923.
I have been working on getting a specific boarding ladder for my truck. The one I was after was the one used on the USMC 7 ton Medium Tactical Replacement Vehicle (MTVR). Originally, I planned on buying one from C&C Equipment. I had this ebay item bookmarked for months and months. Then finally when I secured my truck, I went in to order it.....the listing was pulled:-?. I contacted Clinton and found he had several custom deuce orders from one buyer and had to keep the remaining 4 ladders. I then turned to SS and found one. However, after 3 weeks of waiting I figured it wasn't going to work out:-?. So, I contacted Clinton to find the deuce orders were cancelled and the ladders were mine. I decided to order two of them;-). I don't think I'm going to go with the cut out idea on the tailgate.
The MTVR are pretty solid ladders made from steel;-). I like the ladder approach over the steps for this application. Figured I could devise some kind of mounting system for this ladder so it affords the ability to adjust the ladder height, make the ladder removeable for use elsewhere on the truck, and have a pivot point at the top to angle the ladder. Also planning on putting rollers or something on the bottom of the ladder. This will keep the ladder from scuffing/tearing into the cargo cover.
Also got some parts to mount a rifle mount on the driver side door. The angled bracket is what's used on the buttock mount on the HEMTT's door. This idea was brought on by seeing one on the MTVR.

Here are a couple pics of the stuff I got and MTVR pics showing them in action;-)

http://www.steelsoldiers.com/5-ton-up/19059-mtvr-up-close-7.html
 

Attachments

Last edited:

wsucougarx

Well-known member
6,951
64
48
Location
Washington State
Combat Locks...my version anyways;-)

Wow, with this beautiful weather this morning I decided to work on a quick project before heading to work. I used a couple of these latch type things to make combat locks out of. This project was spurred on by perusing ebay one night. I came across the combat lock decals. The decals got me thinking and I remembered I had these latches from last year...why not;-) In fact I bought about a couple dozen for various projects.
I wanted the locks to be up higher. However, the door lock mechanism was in the way. The placement of the lock was as high as I could go. I used Grade 8 hardware throughout...that's all I had.

I do have extra "combat locks" if anyone is interested. Just PM me;-) I should mention, the doors on the deuces and 5 tons are all the SAME. You can do this on the M44's, M39, M809, M939 trucks.

Projects Completed:
-Combat Lock install

Pics:
1- Latches and decals used for this project (I think those latches are used on the HMMWV sliding bulletproof door glass)
2- Passenger door adorned with it's new lock
3- Door lock in extended "locking" position
4- Interior view of the retracted position. Just barely clears the opening by about 1/8"
5- Interior view of the locked position. Plenty of meat on the latch to keep the door closed.
6-
 

Attachments

Last edited:

wsucougarx

Well-known member
6,951
64
48
Location
Washington State
Project Clean up

I went through and cleaned up a few projects that were completed. I lowered the solargizer mount down and made a swivel type system. This will allow me to raise the mount and point it towards the sun. I used stainless steel hardware with nylock nuts to keep the nuts from back out from use. I can access the mount via rear window on the hardtop.
I also got around to painting the towbar mounting bracket assy (finally had a break in the downpours). The tow bar is brand new but it's been sitting in the elements for sometime so she's a bit faded. Almost looks like she needs a new coat of paint to match her surroundings.

Pics:
1- Solargizer swivel mount
2,3- Towbar mounting bracket assy completed
 

Attachments

wsucougarx

Well-known member
6,951
64
48
Location
Washington State
MTVR Ladder Install Part I & Door Rifle Mount

This morning I was able to get the preliminary MTVR ladder fit. I was only able to cut the four channels in the tailgate for the ladder mounting legs to pass through. This will be a work in progress for a few days.
I was also able to complete the bailout rifle mounts on the doors. I found some stock steel and made the upper door brackets. When I drilled the holes I didn't even think about how I was going to tighten the nuts inside the door. Luckily I had a bag of nutserts on the work bench. The planning on placement took the better part of the morning to figure out. On the passenger door I had to reposition the door handle to accomodate the upper mount. No big deal. I had originally planned to place the mount between the door handle and combat lock. However, the battery box made that impossible.
In regard to the ladder. I am going to bolt in some 1/4" steel stock to take the weight from the ladder off the thin sheet metal on the tailgate. Also need to devise a bracket so I can use 1/2" quick release pins to remove the ladder. The MTVR's have a cut out on the tailgate for the upper steps. I don't plan on cutting into the tailgate for this...at least not yet.

Projects Completed:
-MTVR Ladder Mount Channels cut out of tailgate
-Bail out rifle mounts on doors mounted

Pics:
1- MTVR prelimary fit on tailgate
2- MTVR clearance
3,4- Upper rifle mount bracket fabrication
5- Upper mount bent and mounting holes cut
6- Hanging my M4 from the upper mount to figure out placement of lower mount (No that's an airsoft..LOL)
7,8- Completed mount with M4 ready to go;-)
9- Driver Door mount completed and good to go
10- Pretty simple design
 

Attachments

Last edited:

wsucougarx

Well-known member
6,951
64
48
Location
Washington State
USMC Markings

My son and I have a blast working on these trucks. The other day he says to me " Daddy, that new truck is different. It doesn't look like any of the other trucks. Can we make it a Marine Corps truck?" I've been wanting to do this very thing in honor of my grandfather. My grandfather, Major James Young Henderson, was a career Marine who retired after 35 years of service. He spent a great number of years on the USMC Pistol and Rifle Teams. He was double distinguished in both rifle and pistol. He finished off his career as the Adjutant at the Marine Corps Air Facility in Santa Ana, CA.
My son, James, is named after my grandfather so it was fitting to go forth and working on the stencils. The stencil is nothing more than a computer generated sheet that I cut out. I used cardstock from Walmart and an exacto knife. I just got the stencil painted before it got too dark.
 

Attachments

Last edited:

Amer-team

Well-known member
1,706
28
48
Location
Centralia/WA
Interesting modifications. Thank you for sharing. Was thinking of putting a couple of the flip down steps as found on containers, on the tailgate of the M54. I have one of the aluminum boarding ladders, but it is big. have one fold down on the tailgate of the M715 and it certainly aids in getting into the back of the truck.
 

Jinx

Active member
668
30
28
Location
Gainesville, Florida
I just read through most of this thread and drooled over the pictures you posted. To say I'm a little jealous is an understatement. That's a beautiful truck! I think it's in good hands.
 

wsucougarx

Well-known member
6,951
64
48
Location
Washington State
Interesting modifications. Thank you for sharing. Was thinking of putting a couple of the flip down steps as found on containers, on the tailgate of the M54. I have one of the aluminum boarding ladders, but it is big. have one fold down on the tailgate of the M715 and it certainly aids in getting into the back of the truck.
Definately had to do something. I was going to buy a regular boarding ladder but wanted something more flexible. Sometime down the road I would like to have super singles. I didn't want to buy a fixed boarding ladder and have it useless with 14.00's mounted on her. The MTVR ladder seemed more flexible.

I just read through most of this thread and drooled over the pictures you posted. To say I'm a little jealous is an understatement. That's a beautiful truck! I think it's in good hands.
Hey thanks Jinx. This truck is a M923 wanting to be a MTVR. Or at least as close as I can get;-)
 

wsucougarx

Well-known member
6,951
64
48
Location
Washington State
MTVR ladder (cont) & JY Stencil

Today I completed the install of the MTVR ladder. I used some 90 degree angle brackets from the electrical dept at Home Depot and some 1/2" pins from the local feed store. I put a couple pieces of steel stock under the top two support legs of the ladder. The steel stock is going to absorb a bulk of the load when mounting/dismounting the vehicle. I felt the tailgate sheet metal was far too thin to take years and years of abuse. The 1/2" pins not only "locks" the ladder in place but removes much of the free play in the ladder. My biggest worry was having this ladder clanking around while underway. Just need to get her painted up and she's good to go.
I also mounted a back up light and rear infrared light (pretty much for looks but will be functional). I'll get around to wiring her sometime. I want to get all my electical add-ons mounted first. Then I'll go through and run wires and switches.
I completed my USMC stencilling on the truck. As previously discussed, I made this a USMC truck to honor my Marine grandfather. I brainstormed about how I could somehow incorporate this honor on the truck and came up with only one method. I felt it was only fitting to stencil on an EGA with his nickname in the middle. My grandfather was affectionately known by his close Marines and family as "JY". JY was derived off of his first and middle name initials James Young. I screwed up on the driver side EGA stencil and have the anchor facing backwards and again screwed up on the tailgate. Initially I only had the EGA stencilled on and figured I'd add USMC above it. Then of course I had to take it further and put the serial # down as well;-). I found the EGA online. I just copy/pasted it, enlarged it, printed it out on card stock paper, and used my exacto knife to cut it out.

Projects Completed:
-Mounted the locking bracket for MTVR Ladder
-Stencilled remaining USMC stencils and EGA JY Stencils
-Mounted IR and back up light to the rear of the truck

Pics:
1- Completed ladder assy
2- Locking bracket and pin
3-
4- Back up light
5- Back up light mounted on the brake light bracket
6- USMC stencil
7- EGA JY stencil
8- Tailgate stencil (EGA should be facing the other way..arrgh. That's what happens when you get in a hurry) To be fixed!!
 

Attachments

Last edited:

wsucougarx

Well-known member
6,951
64
48
Location
Washington State
Windshield Fluid

Couple days ago I decided to figure out what the deal was with my windshield fluid issue. The problem was when you depressed the windshield fluid air switch, you'd only get some fluid trickling out of the passenger side nozzle. Then I noticed the floorboard would be wet. Hmmm, figured out I had a leak in the system. I pulled all the windshield fluid hoses and found they were jerry rigged. I found there was a futile attempt to "fix" the hose by inserting a flimpsy plastic whatamacallit to bridge two hose pieces together. Well, they used a hose clamp to tighten it. Well, you use a hose clamp on a soft rubber hose and you're not going to get any flow:-?. Found the driver side was just ripped in two causing fluid to leak down on the cab floor. I went to NAPA and got some heavy duty fuel venting hose of the same diameter. Cost was about $14 for 10 ft of hose. Won't have to worry about that again;-).
Then I found I needed to replace the lid on the fluid reservoir itself. I was missing the small white mineral looking thing in the lid assy. I found one on ebay for $39.59 shipped.
Also found a replacement passenger side windshield wiper air switch assy NOS on ebay for $38.50 shipped. I have the older style switch on the passenger side only. You have to mess with it so it doesn't leak air....done with that!!

Projects Completed:
-Changed out windshield fluid rubber hoses (int cab)
-Changed out the windshield fluid reservoir lid
-Changed out the transfer case gear oil with GL-1
-Stencilled EGA on mudflaps
-Re-stencilled USMC, EGA, Serial number on tailgate..correctly this time!
-Removed cab floor insulation and scrubbed the heck out of it.

Pics:
1- Newer style M939 windshield wiper air switch.
2- Windshield Fluid Reservoir lid with pump. Mine was missing the white cap in the middle of the lid. Caused all the air to shoot out to the reservoir. You need the air to pressurize the reservoir for it to work.
3-5- Newer style wiper switch
6- The older style switch.
 

Attachments

Last edited:

wsucougarx

Well-known member
6,951
64
48
Location
Washington State
Son's help

This last Wednesday my son and I worked on and cleaned up the truck. My son was tasked with driving the truck out of her coral to the driveway. At first he was a bit apprehensive due to the sheer size of the beast. He started her up, threw her in 1st, released the parking brake, and he was grinning ear to ear. We almost ripped off the passenger side west coast mirror on the fence post. However, my quick scream followed by the slamming down on the brake pedal alleviated any damage....whew! Close call.
My son also helped out by manning the grease gun. Having watched his father slam him head on the under carriage of the truck, my son ran into the garage to get his old bike helmet;-). We greased every zerk we could find and topped off the gear oil in the pumpkins.
Next task was ridding the truck of the natural camouflage that accumulated over the past couple months. Pollen, moss, and cat tracks were scrubbed off.

Projects Completed:
- Topped off gear oil in differentials with NAPA GL-1
- Greased up zerks with GAA
- Tested windshield washer system-System checked out!
- Stencilled SLING AND TIE-DOWN onto front bumper
Pics:
1- Soldier B greasing the zerks
2,3,4- After a nice scrubbing. (looks like our cat is on guard duty)
5- Reminds me, I still need to put the LED's on
6-
7-
 

Attachments

Last edited:

usmarines72

New member
65
2
0
Location
California
Hands down, this is by far, the best 923 build I have seen. You've done some really great things to your truck. I esp. like the incorporation of the EGA;-) Great tribute to your grandpa!!
 

AN/ARC186

New member
997
15
0
Location
Graham,Washington
Mike,
I finally checked, yep, I have a 5 ton fender mount antenna bracket, also have those six AS-3009A bases set aside for you, one already installed in the bracket.
 

wsucougarx

Well-known member
6,951
64
48
Location
Washington State
Thanks Dan. You have any weekdays off? My wife has all my weekends booked for various "nesting" jobs around the house;-) Hopefully, all that will subside once our daughter is born. I've been tasked with plumbing today. She wants all new faucets and toilet seats for some unknown reason...LOL.
 

Jared

Member
109
1
16
Location
Amherst, NH
Very nice work. That is a great looking truck. Consider posting any videos?
Nice touch with: "Soldier B greasing the zerks"
 
Top
AdBlock Detected

We get it, advertisements are annoying!

Sure, ad-blocking software does a great job at blocking ads, but it also blocks useful features of our website like our supporting vendors. Their ads help keep Steel Soldiers going. Please consider disabling your ad blockers for the site. Thanks!

I've Disabled AdBlock
No Thanks