• Steel Soldiers now has a few new forums, read more about it at: New Munitions Forums!

  • Microsoft MSN, Live, Hotmail, Outlook email users may not be receiving emails. We are working to resolve this issue. Please add support@steelsoldiers.com to your trusted contacts.

What have you done to your CUCV today/lately? - Part 1

Status
Not open for further replies.

jets1959

Member
594
9
18
Location
Lakewood, WA
Thanks for the tip on Napa. I think I'm going to get some DOM tubing and hex stock when I get a chance this weekend. I've never taken apart an axle before so its going to be interesting to say the least.
No problem just here to help! The nuts holding on the spindle are one time use. I got mine at ace hardware. Do not use nylocks because of brake heat can melt the nylon. The rest is fairly simple. If you have a TM or a mid 1980's Chevy repair manual, it helps. I replaced all the bearings and the U joints when I did mine. Good luck!
 

48cj2a

Active member
311
34
28
Location
Central, IL
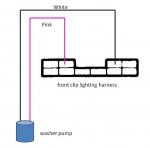
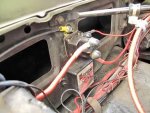
Any pictures of wiring changes needed for the washer pump in the fluid tank?
Its a picture in the first link:

You have to pull the B/O light wires from the harness connector going into the bulkhead on the engine side:


Note: This is a Civilian dash harness installed, Tilt Column with Intermittent wipers and Civilian wiper motor so it could be different if staying all Military on harnesses.


washerpump.JPG
 
Last edited:

Vhyle

New member
181
1
0
Location
Clarksville, TN
I rewired my blower motor switch. I used a 3-way switch as the replacement and installed it next to the volt meter. I left the original intact, for aesthetics. I also painted the trim around the gauges on the instrument cluster, to continue the black/orange theme. The rest of the dash will eventually match. The terribad picture doesn't really do it justice... it looks really good.

gauge_cluster.jpg
 

jets1959

Member
594
9
18
Location
Lakewood, WA
Its a picture in the first link:

You have to pull the B/O light wires from the harness connector going into the bulkhead on the engine side:


Note: This is a Civilian dash harness installed, Tilt Column with Intermittent wipers and Civilian wiper motor so it could be different if staying all Military on harnesses.


View attachment 421396
I have the tilt steering column installed. The other parts I can get. Just didn't know where the wire the washer motor into the harness. Thanks!
 

hunderliggur

Member
237
0
16
Location
Lothian, MD
What have you done to your CUCV today/lately?

Replaced the basic rubber wiper blades with rain-x Latitude blades (17.99 each at Advanced Auto). Wipers move much better now.
 

SandBar

Full Time Patriot
756
231
43
Location
GA/FL
Put the front half of my 4" lift kit on the M1009. Was much easier to cut the ubolts than to tediously unscrew them. Will work on the back half and lowering the transfer case this weekend. Then come the 35's :)
 

poncho457

New member
8
0
0
Location
IL
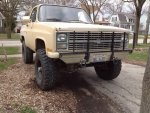
...just got 37s and a little trimming

I picked up a set of take off 37x12.5 bfgs put em on some 8.25 rock rims and gave the bumper a little trim job ...all I have to do now is test it out haha
 

Attachments

twlinks

New member
225
3
0
Location
Hutchinson, KS
poncho457...Welcome to the board. The new tires looke awesome. Can you tell us specifically what the rims are? Model, price, where you got them if you would? Thanks.
 

poncho457

New member
8
0
0
Location
IL
poncho457...Welcome to the board. The new tires looke awesome. Can you tell us specifically what the rims are? Model, price, where you got them if you would? Thanks.
Thanks. The rims are Pro Comp 16.5x8.25 about $70 ea from summit racing, just steel rims nothing fancy.
 

SandBar

Full Time Patriot
756
231
43
Location
GA/FL
Finished installing the rough county 4" lift. The truck looks so much better now. Bought a manual tire changer to put the 35" mud rovers on with, broke some sweat on that so far :) Next on the agenda is more rust remediation and a safari rack.
 

Vhyle

New member
181
1
0
Location
Clarksville, TN
Man, I really do love the look of desert tan on these trucks. If my truck didn't have a $1600 paintjob, I'd probably paint mine desert tan as well. But I'm enjoying my all black stealth theme. :beer:
 

Mainsail

Well-known member
Steel Soldiers Supporter
1,502
1,677
113
Location
Puget Sound, WA
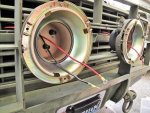
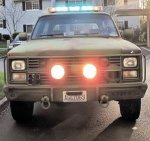
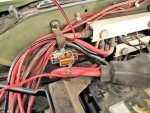
I finally got the landing lights wired up.

So here's the run-down:
8 gauge wire from the 24V bus bar- a very short run to the fuse.
8 gauge wire from the fuse to the solenoid.
8 gauge wire from the solenoid to just shy of the lights, where it splits into two 10 gauge wires, one to each light bucket.
Two 10 gauge ground wires to one 8 gauge wire in the reverse configuration to ground back at the bus bar. The looming of the wires will have to wait until another day. All connections are crimped and solder-filled to keep water out, then covered with heat-shrink.

Pic 1: 40 amp fuse as close to the bus bar as possible.
Pic 2: The solenoid, triggered by 12V.
Pic 3: Almost there!
Pic 4: Lights on!
LL Fuse.jpgLL Relay.jpgLL Guts.jpgLL On.jpg

They worked great, and darn near set my pants on fire as I was doing some preliminary aiming against the garage door. Those bulbs get HOT. I turned all the forward firing lights on for the last picture, and noticed that even with the truck running the voltage gauge was at the very bottom of the green range. So they're moving some serious current.

After I shut them off they wouldn't come back on. Did the 40 amp fuse blow? Nope, it was the solenoid that failed. It was screaming hot. So I need to swap the solenoid out for something a little heavier. I'll probably swap in the same solenoid I used for the doghead starter relay mod.
 

MarcusOReallyus

Well-known member
4,524
816
113
Location
Virginia
All connections are crimped and solder-filled to keep water out, then covered with heat-shrink.

Nice! A lot of people don't understand crimping. Done properly, it provides conduction as good as a soldered connection, but does allow corrosion to set in. Filled with solder, and you have the best of both worlds. :beer:


I need to swap the solenoid out for something a little heavier. I'll probably swap in the same solenoid I used for the doghead starter relay mod.

Yeah, that ought to do it!
 

SandBar

Full Time Patriot
756
231
43
Location
GA/FL
4" Rough Country lift. Pic is without the new shocks and tires. The lift makes working on the underside a little easier.

cucv_lift.jpg
 

Mainsail

Well-known member
Steel Soldiers Supporter
1,502
1,677
113
Location
Puget Sound, WA
Nice! A lot of people don't understand crimping. Done properly, it provides conduction as good as a soldered connection, but does allow corrosion to set in. Filled with solder, and you have the best of both worlds. :beer:


Yeah, that ought to do it!
Well, color me chagrined. I stopped at NAPA after work to pick up the heavier duty solenoid, got it home and it's the same one that had the meltdown. So a 200 amp solenoid melted down running 900 watts of lights? I wish I was good at math....

Well, it's made in China, so maybe I just got a bad one? The only difference between the one I took off and the one I bought today is that the old one grounds through the body, while the new (doghead) has its own ground lug.

Well, it's a $15 gamble......but I'm going in!
 

TechnoWeenie

Well-known member
Steel Soldiers Supporter
1,653
1,669
113
Location
Nova Laboratories, WA
Well, color me chagrined. I stopped at NAPA after work to pick up the heavier duty solenoid, got it home and it's the same one that had the meltdown. So a 200 amp solenoid melted down running 900 watts of lights? I wish I was good at math....

Well, it's made in China, so maybe I just got a bad one? The only difference between the one I took off and the one I bought today is that the old one grounds through the body, while the new (doghead) has its own ground lug.

Well, it's a $15 gamble......but I'm going in!
Sounds like you had a starter solenoid, they're rated for intermittent use. Hence being toasted.

Also realize that relays are rated for both inrush (current peak), and continuous. Most chinese ones will advertise peak, NOT constant current carrying handling. A 200A 'peak' relay will only handle about 75A sustained loads.

DO NOT GO CHEAP, as more often than not, they fail closed, which means it WILL burn up and you won't be able to disconnect the relay/solenoid before it catches fire.


You need a continuous duty solenoid. I have one for you, gratis. you know how to reach me ;)
 
Last edited:
Status
Not open for further replies.
Top
AdBlock Detected

We get it, advertisements are annoying!

Sure, ad-blocking software does a great job at blocking ads, but it also blocks useful features of our website like our supporting vendors. Their ads help keep Steel Soldiers going. Please consider disabling your ad blockers for the site. Thanks!

I've Disabled AdBlock
No Thanks