• Steel Soldiers now has a few new forums, read more about it at: New Munitions Forums!

  • Microsoft MSN, Live, Hotmail, Outlook email users may not be receiving emails. We are working to resolve this issue. Please add support@steelsoldiers.com to your trusted contacts.


goldneagle's M923 recovery and modification thread

goldneagle

Well-known member
4,428
858
113
Location
Slidell, LA
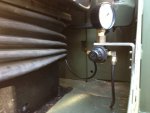
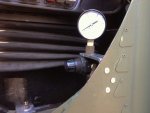
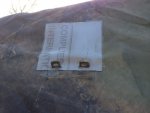
I finally got all the electrical parts in this week. The weather was nice today so it was time to finish installing the Mini-ANL fuse on the line that feeds the 124 volt fuse block. I had to also replace the 3/8" diameter bolt on the battery terminal clamp to a longer one so I could add the cable for the fuse block. After finishing the fuse block install I drilled 2 hole on the driver's side of the battery compartment. I installed 2 toggle switches that were fed from the new 24 volt fuse block. One switch will run the light over the driver's head and the other will run 2 lights over the passenger's heads. (this way I don't have to keep the light on over my head if the passenger needs to finds something in the dark)

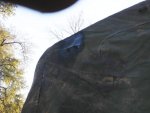
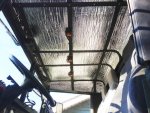
I ran 2 conductor rubber cord to the switches from the fuse block with a 15 amp fuse installed. I ran a 4 conductor rubber cord from the switches to the lights in the ceiling. I used LED amber marker lights as dome lights in the cab. Got them wired in with a ground wire going all the way tot he fuse panel. This way I don't have to worry about a good ground.

See picture attached:
 

Attachments

ptrjason

New member
105
1
0
Location
Menifee, CA
Utterly amazing. I would just paint the insulation to reduce the amount of shine. More so for comfort level, ypur truck sits high. Any day time driving, anything you pass, like standing water, rivers, rain on the streets, sun reflecting off store windows, will shine into the cab, and reflect off the roof down onto you.

Also at night any vehicles that are driving next to you, their headlights maybe reflected down as well. I tend to over think things, but I know how some reflections hit you at just the worst time.
 

goldneagle

Well-known member
4,428
858
113
Location
Slidell, LA
Utterly amazing. I would just paint the insulation to reduce the amount of shine. More so for comfort level, ypur truck sits high. Any day time driving, anything you pass, like standing water, rivers, rain on the streets, sun reflecting off store windows, will shine into the cab, and reflect off the roof down onto you.

Also at night any vehicles that are driving next to you, their headlights maybe reflected down as well. I tend to over think things, but I know how some reflections hit you at just the worst time.
I am still considering painting the insulation but have not decided yet. So far I have not had any issues with reflection off the insulation.

I tested the light tonight when it got dark out. They work fine. Not real bright but enough to help see in the cab at night. Since these light are marker lights they project the light down and to the side only. It helps keep the light off your face when you are driving. I am happy with the results of the installation.
 

goldneagle

Well-known member
4,428
858
113
Location
Slidell, LA
I did 2 small projects today. I installed a air regulator for the air-ride seat and glued a patch on the missing back cargo vent. I used vinyl shower floor liner and Pliobond glue to patch the missing vent cover in the back of the cargo cover. Once I glued it in place i applied one coat of Krylon Fusion Paint and then a flat black paint. I took pictures but too late to post tonight.
 

Attachments

Last edited:

goldneagle

Well-known member
4,428
858
113
Location
Slidell, LA
I had to load a crate with an A/C unit I sold to a member here. After loading and securing the tailgate I noticed there was a opening in the slot that the T bolt goes into for locking the tailgate. It is big enough to put a padlock through. I think it is a good way to secure larger payloads in the back. Even though it is not as secure as the solid communication shelters, it's better than no security at all.
 

goldneagle

Well-known member
4,428
858
113
Location
Slidell, LA
Had a bad day with the truck today. Had to take an A/C unit I sold a member here to a shipping terminal. First the truck was running fine. Then it started to run hot! The fan clutch did not engage during the trip -so I figured the thermal switch was stuck. When I got to the terminal I used the emergency bolts to lock the fan to the clutch housing. This makes the fan run all the time. It is a emergency fix. However the truck still was running hot! I think the **** thermostat is stuck closed. Since there is plenty of coolant in the system and the fan was ON all the time. Had to limp home at 45 MPH to keep the truck from boiling over. At least I made it back. Will order a new thermostat tomorrow.

I will test the truck with an infrared thermometer before I take the thermostat out.
 

goldneagle

Well-known member
4,428
858
113
Location
Slidell, LA
Well, no one was hurt, and now you know it has a problem, so I suppose the day could have been worse. Good luck.
You are right. No one got hurt and I made it back home safe. Once I got the truck home I felt a lot better. Now I can fix the problem at my own pace. No rush. I just want to make sure it is in good shape before I go anywhere far from home.
 

goldneagle

Well-known member
4,428
858
113
Location
Slidell, LA
Those filters you install for the coolant or problem they well clog and keep coolant form flowing.
I am not a fan of them.
It's a bypass filter. It has no bearing on the engine temperature. It uses the same taps as the heater. If it clogs it will not effect the coolant flow. Bypass filter work by detouring a small amount of coolant through the filter and back to the main system. It takes a long time for the bypass filter to clean the entire coolant in the system since it filters only a small fraction each pass.

I actually shut off the flow to the heater and the coolant bypass filter before i headed back home.
 

goldneagle

Well-known member
4,428
858
113
Location
Slidell, LA
Ok I have some up to date news about the "overheating" issue with my truck. It was the temperature sensor or gauge that are faulty. Jeff Davis advised me last night to do a thorough test of the engine with an infrared thermometer. Since I have one handy i decided to follow his suggestion. I started the engine and let it warm up. After quite a while I saw that the temperature gauge was reading over 220 degrees. I tested the temperature of the engine and radiator at various locations and could not get over 165 degrees anywhere. Yet the gauge was reading almost 240 degrees.

This means my engine was not overheating yesterday. The little bit of antifreeze i saw was coming from the loose silicone heater hose going to the bypass filter. I noticed it was loose when i was fiddling with the shut-off valves. (i had shut the bypass filter off before I drove back from Gulfport, MS yesterday) -so that was not the issue on the way home.

I am glad that it was just a bad temperature reading yesterday instead of a overheated engine.

Does anyone have the NAPA part number for the temperature sending unit?
 

juanprado

Well-known member
Steel Soldiers Supporter
5,508
2,708
113
Location
Metairie/La (N'awlins)
Zev,

The temp sender is military only as it has the packard connector unless you want to modify the wiring. The pipe threads is easy to find and there are Stewart Warner temp senders but they normally have a threaded stud with nut or push on connector. You could always make an adapter pigtail. It is nothing special but a regular temp sender with the military packard connector. It is universal to almost all mv uses the same one. It is also the same one used for the trans temp also. There are some on Epay and the surplus dealers if looking for OE.
 

goldneagle

Well-known member
4,428
858
113
Location
Slidell, LA
Zev,

The temp sender is military only as it has the packard connector unless you want to modify the wiring. The pipe threads is easy to find and there are Stewart Warner temp senders but they normally have a threaded stud with nut or push on connector. You could always make an adapter pigtail. It is nothing special but a regular temp sender with the military packard connector. It is universal to almost all mv uses the same one. It is also the same one used for the trans temp also. There are some on Epay and the surplus dealers if looking for OE.
Thanks for the help. I ordered 2 of them for $12.50 each from a seller on Ebay. So I will have a spare in stock.
 
Last edited:

goldneagle

Well-known member
4,428
858
113
Location
Slidell, LA
I had to repair the lock on the driver's side door. I messed it up when I installed the lockable handle. I didn't cut the grooves on the sides of the 5/16 rod like the original handles had. I think locking it from the inside with the battle lock bent a piece inside. I started by removing the exterior door lock handle and then the interior handle. Removed the access panel. Then i removed the mounting screws but could not get the lock down the door. I unhooked the window from the crank mechanism. I figured out if i lock the window in the UP position with channel-locks it would allow better access to the inside of the door.

Once I got the lock mechanism out I figured out what was wrong with it. I used a hammer and chisel to straighten out the bent metal so that the lock would function properly with the outside handle. I tried to reinstall the the lock mechanism but the opening in the door was really digging into my forearm. It was painful and did not get the lock up high enough to reinstall. I came up with an idea. I remembered I had a spool of 80 pound fishing line. I threaded the fishing line through the top screw hole on the side of the door. Down the door and tied it to the matching hole on the lock-set.

I was able to pull the lock mechanism into position and started one screw. Then I started a 2nd screw. I then removed the fishing line. Once I got all the screws tightened on the primary lock mechanism I did the same fishing line trick to get the triangle shaped piece back on to the door (where the inside door handle goes) I got the lock secured and reinstalled the interior handle.

I used my angle grinder to grind the sides of the exterior lock handle to match the original handle. I reinstalled the handle and tested it. Fits much nicer now! Closed up the door. Reground the grooves on the passenger-side locking handle so that it will not damage the locking mechanism.

The reason I decided to do a detail description of the lock reinstall was to share the fishing line solution with other members.
 

goldneagle

Well-known member
4,428
858
113
Location
Slidell, LA
I had a small project today. I decided to move the Jerry Can and mount to the side of the tool box next to the mud flap. It seemed to me like wasted space there. I removed the Jerry Can mount from the top of the tool box. Was not expecting to see some serious rust under there! The bottom of the Jerry Can holder was very rusty. Some serious rust was flaking off. The top of the tool box was also showing rust.

I sanded all the rust off the bottom of the Jerry can holder and primed the area. I also sanded and primed the rusty area on the top of the tool box. Once the primer was dry I painted the metal parts with Gillespie Paint. I also primed and painted the 2 short lengths of Uni-strut I cut for the job.

I drill 2 holes each in the back of the Uni-strut using the reinforcement plate that was reinforcing the Jerry Can mount as a temp-let. I drilled 4 holes on the side of the tool box. I installed the Uni-strut on the outside of the tool box and reinstalled the reinforcement plate on the inside of the tool box. I used the 4 original bolts for securing the Uni-struts to the side of the tool box.

Once Using 4x spring nuts and 4x 3/8" bolts to secure the Jerry Can holder to the Uni-struts. I reinstalled the Jerry Can and secured it with the lockable strap. I capped the 4 holes at the top of the tool box with small vinyl patches and Pliobond Glue. This is only a temporary patch until i decide what tool box I am mounting on top of the existing tool box. Here are some pictures:

Fuel_can_1b.jpgFuel_can_1a.jpgFuel_can_1.jpg
 
Top
AdBlock Detected

We get it, advertisements are annoying!

Sure, ad-blocking software does a great job at blocking ads, but it also blocks useful features of our website like our supporting vendors. Their ads help keep Steel Soldiers going. Please consider disabling your ad blockers for the site. Thanks!

I've Disabled AdBlock
No Thanks