• Steel Soldiers now has a few new forums, read more about it at: New Munitions Forums!

  • Microsoft MSN, Live, Hotmail, Outlook email users may not be receiving emails. We are working to resolve this issue. Please add support@steelsoldiers.com to your trusted contacts.

New to me Deuce with matching trailer - wrenching post

banditt1979

Well-known member
273
738
93
Location
Cincinnati, OH
Rain rain rain. There was a quick break so I replaced the air line going to the transfer case switch, fired it up and let it run for 20 minutes. Shut it down and no more leak under the dash. Came back about an hour later and the pressure had dropped slightly. Must be a tiny leak somewhere else but I can live with that for now. I couldn't hear any leaks walking around the truck so maybe I'll come back at some point with a stethoscope and see if I can hear any leaks at the connections. Possible brake bleeding Saturday afternoon, forecast is rain until then. Good for the gardens, not for working on a truck outside.

I need a large barn. My garage is filled with 2 Firebirds and the truck wouldn't fit anyway. Steel buildings are stupid expensive right now.
 

Mullaney

Well-known member
Steel Soldiers Supporter
Supporting Vendor
7,771
19,879
113
Location
Charlotte NC
Rain rain rain. There was a quick break so I replaced the air line going to the transfer case switch, fired it up and let it run for 20 minutes. Shut it down and no more leak under the dash. Came back about an hour later and the pressure had dropped slightly. Must be a tiny leak somewhere else but I can live with that for now. I couldn't hear any leaks walking around the truck so maybe I'll come back at some point with a stethoscope and see if I can hear any leaks at the connections. Possible brake bleeding Saturday afternoon, forecast is rain until then. Good for the gardens, not for working on a truck outside.

I need a large barn. My garage is filled with 2 Firebirds and the truck wouldn't fit anyway. Steel buildings are stupid expensive right now.
.
A good trick for chasing air leaks is dawn diluted in hot water in a spray bottle.
Helps clean the truck and if there is an air leak the bubbles will show you where it is. :cool:
 

banditt1979

Well-known member
273
738
93
Location
Cincinnati, OH
Yesterday I got the brakes bled and installed a remote reservoir. Nice firm pedal halfway down and doesnt pump up so I'm guessing I got all the air out. Hope to take the beast out for a shakedown run sometime this week. Excited!
 

banditt1979

Well-known member
273
738
93
Location
Cincinnati, OH
This afternoon I replaced the compressor and alternator belts. Compressor pulley loosened right up, figured I would have to fight it like hell but was pleasantly surprised. Went to change the fuel filter under the alternator but when I got the housing off the filter looked like brand new. And much longer than the replacement as well as in the videos I've seen. Anybody have ideas on why this would be?
 

HDN

Well-known member
2,127
5,128
113
Location
Finger Lakes Region, NY
This afternoon I replaced the compressor and alternator belts. Compressor pulley loosened right up, figured I would have to fight it like hell but was pleasantly surprised. Went to change the fuel filter under the alternator but when I got the housing off the filter looked like brand new. And much longer than the replacement as well as in the videos I've seen. Anybody have ideas on why this would be?
It's my understanding that different fuel filters can be used for the same application as long as they provide the filtration needed for proper engine function. When I replaced the fuel filter on my truck, it was different from what was specified in the TM, even though I'm pretty sure it was the Army who installed it (and over-tight at that like others have reported here!). It was still a Cat fuel filter for my Cat diesel, just a different model number from what the TM said to use. I replaced it with the Cat filter model specified in the TM.

That said I can't recall the difference in filtration levels, if there was any. I still have the old fuel filter sitting in my shop with dents and teeth marks from the big channel lock pliers I used to get it off!
 

banditt1979

Well-known member
273
738
93
Location
Cincinnati, OH
No new progress lately. Had to take a break and rebuild almost the entire suspension system on the wife's Trailblazer after replacing the upper ball joint. Figured it was just a matter of time before something else popped. Did get a big tarp to cover it up so the canvas won't deteriorate and keep things mostly dry. Still need to drain and refill the tranny and all three axles, and replace the two fuel filters near the engine. Then we'll take her for a spin!
Anyone have a source for the black rubber "tie downs" for the canvas cover for the bed?
 

kenn

Well-known member
170
513
93
Location
Texas
It's an annoying process having to get your money back but at least it'll happen eventually. At least you have all this documented!

So far I've only bought from Big Mike's and Erik's. They've been kind enough to work with me on shipping smaller parts for lower rates :)
I just searched to see if others have had trouble with Real Custom Trucks and wish I'd searched here before ordering. You can't get in touch with them by phone or email. Fortunately my order was small ($25ish) but I ordered 2 small parts I really needed right away, waited 2 weeks with no responses back on where it was, then asked them to cancel and ordered from Big Mike's. I got Big Mike's order at the house 3 days later and had the parts installed and moved on to the next project and then all of a sudden 1 of the two parts arrived from RCT -- which I no longer need. I sent another email asking to cancel the balance and refund shipping but I'm sure it will get ignored like the previous attempts to contact them.

Let me be clear the reason for my post: DO NOT BUY FROM REAL CUSTOM TRUCKS. Use a supporting vendor here. I've since bought several hundred dollars worth of stuff from Big Mikes!
 

banditt1979

Well-known member
273
738
93
Location
Cincinnati, OH
Sorry to hear they got another one. I disputed the credit card charge and won. I've had good luck with Big Mikes and Eriks.

Ordered and received the flame heater delete kit from Rattlin Trucks and installed this afternoon. Very nice kit and installed in about an hour. Been a while since I had time to wrench on the beast and it felt good 😁
 

banditt1979

Well-known member
273
738
93
Location
Cincinnati, OH
Today I fired it up and let it run for a half hour or so. Still not getting any reading from the temp gauge, but I verified that it does work by grounding the terminal on the block. Oil pressure isn't working either but it stays at 15 psi. I got my hand behind the oil pressure gauge and pushed on the wires and it jumped around a bit so sounds like it's time to pull the cluster and check out the wiring.

While I was pushing on the brake pedal, something clicked and the pedal went to the floor and didn't come up. I kept pushing on it and it did finally come back up. It lost some fluid so I topped it off. Feels different now, when I push on it it goes down about halfway then the air pack feels like it is pushing the pedal back up slightly. Still holds a solid pedal and can't see any leaks. I pushed on it pretty hard several times and it still holds a solid pedal, doesn't pump up at all but just feels different. Anyone have any thoughts/suggestions on this?
 

banditt1979

Well-known member
273
738
93
Location
Cincinnati, OH
Scratch that....I just crawled underneath and the air pack is leaking brake fluid at the rear. Also heard an air leak at the brake light switch. Looks like I'll be putting that NOS air pack to use this weekend, and bleeding lots of brakes!

Still curious what gave out to have brake fluid leaking out the back. I followed tactical repairs video to a tee, pausing each step as I replaced each seal. Guess we'll find out when I break it down.
 

kenn

Well-known member
170
513
93
Location
Texas
On the temp, the test is easy to see if your sender is OK. I have a recent thread on testing electrical gauges on testing mine. It's also in the -20 TM. The testing values I got out of my meter are in there.


Mullaney

Well-known member
Steel Soldiers Supporter
Supporting Vendor
7,771
19,879
113
Location
Charlotte NC
Today I fired it up and let it run for a half hour or so. Still not getting any reading from the temp gauge, but I verified that it does work by grounding the terminal on the block. Oil pressure isn't working either but it stays at 15 psi. I got my hand behind the oil pressure gauge and pushed on the wires and it jumped around a bit so sounds like it's time to pull the cluster and check out the wiring.

While I was pushing on the brake pedal, something clicked and the pedal went to the floor and didn't come up. I kept pushing on it and it did finally come back up. It lost some fluid so I topped it off. Feels different now, when I push on it it goes down about halfway then the air pack feels like it is pushing the pedal back up slightly. Still holds a solid pedal and can't see any leaks. I pushed on it pretty hard several times and it still holds a solid pedal, doesn't pump up at all but just feels different. Anyone have any thoughts/suggestions on this?
.
When you remove the gauge panel, you may or may not have a decent ground. The Zeus fasteners are all you get in the "factory" configuration. Our SOP with rewiring was to build a ground to each gauge and one wire out to a known good ground.

.
 

ToddJK

Well-known member
1,321
4,518
113
Location
Sparta, MI
Another way to ground the instrument panel, get a terminal block/ground block. It'll have one point for the primary ground, and depending on the type you get, it could have 1,2,3,4, or more points to attach other grounds too and the block can be attached behind the dash with screws, zip ties, whatever your heart desires. The primary ground wire can be wired to the battery or any other known ground contact you wish. It's also a good way to keep wire clutter down as well.
 

banditt1979

Well-known member
273
738
93
Location
Cincinnati, OH
On the temp, the test is easy to see if your sender is OK. I have a recent thread on testing electrical gauges on testing mine. It's also in the -20 TM. The testing values I got out of my meter are in there.

Thank you for the link, I'll be sure to reread when I get to checking!
 

banditt1979

Well-known member
273
738
93
Location
Cincinnati, OH
Got the nos air pack installed last night. The allen screw at the rear rounded out when I tried to remove it to add some oil to the can so I took off the large air line and squirted some oil in that way. Down the road I may take it off and drill it out for a new bolt.
 

banditt1979

Well-known member
273
738
93
Location
Cincinnati, OH
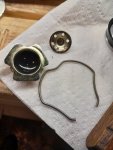
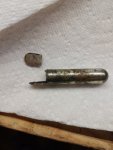
Well as it turns out the air pack wasn't the problem. When I saw brake fluid at the back of the air pack I thought it was leaking; it was actually the line I ran from the master cylinder to the in cab reservoir. The reservoir connection to the hose is a little smaller than the hose and had a slight drip. Once I installed the nos air pack I realized this as well as the master was completely empty. Guess I did something wrong when bleeding before and my pressure bleeder wasn't keeping the master full. So once I filled it up with brake fluid the piston inside would not return to rest. So I pulled it out and opened it up and found this.
20220729_193323.jpg
The little cup with the holes in it had fallen out. Looking at the other piece I could see that it was very poorly staked in. Compared to the original, it had 6 stake points where the replacement had 3, and 2 of them weren't even deep enough to hold that cup in place. I pressed the cup back into the other piece and tried staking it but I ended up making 2 very small holes in the metal. So I reused the one I pulled out which looked ok. Guess I'll contact the seller of this rebuild kit and ask for a replacement part?
Very glad I wasn't driving the truck when this happened!
 

banditt1979

Well-known member
273
738
93
Location
Cincinnati, OH
20220730_154629.jpg20220730_161225.jpg

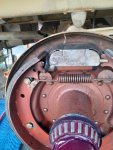
Went to bleed the brakes and noticed a puddle under the driver side mid axle. Pulled the drum off and found this. The weld at the top of the brake shoe failed, not sure if it was the pin possibly installed crooked or if the pin failed first and broke the weld? Hard telling. So I got out the welder, made some very ugly welds at the top, gave it a test with my large channel lock pliers, then gave it a couple shots of chevy orange engine enamel I had left over. Just need another pin, if anyone knows where I can get one without buying another wheel cylinder please let me know.
 
Top
AdBlock Detected

We get it, advertisements are annoying!

Sure, ad-blocking software does a great job at blocking ads, but it also blocks useful features of our website like our supporting vendors. Their ads help keep Steel Soldiers going. Please consider disabling your ad blockers for the site. Thanks!

I've Disabled AdBlock
No Thanks