• Steel Soldiers now has a few new forums, read more about it at: New Munitions Forums!

  • Microsoft MSN, Live, Hotmail, Outlook email users may not be receiving emails. We are working to resolve this issue. Please add support@steelsoldiers.com to your trusted contacts.

Seems like this is turning into a build thread.

CARC686

Well-known member
275
486
63
Location
Las Cruces, New Mexico
Haven't worked on the truck much lately. Just driving. Developed a front end clunk when I shift into reverse that rapidly got worse and now it's clunking when I barely touch the brakes, so shifting load in either direction is causing it. It's also developing a slight front end creak/groan under dynamic load ie simultaneous stopping/turning/damping transitions. Pretty sure I'm getting a very mild steering wobble when the front left suspension is under sustained cornering load. This all developed pretty quickly over a few days. Thought maybe a bolt fell out of the caliper, but it's properly assembled. Lug nuts are tight. Bearing spins freely. Play is within spec. Tie rods are fine. Springs, hangers, mounts, and shocks are good. I was not able to shift the ball joints by yanking on the top and bottom of the tire by hand, but I'm leaning toward that being the culprit unless anybody has a better, more informed idea.
 

cucvrus

Well-known member
11,474
10,437
113
Location
Jonestown Pennsylvania
I am suspect of an outer axle U joint that is seized and causing the issues you explained. Or it gets harder from afar to diagnose as I recall you were working on springs and bushings. Is the center pin and axle U bolts tight to torque. Are the rear drive shaft U joints good? Some look good but hide internal wear. Get the back up and the drive shaft unloaded and check them. Are the L/O both disengaged. Many things here to check. Good Luck.
 

CARC686

Well-known member
275
486
63
Location
Las Cruces, New Mexico
I suspected the u-bolts at first. I reused the originals and have checked the torque on them several times and they haven't loosened up. Maybe I'll go to replace them now and find the center pin broken off. I understand that can happen. The hubs are unlocked, so I didn't expect the outer u-joints to be doing anything, but I'm often wrong. Once my back quits bothering me, I'll get the rear pumpkin up in the air and see if I can find any slop in the propeller shaft.
 

CARC686

Well-known member
275
486
63
Location
Las Cruces, New Mexico
Great news! Today I learned why I couldn't find anything wrong with the front end when the back wheel fell off! I always heard stories about wheels falling off, but I had never seen it happen in my life until today. Somebody must've loosened the lugs for me when I wasn't looking. On the bright side, I'll finally have new rear brakes, since the old ones are scattered down a few hundred feet of road.
 

Mullaney

Well-known member
Steel Soldiers Supporter
Supporting Vendor
7,720
19,767
113
Location
Charlotte NC
.
Nothing like loosing a wheel. Especially a rear. Many moons ago going down Interstate 85... Left rear wheel pulled out and passed me going 55. Then I spotted a tractor barreling down the highway in the passing lane. That truck looked like a caterpillar climbing over the tire... Wow!

He kept on going... Like nothing ever happened...
 

CARC686

Well-known member
275
486
63
Location
Las Cruces, New Mexico
That whole ordeal turned out to be not much of a problem at all. I've always dreaded working on drum brakes because they're basically Rube Goldberg machines that account for half the springs in a vehicle and like to throw pieces across the yard during assembly, never to be seen again. All the same, it only took me about an hour to R&R all six lug studs and replace the shoes and hardware kit on one corner. Stopping power is noticeably improved. I expected no change whatsoever in braking, but that one drum's worth of new ACDelco shoes stops so much better than the other side that the truck doesn't stop straight. I'll do the other corner ASAP and enjoy the improvement. If you're like me and saw that the 40 year old shoe liners were plenty thick and left them alone, go ahead and replace them. You won't regret it.

ACDelco 17473R
 

CARC686

Well-known member
275
486
63
Location
Las Cruces, New Mexico
The OE lug holes were wallered out enough that the wheel was twisting on the hub. I'm just glad it made a bunch of noise instead of quietly snapping the new studs off one by one. Got a rally sport on there with a brand new tire for now. It'll be the spare later. I'm giving the replacement wheel's paint a few days to bake in the sun before mounting a tire on it and then it'll be sorted. Guess I can R&R the front u-bolts in the meantime. I've got 1" over stock length replacements to provide a more comfortable amount of threads to go with the extra leaf in the 1900 pound springs.
 

CARC686

Well-known member
275
486
63
Location
Las Cruces, New Mexico
I give Thrush welded mufflers the thumbs up. Only slightly louder than stock. Nice rumble with heavy throttle. No drone. Appreciably more power to the wheels. Obviously uncorked the exhaust. Can't speak to longevity yet. My butt dyno is impressed and my neighbors won't complain anymore than usual.
 

CARC686

Well-known member
275
486
63
Location
Las Cruces, New Mexico
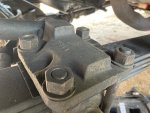
This was gnawing at the back of my mind for many weeks after I reused the original u-bolts with the new 1900 pound leaf springs. I definitely over torqued them, but never managed to get complete thread engagement. The extra leaf was just too thick for comfort.

Before.jpeg

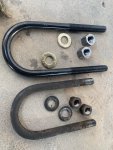
I ordered these from Summit. They were the best deal I could find on a complete over-length set. P/N: SLF-3318 for about fifty bucks shipped.

Comparison.jpeg

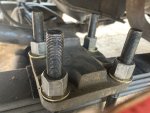
They were advertised as one inch over stock length, which was definitely an understatement. No kill like overkill, I suppose.

After.jpeg

So, there was a creak in the front end before. It's why I was convinced the noise from the rear wheel was coming from the front. That creak is gone. The conventional wisdom is not to reuse your u-bolts. I learned to follow that advice the hard way, as I tend to learn most things.


CARC686

Well-known member
275
486
63
Location
Las Cruces, New Mexico
Still more trouble. Small wonder I couldn't figure what the problem was when there was so much going on. Front left hub and bearing wallered. Never made any noise under load and spun fine in the air somehow, but I noticed the wheel was sitting with positive camber at rest. Hub was too hot to touch after a 20 minute drive. Bearing races fell out when I pulled it apart.

The good news is I got a new hub with races, studs, and rotor for $15 on closeout because the box was destroyed. That'll probably never happen again. New seal and bearings going in when they arrive. Hoping to get away with just repacking the other side. Cross your fingers for me.
 

CARC686

Well-known member
275
486
63
Location
Las Cruces, New Mexico
Alright, I needed a tool I didn't have and then another I didn't have and then another and another. I swore I would not collect up a complete suite of mechanic junk after I retired, but it looks like it's happening anyway.

I'll get after it again soon, but I have a question first. Should I be able to just yank the half shaft out after I pop the spindle off, or is it gonna have a clip in the pumpkin? If there isn't a c-clip in there, is it gonna dump gear oil everywhere when I yank it out anyway? Really would prefer not to have to service the front diff quite yet. Just need the half shaft out of my way so I can knock out a busted ball joint. I did not sign up to rebuild an axle. Feeling like I gave a mouse a cookie right about now.

Just for reference, it's an OEM M1009 10 bolt. Confusion between the M1009 and M1008 has made my life more interesting than it needed to be in the past.

 

WWRD99

Well-known member
Steel Soldiers Supporter
1,117
1,715
113
Location
York Pa
Alright, I needed a tool I didn't have and then another I didn't have and then another and another. I swore I would not collect up a complete suite of mechanic junk after I retired, but it looks like it's happening anyway.

I'll get after it again soon, but I have a question first. Should I be able to just yank the half shaft out after I pop the spindle off, or is it gonna have a clip in the pumpkin? If there isn't a c-clip in there, is it gonna dump gear oil everywhere when I yank it out anyway? Really would prefer not to have to service the front diff quite yet. Just need the half shaft out of my way so I can knock out a busted ball joint. I did not sign up to rebuild an axle. Feeling like I gave a mouse a cookie right about now.

Just for reference, it's an OEM M1009 10 bolt. Confusion between the M1009 and M1008 has made my life more interesting than it needed to be in the past.
No there's the spindle that has to come off first. There's 6 nuts that hold it on if I remember right. I've used several methods of getting it off after they're taken off. A big dead blow hammer has worked on non rusty ones and a nice sharp cold chisel for the sticky ones going around the outside to work it loose. Not a horrible job. As far as the ball joints I've always bought 2 very cheap pickle forks and beat them both into both ball joints at the same time. Typically they'll work 2x before they're destroyed hence the cheap ones get a warranty out quick. I don't think it's worth spending money on the expensive ones...they'll replace those as well but cost a good bit more. I'm not nice to those pickle forks...get hit with a 20lb sledge.

Sent from my SM-S906U using Tapatalk
 

CARC686

Well-known member
275
486
63
Location
Las Cruces, New Mexico
I started out a regular photojournalist on this truck, but something about handling grease in a sandpit made me lose interest in taking pics.

Step 01: Take off the locker select thing and realize you need snap ring pliers.
Step 02: Wait a week for the snap ring pliers you ordered to show up.
Step 03: Realize you need a weird socket.
Step 04: Wait a week for the weird socket you ordered to show up.
Step 05: Pull all the greasy doodads out and be sure to drop them in the sand.
Step 06: Spend all day cleaning the grease and sand out of the greasy doodads.
Step 07: Smear bearing grease on the porch, door, floor, your hands, arms, and face, and be sure to get it on the soles of your shoes.
Step 08: Beat the spindle off with the heaviest non-marring thing you can find.
Step 09: Grab the axle and yank it out. Be sure to drop the oily end in the sand.
Step 10: Sing a chain gang song from O' Brother Where Art Thou? while attacking your pickle fork.
Step 11: Reassembly is sorta kinda reverse of disassembly.
Step 12: Blast the surface gunk off with aerosol skin cracker.
Step 13: Spray the bare metal with grill paint 'cause it's cheaper than engine enamel.
Step 14: Squeeze your caliper with the ball joint press when you can't find your c-clamp.
Step 15: Drive it around until it gets done smoking.
Step 16: Go to the car wash and spend 10 minutes pressure washing baked bird shit off your truck.

1723056462750.png
 

cucvrus

Well-known member
11,474
10,437
113
Location
Jonestown Pennsylvania
I started out a regular photojournalist on this truck, but something about handling grease in a sandpit made me lose interest in taking pics.

Step 01: Take off the locker select thing and realize you need snap ring pliers.
Step 02: Wait a week for the snap ring pliers you ordered to show up.
Step 03: Realize you need a weird socket.
Step 04: Wait a week for the weird socket you ordered to show up.
Step 05: Pull all the greasy doodads out and be sure to drop them in the sand.
Step 06: Spend all day cleaning the grease and sand out of the greasy doodads.
Step 07: Smear bearing grease on the porch, door, floor, your hands, arms, and face, and be sure to get it on the soles of your shoes.
Step 08: Beat the spindle off with the heaviest non-marring thing you can find.
Step 09: Grab the axle and yank it out. Be sure to drop the oily end in the sand.
Step 10: Sing a chain gang song from O' Brother Where Art Thou? while attacking your pickle fork.
Step 11: Reassembly is sorta kinda reverse of disassembly.
Step 12: Blast the surface gunk off with aerosol skin cracker.
Step 13: Spray the bare metal with grill paint 'cause it's cheaper than engine enamel.
Step 14: Squeeze your caliper with the ball joint press when you can't find your c-clamp.
Step 15: Drive it around until it gets done smoking.
Step 16: Go to the car wash and spend 10 minutes pressure washing baked bird shit off your truck.

View attachment 929212
I hope that is a Walmart cake
 
Top
AdBlock Detected

We get it, advertisements are annoying!

Sure, ad-blocking software does a great job at blocking ads, but it also blocks useful features of our website like our supporting vendors. Their ads help keep Steel Soldiers going. Please consider disabling your ad blockers for the site. Thanks!

I've Disabled AdBlock
No Thanks