• Steel Soldiers now has a few new forums, read more about it at: New Munitions Forums!

  • Microsoft MSN, Live, Hotmail, Outlook email users may not be receiving emails. We are working to resolve this issue. Please add support@steelsoldiers.com to your trusted contacts.

Superthermal's M813 Build, THE BOT

Superthermal

Well-known member
Steel Soldiers Supporter
314
859
93
Location
Utah, Murray, United States
@NebraskaFan, you are correct on the hood. Unfortunately my hood is caved in up next to the cab and actually has been rubbing a hole through the hood where the chain lift plates of the motor have been rubbing on it. I am guessing from a bunch of our great boys in camo were climbing up on the top of the rig for a picture! :)
I am OK with doing a clean looking hood scoop as from my view from the cab it would not block my view of any trial. As I have considered this I will either do an only remove what is needed "poke through", like what you see above where only the needed hood area will be cut to allow the hood to open or close easily and allow whatever flex is needed from the frame/motor, or a scoop that covers the ugly mess I make trying to hide my poor execution of the prior "poke through" attempt. LOL, Either way this is still on the shelf since I still need lockers and a few other mods first but is in my oncoming list.
 

NebraskaFan

Member
51
37
18
Location
Kemmerer, Wyoming
@NebraskaFan, you are correct on the hood. Unfortunately my hood is caved in up next to the cab and actually has been rubbing a hole through the hood where the chain lift plates of the motor have been rubbing on it. I am guessing from a bunch of our great boys in camo were climbing up on the top of the rig for a picture! :)
I am OK with doing a clean looking hood scoop as from my view from the cab it would not block my view of any trial. As I have considered this I will either do an only remove what is needed "poke through", like what you see above where only the needed hood area will be cut to allow the hood to open or close easily and allow whatever flex is needed from the frame/motor, or a scoop that covers the ugly mess I make trying to hide my poor execution of the prior "poke through" attempt. LOL, Either way this is still on the shelf since I still need lockers and a few other mods first but is in my oncoming list.
That was actually @US6x4 lol! But I enjoy being included nonetheless less!
 

Superthermal

Well-known member
Steel Soldiers Supporter
314
859
93
Location
Utah, Murray, United States
I am finally getting around to doing an Antifreeze change and a block heater add in + a inline coolant filter which will be placed inline with the replacement heater core I purchased early this year.
To do this with a full flush I drained all what I could from the radiator then pulled the thermostat housing apart and removed the radiator large hose and then the smaller L-shaped tube that drops down to the oil cooler housing. I then popped off the rear water jacket port where the new block heater will go.
I grabbed the hose and stuck it alternately back and forth, back and forth between the coolant tank, thermostat housing, radiator and oil cooler until the water dumping out this rear water jacket port was clear, and then switching until no matter where I stick the high flow hose into the water is clear. After about a half hour of flushing I called it good.
I was amazed at how much garbage came out of this block! Wow,
I'll get some pics when I start to reassemble things tomorrow.
 

Superthermal

Well-known member
Steel Soldiers Supporter
314
859
93
Location
Utah, Murray, United States
@US6x4 WOW all my hoses look brand new in comparison to what your holding onto there. Ruff!
Heater is in, I did a pre-test of it first in the kitchen. It begins to boil water in 4 seconds. I replaced the 1 1/2"x 3" long hoses, as I cracked a bit of the braided strands in them getting the drop tube loose. Still need to make a new gasket for the thermostat housing. Already made a template but need some blue FEL-Pro 3195 sheet gasket material. The gasket material will be here in the morning and will finish this out. Again, I will be shooting for a 60/40 mix for maximum freeze point protection.
When cleaning out the radiator I also spent a bit of time cleaning out the "catch" just below the radiator to ensure no dirt and rocks were up against the radiator. Would hate to pop a hole in this thing (even though I do have a spare radiator now). I also thoroughly cleaned the lower rows of any dirt to ensure that there was nothing that would soak up water that could freeze between the radiator vein channels. Looking good.
I did have one of the 4 thermostat bolts hang in the housing block. Took about 20 min of being nice to it to get it out. Was a bit of crud in there so I bought 4 new bolts but couldn't find any that were 3 3/4" long. So I am going to need to either cut the grade 8 bolts down just a little or washer them up. Lazy is feeling nice right now... LOL.20230929_193531.jpg20230929_105858.jpg

Added that coolant filter inline with my heater core for the cab. Drilled one of the front 1/4" bolts out for a 5/16 and called it good. 20230929_193642.jpg

As far as flushing this monster out. My good friend suggested that after removing that block plate for the heater to go in, to turn my hose on HIGH and blast water into these three ways, The radiator, the oil cooler and the manifold rail (and through the over flow tank and the heater hose). Each time I swapped I would get a fresh lot of brown running out of the motor. Eventually everything was clear and clean. 1696051225162.png
 
Last edited:

Superthermal

Well-known member
Steel Soldiers Supporter
314
859
93
Location
Utah, Murray, United States
Swapped out the power steering hose that had poked a hole back in Febuary. That road side fix was so good I was lazy and put off installing the fixfor way to long. I had to cut the original tube off with a small tubing cutter to get it out from behind the other steering hydraulic line. The new one slipped into place feeding it in from the inside of the frame rail and presto! Steering is back to tops. Filled the system back up with some Prestone steering fluid and done.
 

Superthermal

Well-known member
Steel Soldiers Supporter
314
859
93
Location
Utah, Murray, United States
Was it the upper or lower line that needed replacement?
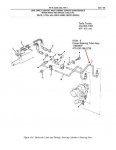
It was the "upper one" of the steering hydraulic lines for the power steering if your talking about where it ran along the cross frame member between the two frame rails. I have snipped a couple of screen shots of my purchase off of EBAY to help you see what I purchased to resolve the issue. I did consider just buying some parts to do a more sure "field repair" with the original hose but I figured replacing it would not hurt my pocket much and steering seems to be a very important part of this trucks performance!! LOL!
This is the part I ordered and it was a perfect fit. I hope that helps.
1701138246799.jpeg1701138373358.png
 

Superthermal

Well-known member
Steel Soldiers Supporter
314
859
93
Location
Utah, Murray, United States
Picked me up two MEP 531a 2Kw generators and a MEP 802a 5Kw on a trailer this week. Drove 1700 miles to the two GOV planet sites to pick them up.
Ordered some air, oil and fuel filters for them thanks to the guidance of the nice TMs and threads here on SS. Will be making one of the 2Kw units a tag-along for the BOT for some trips out wheeling. The others will be setup here at the house for those days that are coming soon. received_764863005688337.jpeg 1704949059726.png

Currently I also picked up a 72" toolbox to go in the S-280 shelter to hold my general tools, some spares and roadside items. I will be removing the standard toolbox on the passenger side of the BOT to add an additional fuel tank, I did buy my first rivnut gun and some bolts to get that box all mounted up solid in the shelter.

I picked up a fuel tank shortie (52 gallons I think) off a M900 series tractor and another standard tank off an M35. I would actually like another identical 78 gallon standard tank like I have on the drivers side to put in place of the current toolbox in front of the rear tires, but these two tanks almost landed in the back of my truck for under 200 with the tank holding bars and straps. I will see if Boyce will trade me or not for the one I want. (Last time I was there they had two of them) Anyhow, these two tanks will be set up to pump into the main tank. To do this I will remove the tool box and then move the battery box to the cab. I have two good going on two year old batteries in the BOT now that I will put into my new to me 5kw generator and I will purchase two Napa Commercial 8D batteries, 1425CC each, for the BOT, which I will mount in the cab under the passenger seat in a vented box (vented to outside the cab) and then, in the place of the current battery box & step I will mount the third tank. Being the M35 tank for this 3rd tank I am hoping to have enough space to still have a small step to get up into the cab without a massive 40" step to take.LOL

So, three tanks, one will be the current main tank, which will be my mixed running tank, then another Main tank on the passenger side that will have fresh diesel in it, then a third tank with WMO in it. I will start the rig with the fresh tank, then switch to the current main mixed tank, then back to the fresh tank on cool down to ensure clean fuel for the next start up. That is the idea, we will see how I do on getting it implemented. I still have a bunch of other projects to get finished.
 
Last edited:

Superthermal

Well-known member
Steel Soldiers Supporter
314
859
93
Location
Utah, Murray, United States
I have all three of the generators working good now. Had to replace all the fuel lines on all of them and Vuala! Making noise and a bit of electricity!
Took one of the little guys with me out on our Utah MV outing over Feb 1-3. Was great! Should have taken a bunch of pics and vids of wheeling in the mud but I have no one to go out and stand in the sloppy mud to take pics while I drive. LOL
No biggie.
Found my nice new coolant filter is clogged already... LOL I am sure I will be going through a half dozen of those before they last very long.
Also had one of the Apaches being flown from our local boys pay us a visit. First time they came buy I could have underhanded them a candy bar!
20240201_173444.jpg20240201_172457.jpgAlso sighted in the EDM 50 at 500 yards(up where that yellow dot is there)
Oh YA, doesn't everyone like a light stick of dynamite going off inches from their face for fun!50 sights.JPG20240202_194925.jpg
 
Last edited:

NebraskaFan

Member
51
37
18
Location
Kemmerer, Wyoming
I have all three of the generators working good now. Had to replace all the fuel lines on all of them and Vuala! Making noise and a bit of electricity!
Took one of the little guys with me out on our Utah MV outing over Feb 1-3. Was great! Should have taken a bunch of pics and vids of wheeling in the mud but I have no one to go out and stand in the sloppy mud to take pics while I drive. LOL
No biggie.
Found my nice new coolant filter is clogged already... LOL I am sure I will be going through a half dozen of those before they last very long.
Also had one of the Apaches being flown from our local boys pay us a visit. First time they came buy I could have underhanded them a candy bar!
View attachment 916661View attachment 916662Also sighted in the EDM 50 at 500 yards(up where that yellow dot is there)
Oh YA, doesn't everyone like a light stick of dynamite going off inches from their face for fun!View attachment 916663View attachment 916665
That apache picture is awesome, looks like a fun time!
 
Top
AdBlock Detected

We get it, advertisements are annoying!

Sure, ad-blocking software does a great job at blocking ads, but it also blocks useful features of our website like our supporting vendors. Their ads help keep Steel Soldiers going. Please consider disabling your ad blockers for the site. Thanks!

I've Disabled AdBlock
No Thanks