Nice work! I've been through all of that on my truck and feel much better that is was done.
Why do you say you "need" new front u-joints? Are you referring to the u-joints for the short shafts? Do they have extra play or obvious problem?
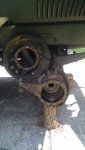
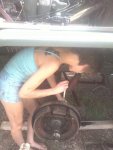
My truck had a bunch of muck that used to be grease in the front axles. I went trough the trouble of taking those big u-joints all apart, cleaning them, and re-assembling them. This is the only way to fully clean and proper re-pack them with grease. They are big, super-tight, and a real bear to work on. I was completely unable to do it alone and needed a buddy to hold stuff, a good press, and some properly sized short tubes and brass blocks. It was a tough job, but I got through it. My u-joiunts were in perfect condition (although the grease was badly contaminated), but the fits were very tight, which made working on them quite difficult. If you don't have the proper equipment, you might want to take them to a driveline shop where they do stuff like this all the time.


![IMG_0625[1].jpg](/data/attachments/352/352778-7b56816d0246188330211a5c1d8d5c52.jpg)